Bumper repair
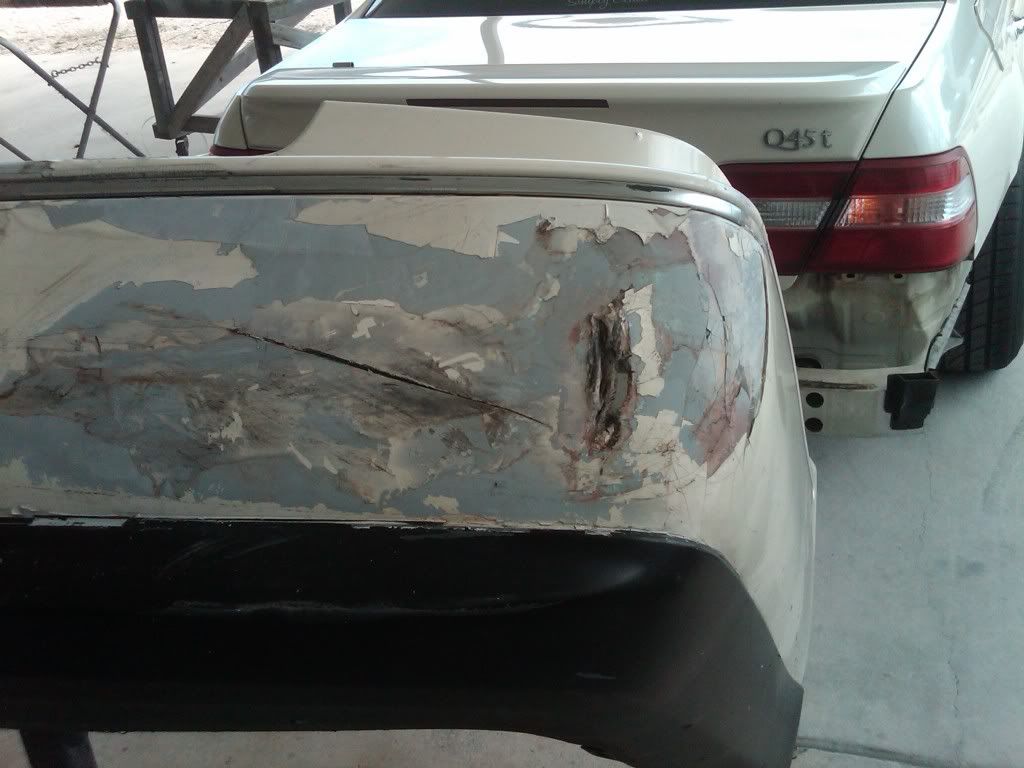
Ok got tired of looking for a rear bumper, so i decided to fix mine.. Gonna give a quick run down on how i did it..
Before


Pretty fucked up huh!!
Grind around hole..

Backside aswell

Put a patch on it

This is a two part plastic filler

Sand down nice..

Apply a good skim coat of filler

Now final sand that and ur ready for primer

Prime time!!


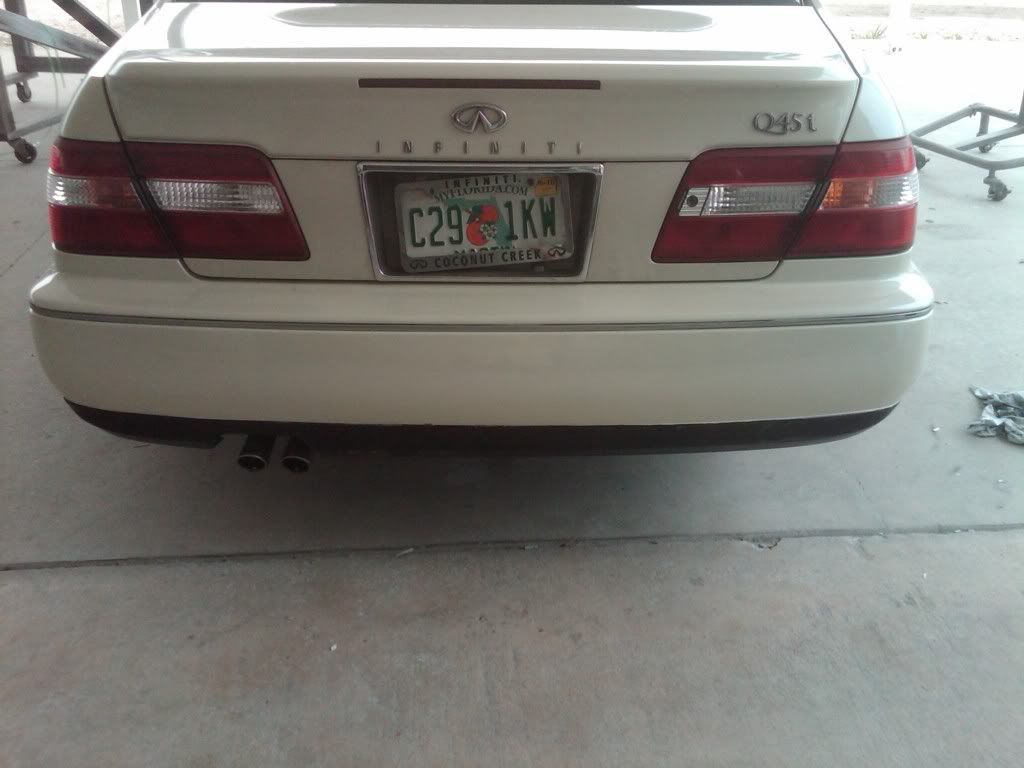
All done!!!

View original BBCode
Ok got tired of looking for a rear bumper, so i decided to fix mine.. Gonna give a quick run down on how i did it..

Before
[IMG]http://i936.photobucket.com/albums/ad210/jlego/bumper.jpg[/IMG]
[IMG]http://i936.photobucket.com/albums/ad210/jlego/yuck.jpg[/IMG]

Pretty fucked up huh!!
[IMG]http://i936.photobucket.com/albums/ad210/jlego/IMG00125-20100528-1352.jpg[/IMG]

Grind around hole..
[IMG]http://i936.photobucket.com/albums/ad210/jlego/IMG00132-20100528-1404.jpg[/IMG]

Backside aswell
[IMG]http://i936.photobucket.com/albums/ad210/jlego/last.jpg[/IMG]

Put a patch on it
[IMG]http://i936.photobucket.com/albums/ad210/jlego/IMG00131-20100528-1403.jpg[/IMG]

This is a two part plastic filler
[IMG]http://i936.photobucket.com/albums/ad210/jlego/IMG00133-20100528-1503.jpg[/IMG]

Sand down nice..
[IMG]http://i936.photobucket.com/albums/ad210/jlego/IMG00134-20100528-1511.jpg[/IMG]

Apply a good skim coat of filler
[IMG]http://i936.photobucket.com/albums/ad210/jlego/IMG00136-20100528-1521.jpg[/IMG]

Now final sand that and ur ready for primer
[IMG]http://i936.photobucket.com/albums/ad210/jlego/IMG00138-20100528-1554.jpg[/IMG]

Prime time!!
[IMG]http://i936.photobucket.com/albums/ad210/jlego/IMG00140-20100528-1600.jpg[/IMG]

[IMG]http://i936.photobucket.com/albums/ad210/jlego/IMG00141-20100528-1600.jpg[/IMG]

All done!!!
[IMG]http://i936.photobucket.com/albums/ad210/jlego/IMG00145-20100528-1911.jpg[/IMG]
[IMG]http://i936.photobucket.com/albums/ad210/jlego/IMG00146-20100528-1911.jpg[/IMG]
Real nice work! :biggthumpup:
View original BBCode
Real nice work! :biggthumpup:
now you just need to fix the license plate...
View original BBCode
now you just need to fix the license plate...
damn thats pretty good hahaha
View original BBCode
damn thats pretty good hahaha
I think if most people had access to grinding and sanding pneumatic tools and a paint booth with all the sprays...this is doable... Wish I had access...
View original BBCode
I think if most people had access to grinding and sanding pneumatic tools and a paint booth with all the sprays...this is doable... Wish I had access...
What kind of patch do you use?
View original BBCode
What kind of patch do you use?
Blitz;324097 wrote:I think if most people had access to grinding and sanding pneumatic tools and a paint booth with all the sprays...this is doable... Wish I had access...
i do, and i still don't know how to do this shit, lol. but i'm gonna try to learn this summer. :giggity:
View original BBCode
[QUOTE=Blitz;324097]I think if most people had access to grinding and sanding pneumatic tools and a paint booth with all the sprays...this is doable...  Wish I had access...[/QUOTE]

i do, and i still don't know how to do this shit, lol. but i'm gonna try to learn this summer. :giggity:
need this done to my front bumper
View original BBCode
need this done to my front bumper
thanks guys for all the responses!! the patch is made by 3m dont know the actual name of it though..And yeah with just alittle practice anyone can do it. and the plate is fixed now..:slap:
View original BBCode
thanks guys for all the responses!! the patch is made by 3m dont know the actual name of it though..And yeah with just alittle practice anyone can do it. and the plate is fixed now..:slap:
ez repair patch 05888...the gray filler is 5887...that stuff is great but can get really expensive...before applying anything, you must use their adhesion promoter or you risk the chance of delaminating...you can bend that thing in half and still won't crack...
View original BBCode
ez repair patch 05888...the gray filler is 5887...that stuff is great but can get really expensive...before applying anything, you must use their adhesion promoter or you risk the chance of delaminating...you can bend that thing in half and still won't crack...
He's right here's the stuff i used for adhesion..

View original BBCode
He's right here's the stuff i used for adhesion..
[IMG]http://i936.photobucket.com/albums/ad210/jlego/stuff.jpg[/IMG]
Great How-To for the learners
View original BBCode
Great How-To for the learners
Good job. Plastic work is a lost art, most shops just replace
View original BBCode
Good job. Plastic work is a lost art, most shops just replace
nice i need this done to my bumpers as well! good stuff!! wish it was as easy as it looks! LOL!! btw how come you didnt paint the black bottom part white also? just curious.
View original BBCode
nice i need this done to my bumpers as well! good stuff!! wish it was as easy as it looks! LOL!! btw how come you didnt paint the black bottom part white also? just curious.
Joey Looks like its a 97-98 body style, the bumpers and side skirts are all two tone check hermz car
View original BBCode
Joey Looks like its a 97-98 body style, the bumpers and side skirts are all two tone check hermz car
