Cinnnnnaammmmoooonnnn!!!!!
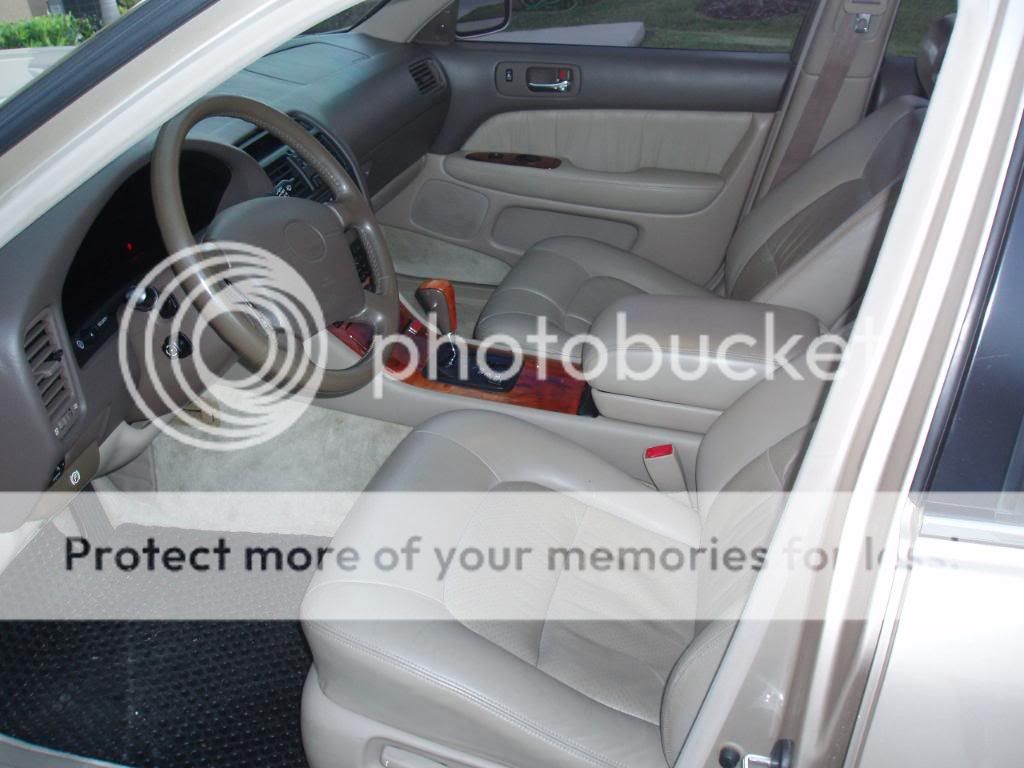
I have a 97 Lexus LS400 Coach edition that is tastefully modded (in my opinion)-but I was not feeling the tan interior. The interior was too tan, and hard to maintain/keep clean. I always liked the way the e46 BMW M3 Cinnamon interiors looked against the black, so I decided this would be the way I went. I am a serious DIY'er and figured this would be another perfect project! My plans were to convert most of the interior to Cinnamon/black, and leave parts tan as the car just has too much tan in it from the factory to convert it all (seatbelts, etc.) I have already dyed the seats once the factory tan color using Leatherique products (www.leatherique.com) and was impressed by the outcome. This time I figured I would go all out and do a complete re-dye of the tan and perform a color change. This will document my process and how it came out in the end. This is what I started with:
The rear with JP accessories:

View original BBCode
I have a 97 Lexus LS400 Coach edition that is tastefully modded (in my opinion)-but I was not feeling the tan interior.  The interior was too tan, and hard to maintain/keep clean.  I always liked the way the e46 BMW M3 Cinnamon interiors looked against the black, so I decided this would be the way I went.  I am a serious DIY'er and figured this would be another perfect project!  My plans were to convert most of the interior to Cinnamon/black, and leave parts tan as the car just has too much tan in it from the factory to convert it all (seatbelts, etc.)  I have already dyed the seats once the factory tan color using Leatherique products ([url]www.leatherique.com[/url]) and was impressed by the outcome.  This time I figured I would go all out and do a complete re-dye of the tan and perform a color change.  This will document my process and how it came out in the end.  This is what I started with:
[IMG]http://i474.photobucket.com/albums/rr110/polobai/Lexus%20General%20pics/LexusApril09002.jpg[/IMG]

The rear with JP accessories:
[IMG]http://i474.photobucket.com/albums/rr110/polobai/Lexus%20General%20pics/LexusSeptember09012.jpg[/IMG]
So here it goes, first off is to remove the seats from the car and begin the prep work. I warn you now-if you plan on doing a full re-dye, give yourself at least a month to get it done without killing yourself. My project took two, but I took my time and didnt stress it too much as this is not my only mode of transportation. Im sure you guys know how to pull seats and door panels, so I will not bore you with that. Here is the drivers seat after much prep. To prep the seat, I used the leatherique prepping agent (ALOT) and wetsanded the seat using 400 grit sandpaper. Yes, you need to sand the original dye off your leather to ensure the color change sticks! I must admit that it was scary sanding my leather as it was in pretty good shape and I hate to mess up a good thing-but it was worth it. Spend your time prepping-your results will show it if you do not. You need to take off about 60-75% of the original dye off the leather, keep plenty of rags handy to wipe the surface clean, and make sure you dont sand the leather down to suede. It may not look like much of the original color is out of the seat-but trust me it is. Once its dry it looks more tan than it is, when wet you can barley tell it was tan to begin with! You will know when the dye is breaking up-it will start to show a dark color and smooth feel to it.

View original BBCode
So here it goes, first off is to remove the seats from the car and begin the prep work.  I warn you now-if you plan on doing a full re-dye, give yourself at least a month to get it done without killing yourself.  My project took two, but I took my time and didnt stress it too much as this is not my only mode of transportation.  Im sure you guys know how to pull seats and door panels, so I will not bore you with that.  Here is the drivers seat after much prep.  To prep the seat, I used the leatherique prepping agent (ALOT) and wetsanded the seat using 400 grit sandpaper.  Yes, you need to sand the original dye off your leather to ensure the color change sticks!  I must admit that it was scary sanding my leather as it was in pretty good shape and I hate to mess up a good thing-but it was worth it.  Spend your time prepping-your results will show it if you do not.  You need to take off about 60-75% of the original dye off the leather, keep plenty of rags handy to wipe the surface clean, and make sure you dont sand the leather down to suede. It may not look like much of the original color is out of the seat-but trust me it is.  Once its dry it looks more tan than it is, when wet you can barley tell it was tan to begin with!  You will know when the dye is breaking up-it will start to show a dark color and smooth feel to it.

[IMG]http://i474.photobucket.com/albums/rr110/polobai/Lexus%20cinnamon%20interior/Lexuscinnamoninterior001.jpg[/IMG]
interesting. i'm always apprehensive when people decide to DIY a color change with dye, but i've seen it pulled off enough to know it's doable. in for progress pics!
View original BBCode
interesting. i'm always apprehensive when people decide to DIY a color change with dye, but i've seen it pulled off enough to know it's doable. in for progress pics!
Here are some of the parts I am dying black

These will be wrapped in black suede by yours truly :)

View original BBCode
Here are some of the parts I am dying black

[IMG]http://i474.photobucket.com/albums/rr110/polobai/Lexus%20cinnamon%20interior/Lexuscinnamoninterior002.jpg[/IMG]

These will be wrapped in black suede by yours truly :)

[IMG]http://i474.photobucket.com/albums/rr110/polobai/Lexus%20cinnamon%20interior/Lexuscinnamoninterior003.jpg[/IMG]
Here are the back seats

View original BBCode
Here are the back seats

[IMG]http://i474.photobucket.com/albums/rr110/polobai/Lexus%20cinnamon%20interior/Lexuscinnamoninterior005.jpg[/IMG]
And door panel inserts/armrest

View original BBCode
And door panel inserts/armrest

[IMG]http://i474.photobucket.com/albums/rr110/polobai/Lexus%20cinnamon%20interior/Lexuscinnamoninterior004.jpg[/IMG]
Now onto the fun part-how to apply the dye. In the past I used a "wipe dye" technique (see leatheriques site for how its done)-but found that it left swirls. This time I wanted to spray the dye on, so off to Harbor Freight I went and purchased a High Volume/Low Pressure detail gun. This way the application of the dye should be much smoother in the end.

View original BBCode
Now onto the fun part-how to apply the dye.  In the past I used a "wipe dye" technique (see leatheriques site for how its done)-but found that it left swirls.  This time I wanted to spray the dye on, so off to Harbor Freight I went and purchased a High Volume/Low Pressure detail gun.  This way the application of the dye should be much smoother in the end.
[IMG]http://i474.photobucket.com/albums/rr110/polobai/Lexus%20cinnamon%20interior/Lexuscinnamoninterior006.jpg[/IMG]
I also purchased an air regulator. This was very important, as the gun operates at low pressures-I set the gun to 35psi and it was too much at first, eventually I found the sweet spot at around 25 psi of pressure.

View original BBCode
I also purchased an air regulator.  This was very important, as the gun operates at low pressures-I set the gun to 35psi and it was too much at first, eventually I found the sweet spot at around 25 psi of pressure.

[IMG]http://i474.photobucket.com/albums/rr110/polobai/Lexus%20cinnamon%20interior/Lexuscinnamoninterior007.jpg[/IMG]
Now comes the fun part-spraying on the dye! I started with the rear armrest as this would be tough to get to with it closed :) The dye dries within 5 mins to the touch, i found 3 coats were necessary to achieve full color. Spray light, even coats-this stuff WILL RUN if you spray it on to thick, so be careful! (I practiced on the back of the rear headrest and it ran! I found the correct pressure before doing the back seat. If it runs, wait till it dries, sand it off and spray again.)

View original BBCode
Now comes the fun part-spraying on the dye!  I started with the rear armrest as this would be tough to get to with it closed :)  The dye dries within 5 mins to the touch, i found 3 coats were necessary to achieve full color.  Spray light, even coats-this stuff WILL RUN if you spray it on to thick, so be careful! (I practiced on the back of the rear headrest and it ran!  I found the correct pressure before doing the back seat.  If it runs, wait till it dries, sand it off and spray again.)
[IMG]http://i474.photobucket.com/albums/rr110/polobai/Lexus%20cinnamon%20interior/Lexuscinnamoninterior008.jpg[/IMG]
brainneeded;386261 wrote: in for progress pics!
x2
View original BBCode
[QUOTE=brainneeded;386261] [B]in for progress pics![/B][/QUOTE]x2
Here is the inside of the armrest (top and bottom)

View original BBCode
Here is the inside of the armrest (top and bottom)
[IMG]http://i474.photobucket.com/albums/rr110/polobai/Lexus%20cinnamon%20interior/Lexuscinnamoninterior009.jpg[/IMG]
I want to say this is the first or second coat on the back seats

View original BBCode
I want to say this is the first or second coat on the back seats

[IMG]http://i474.photobucket.com/albums/rr110/polobai/Lexus%20cinnamon%20interior/Lexuscinnamoninterior010.jpg[/IMG]
Second coat on the door panel inserts and armrest

View original BBCode
Second coat on the door panel inserts and armrest
[IMG]http://i474.photobucket.com/albums/rr110/polobai/Lexus%20cinnamon%20interior/Lexuscinnamoninterior012.jpg[/IMG]
Third coat on the rears

View original BBCode
Third coat on the rears
[IMG]http://i474.photobucket.com/albums/rr110/polobai/Lexus%20cinnamon%20interior/Lexuscinnamoninterior013.jpg[/IMG]
last for the armrest and door panel inserts

View original BBCode
last for the armrest and door panel inserts
[IMG]http://i474.photobucket.com/albums/rr110/polobai/Lexus%20cinnamon%20interior/Lexuscinnamoninterior015.jpg[/IMG]
Final coat on the rear seats

View original BBCode
Final coat on the rear seats
[IMG]http://i474.photobucket.com/albums/rr110/polobai/Lexus%20cinnamon%20interior/Lexuscinnamoninterior014.jpg[/IMG]
First coat on the front seats

View original BBCode
First coat on the front seats
[IMG]http://i474.photobucket.com/albums/rr110/polobai/Lexus%20cinnamon%20interior/Lexuscinnamoninterior016.jpg[/IMG]
A few coats later (5 total on the front-dont want any chance of them rubbing off)

View original BBCode
A few coats later (5 total on the front-dont want any chance of them rubbing off)
[IMG]http://i474.photobucket.com/albums/rr110/polobai/Lexus%20cinnamon%20interior/Lexuscinnamoninterior018.jpg[/IMG]
back seat done

View original BBCode
back seat done
[IMG]http://i474.photobucket.com/albums/rr110/polobai/Lexus%20cinnamon%20interior/Lexuscinnamoninterior019.jpg[/IMG]
rear bench done

View original BBCode
rear bench done
[IMG]http://i474.photobucket.com/albums/rr110/polobai/Lexus%20cinnamon%20interior/Lexuscinnamoninterior021.jpg[/IMG]
Inserts and armrest done.

View original BBCode
Inserts and armrest done.
[IMG]http://i474.photobucket.com/albums/rr110/polobai/Lexus%20cinnamon%20interior/Lexuscinnamoninterior020.jpg[/IMG]
My buddy Roy helping me shampoo the carpets while I was applying the dye

View original BBCode
My buddy Roy helping me shampoo the carpets while I was applying the dye

[IMG]http://i474.photobucket.com/albums/rr110/polobai/Lexus%20cinnamon%20interior/Lexuscinnamoninterior017.jpg[/IMG]
Mats came out clean

Coach edition son!

View original BBCode
Mats came out clean
[IMG]http://i474.photobucket.com/albums/rr110/polobai/Lexus%20cinnamon%20interior/Lexuscinnamoninterior022.jpg[/IMG]
Coach edition son!
[IMG]http://i474.photobucket.com/albums/rr110/polobai/Lexus%20cinnamon%20interior/Lexuscinnamoninterior023.jpg[/IMG]
Next was time to redye the factory speaker grills-they were pretty bad...so i redyed them tan with the leftover dye i had from my previous job-before

View original BBCode
Next was time to redye the factory speaker grills-they were pretty bad...so i redyed them tan with the leftover dye i had from my previous job-before

[IMG]http://i474.photobucket.com/albums/rr110/polobai/Lexus%20cinnamon%20interior/Lexuscinnamoninterior029.jpg[/IMG]
After

View original BBCode
After
[IMG]http://i474.photobucket.com/albums/rr110/polobai/Lexus%20cinnamon%20interior/Lexuscinnamoninterior030.jpg[/IMG]
here you can see I also dyed the steering wheel black (same process)

View original BBCode
here you can see I also dyed the steering wheel black (same process)
[IMG]http://i474.photobucket.com/albums/rr110/polobai/Lexus%20cinnamon%20interior/Lexuscinnamoninterior026.jpg[/IMG]
finished

Shift knob

View original BBCode
finished
[IMG]http://i474.photobucket.com/albums/rr110/polobai/Lexus%20cinnamon%20interior/Lexuscinnamoninterior027.jpg[/IMG]
 Shift knob
[IMG]http://i474.photobucket.com/albums/rr110/polobai/Lexus%20cinnamon%20interior/Lexuscinnamoninterior025.jpg[/IMG]
I also redyed the rear map pockets on the back of the front seats

View original BBCode
I also redyed the rear map pockets on the back of the front seats
[IMG]http://i474.photobucket.com/albums/rr110/polobai/Lexus%20cinnamon%20interior/Lexuscinnamoninterior024.jpg[/IMG]
dried and finished

View original BBCode
dried and finished
[IMG]http://i474.photobucket.com/albums/rr110/polobai/Lexus%20cinnamon%20interior/007.jpg[/IMG]
yes, a million pieces to dye black. For this I used Duplicolors Matt Black vinyl and fabric paint. I prepped it by spraying and scrubbing the pieces with Simple Green cleaner to remove and wax/previous cleaners, and wiped clean. Once dry, then the dying began!

View original BBCode
yes, a million pieces to dye black.  For this I used Duplicolors Matt Black vinyl and fabric paint.  I prepped it by spraying and scrubbing the pieces with Simple Green cleaner to remove and wax/previous cleaners, and wiped clean.  Once dry, then the dying began!

[IMG]http://i474.photobucket.com/albums/rr110/polobai/Lexus%20cinnamon%20interior/001.jpg[/IMG]
In process

View original BBCode
In process
[IMG]http://i474.photobucket.com/albums/rr110/polobai/Lexus%20cinnamon%20interior/005.jpg[/IMG]
done!

View original BBCode
done!
[IMG]http://i474.photobucket.com/albums/rr110/polobai/Lexus%20cinnamon%20interior/006.jpg[/IMG]
Wow. That's really dope. I never knew you could just dye your seat color like that. Cant wait to see it all finished.
View original BBCode
Wow. That's really dope. I never knew you could just dye your seat color like that. Cant wait to see it all finished.
front seatbacks ready for dye

View original BBCode
front seatbacks ready for dye
[IMG]http://i474.photobucket.com/albums/rr110/polobai/Lexus%20cinnamon%20interior/003.jpg[/IMG]
done!

View original BBCode
done!
[IMG]http://i474.photobucket.com/albums/rr110/polobai/Lexus%20cinnamon%20interior/004.jpg[/IMG]
oh no! What about the brown dash?!?!? Dye it :) I decided to tackle it in the car (did my Supras the same way) and it came out good-have lots of newspaper and tape handy!

View original BBCode
oh no!  What about the brown dash?!?!?  Dye it :)  I decided to tackle it in the car (did my Supras the same way) and it came out good-have lots of newspaper and tape handy!

[IMG]http://i474.photobucket.com/albums/rr110/polobai/Lexus%20cinnamon%20interior/Lexuscinnamoninterior031.jpg[/IMG]
View original BBCode
[IMG]http://i474.photobucket.com/albums/rr110/polobai/Lexus%20cinnamon%20interior/Lexuscinnamoninterior032.jpg[/IMG]
dash done (used same prep technique as the other interior parts and dyed using duplicolor matt black)

View original BBCode
dash done (used same prep technique as the other interior parts and dyed using duplicolor matt black)
[IMG]http://i474.photobucket.com/albums/rr110/polobai/Lexus%20cinnamon%20interior/Lexuscinnamoninterior033.jpg[/IMG]
View original BBCode
[IMG]http://i474.photobucket.com/albums/rr110/polobai/Lexus%20cinnamon%20interior/Lexuscinnamoninterior034.jpg[/IMG]
Not too shabby huh?

View original BBCode
Not too shabby huh?

[IMG]http://i474.photobucket.com/albums/rr110/polobai/Lexus%20cinnamon%20interior/Lexuscinnamoninterior035.jpg[/IMG]
Thats all for tonight, going to start with the suede pics next!
View original BBCode
Thats all for tonight, going to start with the suede pics next!
Smitty;386298 wrote:Wow. That's really dope. I never knew you could just dye your seat color like that. Cant wait to see it all finished.
you can, and its just like the original if you prep it right. the bad part is the prep work, its a ridiculous amount of work to do it right (see leatheriques site for more detailed instructions)
View original BBCode
[QUOTE=Smitty;386298]Wow.  That's really dope. I never knew you could just dye your seat color like that. Cant wait to see it all finished.[/QUOTE]

you can, and its just like the original if you prep it right.  the bad part is the prep work, its a ridiculous amount of work to do it right (see leatheriques site for more detailed instructions)
damn, you put in some work - wanna do my e class next?...pleeeeease, lol. nice work. i want to see it complete.
View original BBCode
damn, you put in some work - wanna do my e class next?...pleeeeease, lol. nice work. i want to see it complete.
dayumn... that's sick..
View original BBCode
dayumn... that's sick..
NELSON09;386318 wrote:damn, you put in some work - wanna do my e class next?...pleeeeease, lol. nice work. i want to see it complete.
yea, your right about that...i had a benz also-a w124. Yours is siiick!!!


View original BBCode
[QUOTE=NELSON09;386318]damn, you put in some work - wanna do my e class next?...pleeeeease, lol. nice work. i want to see it complete.[/QUOTE]

yea, your right about that...i had a benz also-a w124.  Yours is siiick!!!

[IMG]http://i474.photobucket.com/albums/rr110/polobai/benzfront.jpg[/IMG]
[IMG]http://i474.photobucket.com/albums/rr110/polobai/benzback.jpg[/IMG]
MOAAAAAR PICS!!!
View original BBCode
MOAAAAAR PICS!!!
genetic;386331 wrote:MOAAAAAR PICS!!!
how about a pic of the ride?

View original BBCode
[QUOTE=genetic;386331]MOAAAAAR PICS!!![/QUOTE]

how about a pic of the ride?

[IMG]http://i474.photobucket.com/albums/rr110/polobai/Lexus%20General%20pics/LSHFRolling.jpg[/IMG]
Winner of "Best Stance" at Hellaflush 6 Miami

View original BBCode
Winner of "Best Stance" at Hellaflush 6 Miami
[IMG]http://i474.photobucket.com/albums/rr110/polobai/Lexus%20General%20pics/LSStancenation.jpg[/IMG]
Good work you're putting in man.
View original BBCode
Good work you're putting in man.
will look forward to the finish pics.

i do believe it is easier to take out the dash than to mask it inside the car..since you already got most of the stuff out.

on my wife's gs i took it out it was about 8 bolts or so.
View original BBCode
will look forward to the finish pics.
i do believe it is easier to take out the dash than to mask it inside the car..since you already got most of the stuff out.
on my wife's gs i took it out it was about 8 bolts or so.
yous a boss man
View original BBCode
yous a boss man
wow man im not that brave enough to shoot my dash like that. but i gotta give it up to u. thats alotta hard work it looks really nice! i wanna see what those seats look like when all put back together. keep it up man!
View original BBCode
wow man im not that brave enough to shoot my dash like that. but i gotta give it up to u. thats alotta hard work it looks really nice! i wanna see what those seats look like when all put back together. keep it up man!
You don't need no stinkin sleep.. post those pics!!!!
View original BBCode
You don't need no stinkin sleep.. post those pics!!!!
Wow, that is amazing. Wish I can see in person.
View original BBCode
Wow, that is amazing. Wish I can see in person.
U haven't been on the boards in awhile, and u come back with good stuff...can't wait to see the end results
View original BBCode
U haven't been on the boards in awhile, and u come back with good stuff...can't wait to see the end results
damn this is gonna be epic once completed
View original BBCode
damn this is gonna be epic once completed
Looks dope, but the one thing that has always puzzled me is how well the dye will last in the seats? Dying interior panels is a no-brainer, but the seats have to take a lot more "abuse"... wouldn't want to fuck up my clothes after a hot&sweatty day :shrug:
View original BBCode
Looks dope, but the one thing that has always puzzled me is how well the dye will last in the seats? Dying interior panels is a no-brainer, but the seats have to take a lot more "abuse"... wouldn't want to fuck up my clothes after a hot&sweatty day :shrug:
Good stuff man, I know how daunting this task is. I converted my interior from tan to black when I had my SC300 and it took me forever to get it looking right. Lots and lots of work and effort involved. Can't wait to see more pix!!!!
View original BBCode
Good stuff man, I know how daunting this task is. I converted my interior from tan to black when I had my SC300 and it took me forever to get it looking right. Lots and lots of work and effort involved. Can't wait to see more pix!!!!
wooow, what a great job. i would never have enough balls to do this on my own! big ups to you!
View original BBCode
wooow, what a great job. i would never have enough balls to do this on my own! big ups to you!
Juzzo;386398 wrote:Looks dope, but the one thing that has always puzzled me is how well the dye will last in the seats? Dying interior panels is a no-brainer, but the seats have to take a lot more "abuse"... wouldn't want to fuck up my clothes after a hot&sweatty day :shrug:
:pat:
View original BBCode
[QUOTE=Juzzo;386398]Looks dope, but the one thing that has always puzzled me is how well the dye will last in the seats? Dying interior panels is a no-brainer, but the seats have to take a lot more "abuse"... wouldn't want to fuck up my clothes after a hot&sweatty day :shrug:[/QUOTE]
 :pat:
Juzzo;386398 wrote:Looks dope, but the one thing that has always puzzled me is how well the dye will last in the seats? Dying interior panels is a no-brainer, but the seats have to take a lot more "abuse"... wouldn't want to fuck up my clothes after a hot&sweatty day :shrug:
if you prep it right it'll last a long ass time. I had tan seats and door panels dyed black, I sanded the seats first and used a adhesion promoter. One specific instance I draw reference to every time I think about the durability is once I threw a wheel box in the backseat and it wasn't in the car all the way, so when I closed the door on it the door panel smashed into the corner of the box, and my subsequent attempts to close the door fucked it up even worse. T he door panel looked like the elephant mans face but nowhere did the vinyl dye crack or break. Vinyl dye is a excellent alternative to new seat covers and doors. When paired with other techniques like shallow crack filler you can get a outcome identical to new leathers. Cracked perforated seats are a motherfucker though. Nothinf yoy can realky do about suede and suede replicas.
View original BBCode
[QUOTE=Juzzo;386398]Looks dope, but the one thing that has always puzzled me is how well the dye will last in the seats? Dying interior panels is a no-brainer, but the seats have to take a lot more "abuse"... wouldn't want to fuck up my clothes after a hot&sweatty day :shrug:[/QUOTE]


if you prep it right it'll last a long ass time. I had tan seats and door panels dyed black, I sanded the seats first and used a adhesion promoter.  One specific instance I draw reference to every time I think about the durability is once I threw a wheel box in the backseat and it wasn't in the car all the way, so when I closed the door on it the door panel smashed into the corner of the box, and my subsequent attempts to close the door fucked it up even worse.  T he door panel looked like the elephant mans face but nowhere did the vinyl dye crack or break.  Vinyl dye is a excellent alternative to new seat  covers and doors.  When paired with other techniques like shallow crack filler you can get a outcome identical to new leathers.  Cracked perforated seats are a motherfucker though.  Nothinf yoy can realky do about suede and suede replicas.
lowvanu2;386376 wrote:You don't need no stinkin sleep.. post those pics!!!!
x2
great work so far. I love that you chose to diy that interior is gonna be sick. :biggthumpup:
View original BBCode
[QUOTE=lowvanu2;386376]You don't need no stinkin sleep.. post those pics!!!![/QUOTE]


x2

great work so far.  I love that you chose to diy that interior is gonna be sick.  :biggthumpup:
in for the win
View original BBCode
in for the win
damn, this is gonna be nice!
View original BBCode
damn, this is gonna be nice!
wow i wanna see updates so bad
View original BBCode
wow i wanna see updates so bad
5t341tH;386536 wrote:wow i wanna see updates so bad
x2 lotta work involved! :biggthumpup:
View original BBCode
[QUOTE=5t341tH;386536]wow i wanna see updates so bad[/QUOTE]

x2 lotta work involved! :biggthumpup:
holy hell!!!!! didnt know you could spray everything wow good looks bro!!!!
View original BBCode
holy hell!!!!! didnt know you could spray everything wow good looks bro!!!!
Sprayed it like it was Agent Orange
View original BBCode
Sprayed it like it was Agent Orange
Effin' amazing!
I've been on Leatheriques site a tonne just in the past week.
I've been contemplating this a lot lately. Going back and forth on ordering seat covers from Japan or doing this.
Now you've given me the confidence to do this. I think the Lexus leather is better than anything I could order.
View original BBCode
Effin' amazing!
I've been on Leatheriques site a tonne just in the past week.
I've been contemplating this a lot lately. Going back and forth on ordering seat covers from Japan or doing this.
Now you've given me the confidence to do this. I think the Lexus leather is better than anything I could order.
Schnitz;386688 wrote:I think the Lexus leather is better than anything I could order.
Exactly. I was going to drop $1,700 on new leathers to do my benz then took the covers off and realized how mad thick my leathers were. Redye :biggthumpup::biggthumpup:
View original BBCode
[QUOTE=Schnitz;386688]I think the Lexus leather is better than anything I could order.[/QUOTE]

Exactly.  I was going to drop $1,700 on new leathers to do my benz then took the covers off and realized how mad thick my leathers were.  Redye :biggthumpup::biggthumpup:
Awesome work put in! I would love to see this at a Fl meet sometime.
View original BBCode
Awesome work put in! I would love to see this at a Fl meet sometime.
That's a lot of hard work and dedication, nothing but great results!

Would love to see this in person, props!
View original BBCode
That's a lot of hard work and dedication, nothing but great results!
Would love to see this in person, props!
Juzzo;386398 wrote:Looks dope, but the one thing that has always puzzled me is how well the dye will last in the seats? Dying interior panels is a no-brainer, but the seats have to take a lot more "abuse"... wouldn't want to fuck up my clothes after a hot&sweatty day :shrug:
I feel ya, trust me-if its prepped right, applied properly, and given the correct time to cure-its not coming off. Remember, I dyed these seats before (same tan color) and it never came off. This is a permanent solution-no problems so far, just lots of work (had it in for about a week-and I used it quite a bit (front and back seats =) ))
View original BBCode
[QUOTE=Juzzo;386398]Looks dope, but the one thing that has always puzzled me is how well the dye will last in the seats? Dying interior panels is a no-brainer, but the seats have to take a lot more "abuse"... wouldn't want to fuck up my clothes after a hot&sweatty day :shrug:[/QUOTE]

I feel ya, trust me-if its prepped right, applied properly, and given the correct time to cure-its not coming off.  Remember, I dyed these seats before (same tan color) and it never came off.  This is a permanent solution-no problems so far, just lots of work (had it in for about a week-and I used it quite a bit (front and back seats =) ))
ok time for updates!!! Onto the Suede!!!! This is the rear console I made, wrapped in Suede

View original BBCode
ok time for updates!!! Onto the Suede!!!!  This is the rear console I made, wrapped in Suede

[IMG]http://i474.photobucket.com/albums/rr110/polobai/Lexus%20cinnamon%20interior/011.jpg[/IMG]
center console wrapped

View original BBCode
center console wrapped

[IMG]http://i474.photobucket.com/albums/rr110/polobai/Lexus%20cinnamon%20interior/009.jpg[/IMG]
teaser with the arm rest rested on top

View original BBCode
teaser with the arm rest rested on top

[IMG]http://i474.photobucket.com/albums/rr110/polobai/Lexus%20cinnamon%20interior/010.jpg[/IMG]
rear deck with glue applied...

View original BBCode
rear deck with glue applied...

[IMG]http://i474.photobucket.com/albums/rr110/polobai/Lexus%20cinnamon%20interior/015.jpg[/IMG]
done!!!!!

View original BBCode
done!!!!!

[IMG]http://i474.photobucket.com/albums/rr110/polobai/Lexus%20cinnamon%20interior/016.jpg[/IMG]
speaker grill painted (used duplicolor matt black) and third brake light dyed

View original BBCode
speaker grill painted (used duplicolor matt black) and third brake light dyed

[IMG]http://i474.photobucket.com/albums/rr110/polobai/Lexus%20cinnamon%20interior/023.jpg[/IMG]
NOW its done ;)

View original BBCode
NOW its done ;)

[IMG]http://i474.photobucket.com/albums/rr110/polobai/Lexus%20cinnamon%20interior/024.jpg[/IMG]
installed in the car (dynamatted the rear deck but forgot to take pics :( )

View original BBCode
installed in the car (dynamatted the rear deck but forgot to take pics :( )
[IMG]http://i474.photobucket.com/albums/rr110/polobai/Lexus%20cinnamon%20interior/026.jpg[/IMG]
Center console installed with armrest installed

View original BBCode
Center console installed  with armrest installed

[IMG]http://i474.photobucket.com/albums/rr110/polobai/Lexus%20cinnamon%20interior/025.jpg[/IMG]
assembling the rear seatbacks...i also made tables to fit the curvature of the panel-I was going to do the Jag tables but they didnt fit the seatback as well as i would like, although the mechanism is the Jag tables is by far the best I have seen

View original BBCode
assembling the rear seatbacks...i also made tables to fit the curvature of the panel-I was going to do the Jag tables but they didnt fit the seatback as well as i would like, although the mechanism is the Jag tables is by far the best I have seen

[IMG]http://i474.photobucket.com/albums/rr110/polobai/Lexus%20cinnamon%20interior/017.jpg[/IMG]
assembled and ready for installation!

View original BBCode
assembled and ready for installation!
[IMG]http://i474.photobucket.com/albums/rr110/polobai/Lexus%20cinnamon%20interior/018.jpg[/IMG]
installed on the seat!!!

View original BBCode
installed on the seat!!!
[IMG]http://i474.photobucket.com/albums/rr110/polobai/Lexus%20cinnamon%20interior/021.jpg[/IMG]
steering wheel assembled and airbag wrapped in suede also (slits are made in the suede so the airbag will still deploy if needed) Also you can see the remote panel i molded for my double din...works great!!!!

View original BBCode
steering wheel assembled and airbag wrapped in suede also (slits are made in the suede so the airbag will still deploy if needed) Also you can see the remote panel i molded for my double din...works great!!!!

[IMG]http://i474.photobucket.com/albums/rr110/polobai/Lexus%20cinnamon%20interior/019.jpg[/IMG]
onto the door panels-here is the top part of the panels wrapped in suede (I had to have these wrapped as it needed to be stitched, as well as the door armrests)

View original BBCode
onto the door panels-here is the top part of the panels wrapped in suede (I had to have these wrapped as it needed to be stitched, as well as the door armrests)

[IMG]http://i474.photobucket.com/albums/rr110/polobai/Lexus%20cinnamon%20interior/012.jpg[/IMG]
Boom!!!! Assembled!!!

View original BBCode
Boom!!!! Assembled!!!

[IMG]http://i474.photobucket.com/albums/rr110/polobai/Lexus%20cinnamon%20interior/013.jpg[/IMG]
all four done and ready!!!

View original BBCode
all four done and ready!!!

[IMG]http://i474.photobucket.com/albums/rr110/polobai/Lexus%20cinnamon%20interior/014.jpg[/IMG]
here you can see where I dyed the rear headrest adjustments black and the rear cupholders. I could not get the cupholders out for anything-so i dyed them on the seats, if I had to do it again I would try harder to take it apart-it would come out better.

View original BBCode
here you can see where I dyed the rear headrest adjustments black and the rear cupholders.  I could not get the cupholders out for anything-so i dyed them on the seats, if I had to do it again I would try harder to take it apart-it would come out better.

[IMG]http://i474.photobucket.com/albums/rr110/polobai/Lexus%20cinnamon%20interior/020.jpg[/IMG]
seats assembled (painted the bottom power adjustment panels black and installed)

View original BBCode
seats assembled (painted the bottom power adjustment panels black and installed)
[IMG]http://i474.photobucket.com/albums/rr110/polobai/Lexus%20cinnamon%20interior/022.jpg[/IMG]
nice updates! more!!
View original BBCode
nice updates! more!!
So far I am so impressed I want to do my interior as well with the same product. I wonder how well the dye does over time. Looks like spray? I am sure it's already been discussed lol so I won't ask.

For me I think a darker grey leather :)
View original BBCode
So far I am so impressed I want to do my interior as well with the same product. I wonder how well the dye does over time. Looks like spray? I am sure it's already been discussed lol so I won't ask.
For me I think a darker grey leather :)
Holy Mother!!! The outcome is sensational! I am sure you have inspired many a fool to do this for them self!! On a sidenote, I'm sure there is big money to be made if someone offered this as a service!!! Do It!!!!
View original BBCode
Holy Mother!!! The outcome is sensational! I am sure you have inspired many a fool to do this for them self!! On a sidenote, I'm sure there is big money to be made if someone offered this as a service!!! Do It!!!!
do work!
View original BBCode
do work!
this is insane....didnt realize this was a DIY kind of service!! I imagine it is very labor/hour intensive. Nice work!
View original BBCode
this is insane....didnt realize this was a DIY kind of service!! I imagine it is very labor/hour intensive. Nice work!
Very nice indeed.Liking the seat colors.Keep up the good work!!!Some questions though.Did you do the stitching on the suede yourself also?Where did you get the suede.Was it local or website?If website,link please.Thanks.
View original BBCode
Very nice indeed.Liking the seat colors.Keep up the good work!!!Some questions though.Did you do the stitching on the suede yourself also?Where did you get the suede.Was it local or website?If website,link please.Thanks.
wow, the black and orange look a lot better together than I originally though it would.

Looks decent.
View original BBCode
wow, the black and orange look a lot better together than I originally though it would.
Looks decent.
bleachigo;387128 wrote:Very nice indeed.Liking the seat colors.Keep up the good work!!!Some questions though.Did you do the stitching on the suede yourself also?Where did you get the suede.Was it local or website?If website,link please.Thanks.
Thanks, the stitching was done by a local upholstery shop. The suede was actually purchased from JoAnne fabrics-I used the Liz Claiborne collection for home draperies...not too bad-about $25 per yard, needed about 3 yards to get it going.
View original BBCode
[QUOTE=bleachigo;387128]Very nice indeed.Liking the seat colors.Keep up the good work!!!Some questions though.Did you do the stitching on the suede yourself also?Where did you get the suede.Was it local or website?If website,link please.Thanks.[/QUOTE]

Thanks, the stitching was done by a local upholstery shop.  The suede was actually purchased from JoAnne fabrics-I used the Liz Claiborne collection for home draperies...not too bad-about $25 per yard, needed about 3 yards to get it going.
lowvanu2;387088 wrote:Holy Mother!!! The outcome is sensational! I am sure you have inspired many a fool to do this for them self!! On a sidenote, I'm sure there is big money to be made if someone offered this as a service!!! Do It!!!!
Hahha nice-I wouldnt do this for anyone else...to do it right and with the manhours involved no one would want to pay the price to do it right!
View original BBCode
[QUOTE=lowvanu2;387088]Holy Mother!!! The outcome is sensational! I am sure you have inspired many a fool to do this for them self!!  On a sidenote, I'm sure there is big money to be made if someone offered this as a service!!! Do It!!!![/QUOTE]

Hahha nice-I wouldnt do this for anyone else...to do it right and with the manhours involved no one would want to pay the price to do it right!
gh0st;387116 wrote:this is insane....didnt realize this was a DIY kind of service!! I imagine it is very labor/hour intensive. Nice work!
Dude, you can only imagine the work-but the end result is worth it for me!!! Thanks!!!:biggthumpup:
View original BBCode
[QUOTE=gh0st;387116]this is insane....didnt realize this was a DIY kind of service!! I imagine it is very labor/hour intensive. Nice work![/QUOTE]

Dude, you can only imagine the work-but the end result is worth it for me!!!  Thanks!!!:biggthumpup:
ok time for updates! I took the headlights apart while the car was down to install some CCFL tubes

View original BBCode
ok time for updates!  I took the headlights apart while the car was down to install some CCFL tubes

[IMG]http://i474.photobucket.com/albums/rr110/polobai/Lexus%20cinnamon%20interior/Lexuscinnamoninterior006-1.jpg[/IMG]
While they were apart I decided to paint the factory fog area yellow for a little different look

View original BBCode
While they were apart I decided to paint the factory fog area yellow for a little different look

[IMG]http://i474.photobucket.com/albums/rr110/polobai/Lexus%20cinnamon%20interior/Lexuscinnamoninterior007-1.jpg[/IMG]
assembled


View original BBCode
assembled
[IMG]http://i474.photobucket.com/albums/rr110/polobai/Lexus%20cinnamon%20interior/Lexuscinnamoninterior008-1.jpg[/IMG]
[IMG]http://i474.photobucket.com/albums/rr110/polobai/Lexus%20cinnamon%20interior/Lexuscinnamoninterior009-1.jpg[/IMG]
on and running!

View original BBCode
on and running!
[IMG]http://i474.photobucket.com/albums/rr110/polobai/Lexus%20cinnamon%20interior/Lexuscinnamoninterior010-1.jpg[/IMG]
Whos ready for some installed pics?!!? Here is the rear seatback installed along with a third headrest from a UCF10 front seat!

View original BBCode
Whos ready for some installed pics?!!?  Here is the rear seatback installed along with a third headrest from a UCF10 front seat!
[IMG]http://i474.photobucket.com/albums/rr110/polobai/Lexus%20cinnamon%20interior/Lexuscinnamoninterior001-1.jpg[/IMG]
Bottom cushion installed

View original BBCode
Bottom cushion installed
[IMG]http://i474.photobucket.com/albums/rr110/polobai/Lexus%20cinnamon%20interior/Lexuscinnamoninterior002-1.jpg[/IMG]
rear neck cushions installed along with custom water bottle holder ;)

View original BBCode
rear neck cushions installed along with custom water bottle holder ;)
[IMG]http://i474.photobucket.com/albums/rr110/polobai/Lexus%20cinnamon%20interior/Lexuscinnamoninterior017-1.jpg[/IMG]
rear console installed-its all about the touches!!! Yes, I made them all myself-I have some interesting ideas sometimes!

View original BBCode
rear console installed-its all about the touches!!! Yes, I made them all myself-I have some interesting ideas sometimes!

[IMG]http://i474.photobucket.com/albums/rr110/polobai/Lexus%20cinnamon%20interior/Lexuscinnamoninterior016-1.jpg[/IMG]
Front seats in!

View original BBCode
Front seats in!
[IMG]http://i474.photobucket.com/albums/rr110/polobai/Lexus%20cinnamon%20interior/Lexuscinnamoninterior003-1.jpg[/IMG]
showing the back and the back of the front seats!

View original BBCode
showing the back and the back of the front seats!
[IMG]http://i474.photobucket.com/albums/rr110/polobai/Lexus%20cinnamon%20interior/Lexuscinnamoninterior004-1.jpg[/IMG]
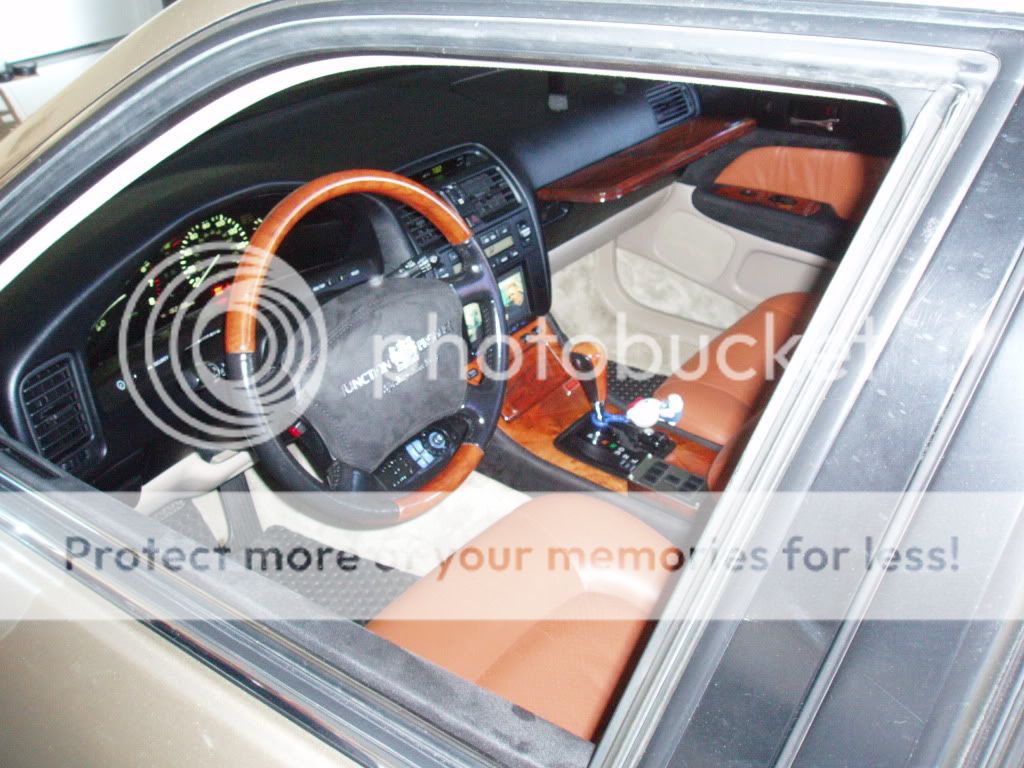
added a JP emblem to the steering wheel since the factory Lexus logo disappeared once wrapped...went for something different-I am happy with the outcome
View original BBCode
added a JP emblem to the steering wheel since the factory Lexus logo disappeared once wrapped...went for something different-I am happy with the outcome
[IMG]http://i474.photobucket.com/albums/rr110/polobai/Lexus%20cinnamon%20interior/Lexuscinnamoninterior011-1.jpg[/IMG]
Another front shot

View original BBCode
Another front shot
[IMG]http://i474.photobucket.com/albums/rr110/polobai/Lexus%20cinnamon%20interior/Lexuscinnamoninterior013-1.jpg[/IMG]
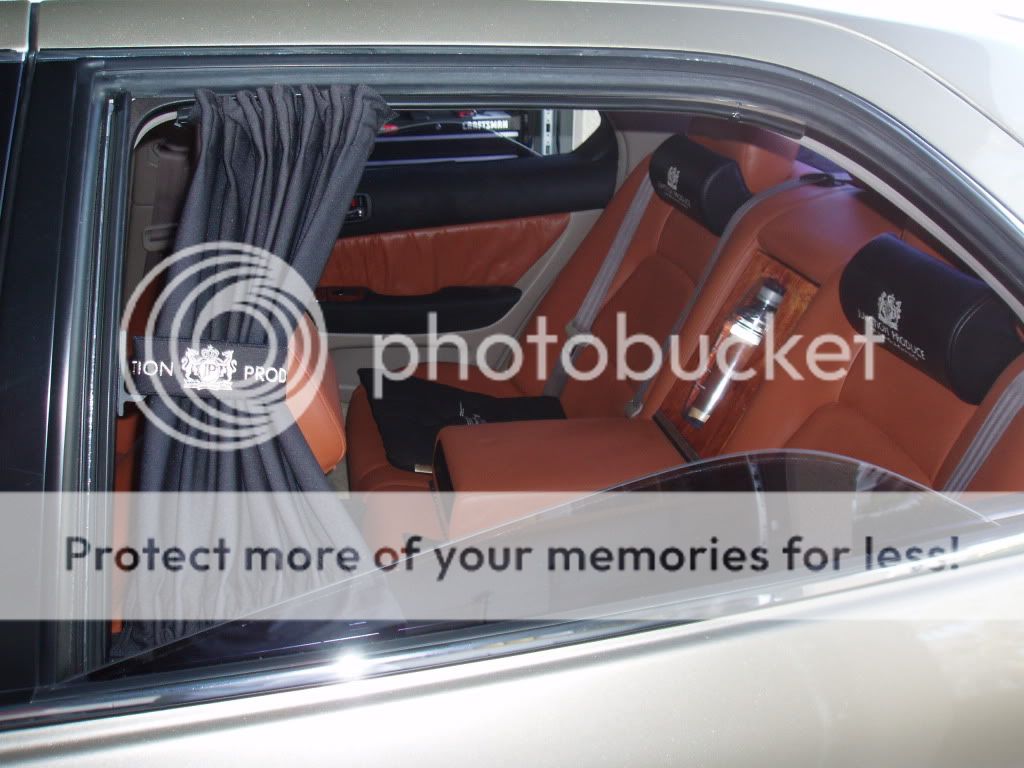
rear shot with the curtains
View original BBCode
rear shot with the curtains
[IMG]http://i474.photobucket.com/albums/rr110/polobai/Lexus%20cinnamon%20interior/Lexuscinnamoninterior012-1.jpg[/IMG]
another front angle from the passenger side

View original BBCode
another front angle from the passenger side
[IMG]http://i474.photobucket.com/albums/rr110/polobai/Lexus%20cinnamon%20interior/Lexuscinnamoninterior018-1.jpg[/IMG]
another custom touch! Here I made a exhaust finishing piece to tie both sides together (its a Trust SP2 system from a TT 300zx with custom 2.5 inch piping) Its all about the details!!!

View original BBCode
another custom touch!  Here I made a exhaust finishing piece to tie both sides together (its a Trust SP2 system from a TT 300zx with custom 2.5 inch piping)  Its all about the details!!!
[IMG]http://i474.photobucket.com/albums/rr110/polobai/Lexus%20cinnamon%20interior/Lexuscinnamoninterior014-1.jpg[/IMG]
and a shot of the stable-I need a bigger garage!!! Not pictured here is an e30 with a m3 conversion and sr20 swap in the works...I have too many projects!!! If the supra looks familiar it was the same one featured on fatlace over the summer!

View original BBCode
and a shot of the stable-I need a bigger garage!!! Not pictured here is an e30 with a m3 conversion and sr20 swap in the works...I have too many projects!!!  If the supra looks familiar it was the same one featured on fatlace over the summer!

[IMG]http://i474.photobucket.com/albums/rr110/polobai/Lexus%20cinnamon%20interior/Lexuscinnamoninterior019-1.jpg[/IMG]
Last but not least a pic with the system back in-yes all done by me :) I hope you guys enjoyed my Cinnnnaaaammmmooonn adventure-lots of work but worth it in the end!!!!

View original BBCode
Last but not least a pic with the system back in-yes all done by me :)  I hope you guys enjoyed my Cinnnnaaaammmmooonn adventure-lots of work but worth it in the end!!!!

[IMG]http://i474.photobucket.com/albums/rr110/polobai/Lexus%20cinnamon%20interior/Lexuscinnamoninterior020-1.jpg[/IMG]
Here it is to wrap it up-before
after
View original BBCode
Here it is to wrap it up-before
[IMG]http://i474.photobucket.com/albums/rr110/polobai/Lexus%20General%20pics/LexusApril09002.jpg[/IMG]
after
[IMG]http://i474.photobucket.com/albums/rr110/polobai/Lexus%20cinnamon%20interior/Lexuscinnamoninterior013-1.jpg[/IMG]
rear-before
after
View original BBCode
rear-before
[IMG]http://i474.photobucket.com/albums/rr110/polobai/Lexus%20General%20pics/LexusSeptember09012.jpg[/IMG]
after
[IMG]http://i474.photobucket.com/albums/rr110/polobai/Lexus%20cinnamon%20interior/Lexuscinnamoninterior012-1.jpg[/IMG]
Well fukkin' done!!!!!! I love the whole car. And the fact that it s DIY makes it that much better.

3 questions:

1) Did you follow up with 600 grit after the 400 when you prepped? Leatherique states its the next step but you didn't mention it.

2) Do you think if you taped off the inserts you could have done them a different colour?

3) How did you attach your rear lip? I have the Wald one as well. I see the holes to screw it in at the wheel wells but what about along the rear bumper?
View original BBCode
Well fukkin' done!!!!!! I love the whole car. And the fact that it s DIY makes it that much better.
3 questions:
1) Did you follow up with 600 grit after the 400 when you prepped? Leatherique states its the next step but you didn't mention it.
2) Do you think if you taped off the inserts you could have done them a different colour?
3) How did you attach your rear lip? I have the Wald one as well. I see the holes to screw it in at the wheel wells but what about along the rear bumper?
Schnitz;387296 wrote:Well fukkin' done!!!!!! I love the whole car. And the fact that it s DIY makes it that much better.
3 questions:
1) Did you follow up with 600 grit after the 400 when you prepped? Leatherique states its the next step but you didn't mention it.
I didnt, I just sanded with 400 until it was smooth...I did go over it twice with the 400 as the 400 was wearing out, so I guess it was like sanding with a higher grit.
2) Do you think if you taped off the inserts you could have done them a different colour?
Yes, you can but it is hard to get a clean tapeline...its just like automotive paint with the way I sprayed it. If you are going for a two tone, I would suggest a steady hand and doing at least the edges with a high quality brush and taping off the rest.
3) How did you attach your rear lip? I have the Wald one as well. I see the holes to screw it in at the wheel wells but what about along the rear bumper?
I had the body shop use plastic weld to attach the rear lip along the rear bumper-that and the screws in the wheel wells are all thats needed on mine.
View original BBCode
[QUOTE=Schnitz;387296]Well fukkin' done!!!!!! I love the whole car. And the fact that it s DIY makes it that much better.

3 questions:

1) Did you follow up with 600 grit after the 400 when you prepped? Leatherique states its the next step but you didn't mention it.

I didnt, I just sanded with 400 until it was smooth...I did go over it twice with the 400 as the 400 was wearing out, so I guess it was like sanding with a higher grit.

2) Do you think if you taped off the inserts you could have done them a different colour?
Yes, you can but it is hard to get a clean tapeline...its just like automotive paint with the way I sprayed it.  If you are going for a two tone, I would suggest a steady hand and doing at least the edges with a high quality brush and taping off the rest.

3) How did you attach your rear lip? I have the Wald one as well. I see the holes to screw it in at the wheel wells but what about along the rear bumper?[/QUOTE]

I had the body shop use plastic weld to attach the rear lip along the rear bumper-that and the screws in the wheel wells are all thats needed on mine.
i think RIT makes a great Carpet Dye, you should check it out I think black carpet and painting the rest of the doors black would make the interior look a little more complete.

Very VERY well done though, Looks great.
View original BBCode
i think RIT makes a great Carpet Dye, you should check it out I think black carpet and painting the rest of the doors black would make the interior look a little more complete.
Very VERY well done though, Looks great.
Thank you sir. :biggthumpup:
View original BBCode
Thank you sir. :biggthumpup:
trunk setup is soooo clean
View original BBCode
trunk setup is soooo clean
Avantgarde;387397 wrote:i think RIT makes a great Carpet Dye, you should check it out I think black carpet and painting the rest of the doors black would make the interior look a little more complete.
Very VERY well done though, Looks great.
Thanks, I left it like that because I dyed the carpets in my Supra from maroon to black and I didnt like the outcome. I am in process of searching for OEM black carpet and seatbelts as well as other small tidbits like the door edge molding, etc. Once I find them, then I will do a full black conversion and finish up everything else in black suede (headliner, etc.). Thanks for the compliments!
View original BBCode
[QUOTE=Avantgarde;387397]i think RIT makes a great Carpet Dye, you should check it out I think black carpet and painting the rest of the doors black would make the interior look a little more complete.

Very VERY well done though, Looks great.[/QUOTE]

Thanks, I left it like that because I dyed the carpets in my Supra from maroon to black and I didnt like the outcome.  I am in process of searching for OEM black carpet and seatbelts as well as other small tidbits like the door edge molding, etc.  Once I find them, then I will do a full black conversion and finish up everything else in black suede (headliner, etc.).  Thanks for the compliments!
DOPEEEEE
View original BBCode
DOPEEEEE
love it all except for the random illest sticker...
View original BBCode
love it all except for the random illest sticker...
Hey dude for carpet get it soaked first then get a kiddy pool full of dye mix and soak wash soak works wonders when the carpet is already wet
View original BBCode
Hey dude for carpet get it soaked first then get a kiddy pool full of dye mix and soak wash soak works wonders when the carpet is already wet
great DIY, love the creation, and initiative you took to stand out from the rest. I'm a big fan of the cinnamon shade interiors. :thumbup:
View original BBCode
great DIY, love the creation, and initiative you took to stand out from the rest. I'm a big fan of the cinnamon shade interiors. :thumbup:
wow
View original BBCode
wow
nice fkn interior and great fkn ls man!
View original BBCode
nice fkn interior and great fkn ls man!
I have been lurking this forum for a while, and this would be the first thing I feel the need to comment on.
That is DOPE man. Absolutely awesome job, I take my hat off to you for the incredible DIY talent you have.

Hope you dont mind me stealing the idea for the table you made in the rear.
View original BBCode
I have been lurking this forum for a while, and this would be the first thing I feel the need to comment on.
That is DOPE man. Absolutely awesome job, I take my hat off to you for the incredible DIY talent you have.
Hope you dont mind me stealing the idea for the table you made in the rear.
so freakin nice.
View original BBCode
so freakin nice.
Kouki Monster;387504 wrote:Hey dude for carpet get it soaked first then get a kiddy pool full of dye mix and soak wash soak works wonders when the carpet is already wet
I am Thinking about it since oem black carpet is tough to find...do you mean just soak the carpet in water and then dip it in the dye solution?
View original BBCode
[QUOTE=Kouki Monster;387504]Hey dude for carpet get it soaked first then get a kiddy pool full of dye mix and soak wash soak works wonders when the carpet is already wet[/QUOTE]

I am Thinking about it since oem black carpet is tough to find...do you mean just soak the carpet in water and then dip it in the dye solution?
Man that's a huge project to undertake. Mucho props for having that much patience. It looks unbelievable. The only thing I Would have done differently would be dying the rest of the tan pieces black. Sick Ls.
View original BBCode
Man that's a huge project to undertake. Mucho props for having that much patience. It looks unbelievable. The only thing I Would have done differently would be dying the rest of the tan pieces black. Sick Ls.
thank alot guys, still in process of looking for the OEM black carpet an door panels if I can find them (the door panels have black carpet on them also)...trying to avoid dying the carpet if possible...
View original BBCode
thank alot guys, still in process of looking for the OEM black carpet an door panels if I can find them (the door panels have black carpet on them also)...trying to avoid dying the carpet if possible...
yeah soak the carpet in pool, like seriously saturate it with water, then pull out, fill add dye, throw in. repeat til its perfecto
View original BBCode
yeah soak the carpet in pool, like seriously saturate it with water, then pull out, fill add dye, throw in. repeat til its perfecto
So freaking nice man. You inspire me to get cracking on mine now.
View original BBCode
So freaking nice man. You inspire me to get cracking on mine now.
Well you just sold me on doing this to my all black interior 430. Saddle leather door panel inserts and seats here I come!!
View original BBCode
Well you just sold me on doing this to my all black interior 430. Saddle leather door panel inserts and seats here I come!!
Nice that I can inspire some! I want to warn you guys, its alot of work-and WILL take tons of time and dedication. On another note, just purchased OEM black carpet and door panels :)
View original BBCode
Nice that I can inspire some! I want to warn you guys, its alot of work-and WILL take tons of time and dedication. On another note, just purchased OEM black carpet and door panels :)
great job. im a little confused on the door panels tho. i would think u would paint/wrap the remaining bottom portion as well
View original BBCode
great job. im a little confused on the door panels tho. i would think u would paint/wrap the remaining bottom portion as well
I want to do the entire panel but not until I got the carpet. This way it will flow better with the tan. I have the oem black carpet and door panels on the way now-should be in within a couple weeks for a more complete look ;)
View original BBCode
I want to do the entire panel but not until I got the carpet. This way it will flow better with the tan. I have the oem black carpet and door panels on the way now-should be in within a couple weeks for a more complete look ;)
Sick! if you look hard enough you always find what you are lookin for!
View original BBCode
Sick! if you look hard enough you always find what you are lookin for!
Do the seats still feel soft? The dye doesn't get hard like paint?
View original BBCode
Do the seats still feel soft? The dye doesn't get hard like paint?
mad props this shit is sick!! do work son
View original BBCode
mad props this shit is sick!! do work son
bob_sagat;388260 wrote:Do the seats still feel soft? The dye doesn't get hard like paint?
nope, just as soft as before...its actual leather dye so its stays very flexible.
View original BBCode
[QUOTE=bob_sagat;388260]Do the seats still feel soft? The dye doesn't get hard like paint?[/QUOTE]

nope, just as soft as before...its actual leather dye so its stays very flexible.
DAMN G! I jus went through this build thread for the first time. EPIC build thread! This belongs up there w/ the greats as far as build threads! Amazing work!

Test - Wear all white drive around in the heat and then share the results lol
View original BBCode
DAMN G! I jus went through this build thread for the first time. EPIC build thread! This belongs up there w/ the greats as far as build threads! Amazing work!
Test - Wear all white drive around in the heat and then share the results lol
lol
View original BBCode
lol
ok i got some more updates-not related to the cinnamon-but interior a bit...got wood?

This is house wood flooring that i cut, stained, and glossed for the trunk...
View original BBCode
ok i got some more updates-not related to the cinnamon-but interior a bit...got wood?
[IMG]http://i474.photobucket.com/albums/rr110/polobai/Lexus%20General%20pics/gotwood.jpg[/IMG]

This is house wood flooring that i cut, stained, and glossed for the trunk...
installed!

View original BBCode
installed!
[IMG]http://i474.photobucket.com/albums/rr110/polobai/Lexus%20General%20pics/remix51511wood.jpg[/IMG]
decided to add a second layer to my front table

View original BBCode
decided to add a second layer to my front table
[IMG]http://i474.photobucket.com/albums/rr110/polobai/Lexus%20General%20pics/tablesecondlayer.jpg[/IMG]
installed-the legs are acrylic-I will be illuminating these soon

View original BBCode
installed-the legs are acrylic-I will be illuminating these soon
[IMG]http://i474.photobucket.com/albums/rr110/polobai/Lexus%20General%20pics/champagne.jpg[/IMG]
another angle

View original BBCode
another angle
[IMG]http://i474.photobucket.com/albums/rr110/polobai/Lexus%20General%20pics/remix51511interior.jpg[/IMG]
water bottles in the rear console-will be illuminating as well :) I will post pics up of the front JP neckpads and hip pads soon...

View original BBCode
water bottles in the rear console-will be illuminating as well :)  I will post pics up of the front JP neckpads and hip pads soon...

[IMG]http://i474.photobucket.com/albums/rr110/polobai/Lexus%20General%20pics/water.jpg[/IMG]
PANCAKES!;388701 wrote:DAMN G! I jus went through this build thread for the first time. EPIC build thread! This belongs up there w/ the greats as far as build threads! Amazing work!
Test - Wear all white drive around in the heat and then share the results lol
Thanks-as far as the test goes-already done (well white tee and light shorts)...nothing comes off :) Plus I "got comfy" in the back seats with no issues :giggity:
View original BBCode
[QUOTE=PANCAKES!;388701]DAMN G! I jus went through this build thread for the first time. EPIC build thread! This belongs up there w/ the greats as far as build threads! Amazing work!

Test - Wear all white drive around in the heat and then share the results lol[/QUOTE]

Thanks-as far as the test goes-already done (well white tee and light shorts)...nothing comes off :)  Plus I "got comfy" in the back seats with no issues :giggity:
:biggthumpup::eek5h5:
View original BBCode
:biggthumpup::eek5h5:
ok so i'm like stupid jealous of your interior / trunk setup.... thanks for making me spend more money
View original BBCode
ok so i'm like stupid jealous of your interior / trunk setup.... thanks for making me spend more money
saw this car up close at the Remix event this past Saturday in FL.

I must say, the interior looks just as good in person. and the trunk as well. lots of attention to detail.
View original BBCode
saw this car up close at the Remix event this past Saturday in FL.
I must say, the interior looks just as good in person. and the trunk as well. lots of attention to detail.
im so jealous. wanna come over here and do my car too? i want black/cinnamon!
View original BBCode
im so jealous. wanna come over here and do my car too? i want black/cinnamon!
Lol thanks guys! I can't wait to get the new carpet and lower half of the door panels in!!!
View original BBCode
Lol thanks guys! I can't wait to get the new carpet and lower half of the door panels in!!!
NET;388876 wrote:saw this car up close at the Remix event this past Saturday in FL.
I must say, the interior looks just as good in person. and the trunk as well. lots of attention to detail.
Thanks boss-I didn't see your sc there? I took "hottest VIP" at that show, I was surprised!
View original BBCode
[QUOTE=NET;388876]saw this car up close at the Remix event this past Saturday in FL.

I must say, the interior looks just as good in person. and the trunk as well. lots of attention to detail.[/QUOTE]


Thanks boss-I didn't see your sc there?  I took "hottest VIP" at that show, I was surprised!
ok, so its been a while since I updated this-the cinnamon is holding up great so far! I have made a few roadtrips and put over 2k miles on the car since back together-so its good to go! Here are some night pics of my tables/bottles all lite up :) I used LED strips mounted under them with a 9 volt battery to power them and a separate switch all built into the tables. This way I can remove the tables without having to worry about any wiring still attached to the car, etc.

View original BBCode
ok, so its been a while since I updated this-the cinnamon is holding up great so far!  I have made a few roadtrips and put over 2k miles on the car since back together-so its good to go!  Here are some night pics of my tables/bottles all lite up :)  I used LED strips mounted under them with a 9 volt battery to power them and a separate switch all built into the tables.  This way I can remove the tables without having to worry about any wiring still attached to the car, etc.

[IMG]http://i474.photobucket.com/albums/rr110/polobai/Lexus%20General%20pics/tableshots005.jpg[/IMG]
Lights on!

View original BBCode
Lights on!
[IMG]http://i474.photobucket.com/albums/rr110/polobai/Lexus%20General%20pics/tableshots010.jpg[/IMG]
center console and rear armrest with h20 bottles

View original BBCode
center console and rear armrest with h20 bottles
[IMG]http://i474.photobucket.com/albums/rr110/polobai/Lexus%20General%20pics/tableshots006.jpg[/IMG]
Lights on!

View original BBCode
Lights on!
[IMG]http://i474.photobucket.com/albums/rr110/polobai/Lexus%20General%20pics/tableshots003.jpg[/IMG]
a more clear one of the front table with the lights on

View original BBCode
a more clear one of the front table with the lights on

[IMG]http://i474.photobucket.com/albums/rr110/polobai/Lexus%20General%20pics/tableshots001.jpg[/IMG]
View original BBCode
[IMG]http://i474.photobucket.com/albums/rr110/polobai/Lexus%20General%20pics/tableshots005.jpg[/IMG]
hot! love it
View original BBCode
hot! love it
Looks amazing was wondering if the dye has faded at all was thinking maybe dye my dash black.
View original BBCode
Looks amazing was wondering if the dye has faded at all was thinking maybe dye my dash black.
Wow.... I want to do this for a winter project ahaha
View original BBCode
Wow.... I want to do this for a winter project ahaha
This is just ridiculous. Mad props to you man. came out freaking awesome
View original BBCode
This is just ridiculous. Mad props to you man. came out freaking awesome
Can't believe I missed this. Love it!
View original BBCode
Can't believe I missed this. Love it!
nice work
View original BBCode
nice work
Awesome job! Liked the color combo of cinnamon, black and bone/tan
View original BBCode
Awesome job! Liked the color combo of cinnamon, black and bone/tan
i love this car.
View original BBCode
i love this car.
your car looks bad ass and great job on the interior
View original BBCode
your car looks bad ass and great job on the interior
i think its the first time i've seen that color looks amazing. also awesome progress pics
View original BBCode
i think its the first time i've seen that color looks amazing. also awesome progress pics
The rear arm rest is clean yo ...
View original BBCode
The rear arm rest is clean yo ...
polobai;392291 wrote:a more clear one of the front table with the lights on
Well done sir....
View original BBCode
[QUOTE=polobai;392291]a more clear one of the front table with the lights on

[IMG]http://i474.photobucket.com/albums/rr110/polobai/Lexus%20General%20pics/tableshots001.jpg[/IMG][/QUOTE]

Well done sir....
Nice work but I really think you should have done black carpet and dyed the bottom half of the door black also
View original BBCode
Nice work but I really think you should have done black carpet and dyed the bottom half of the door black also
Nice job.....never got into the whole bottle/glass thing....
View original BBCode
Nice job.....never got into the whole bottle/glass thing....
polobai;392286 wrote:Lights on!
Pretty damn fly sir.. Nice job!
View original BBCode
[QUOTE=polobai;392286]Lights on!
[IMG]http://i474.photobucket.com/albums/rr110/polobai/Lexus%20General%20pics/tableshots010.jpg[/IMG][/QUOTE]

Pretty damn fly sir.. Nice job!
man i'm late as hell on this build... but man damn thats good work. well done sir. that color looks great.
View original BBCode
man i'm late as hell on this build... but man damn thats good work. well done sir. that color looks great.
awesome conversion
View original BBCode
awesome conversion
Dudé what material whats use for the suade? that thing looks dark as hell awesome. Please send me a link for some information on where you got it
View original BBCode
Dudé what material whats use for the suade? that thing looks dark as hell awesome. Please send me a link for some information on where you got it
what did you use for the black dye? looks good!
View original BBCode
what did you use for the black dye? looks good!
So you spray painted your seats and used cheap ass jo annes fabric microsuede? Not exactly illest as the cheesy sticker implies

Sent from my SAMSUNG-SGH-I717 using Tapatalk 2
View original BBCode
So you spray painted your seats and used cheap ass jo annes fabric microsuede? Not exactly illest as the cheesy sticker implies
Sent from my SAMSUNG-SGH-I717 using Tapatalk 2
visitor;464919 wrote:So you spray painted your seats and used cheap ass jo annes fabric microsuede? Not exactly illest as the cheesy sticker implies
Sent from my SAMSUNG-SGH-I717 using Tapatalk 2
This guy has no idea... Man read the thread before you go bashing builds
Sent from my SAMSUNG-SGH-I747 using Tapatalk 2
View original BBCode
[QUOTE=visitor;464919]So you spray painted your seats and used cheap ass jo annes fabric microsuede? Not exactly illest as the cheesy sticker implies

Sent from my SAMSUNG-SGH-I717 using Tapatalk 2[/QUOTE]

This guy has no idea... Man read the thread before you go bashing builds

Sent from my SAMSUNG-SGH-I747 using Tapatalk 2
U R focused

very nice work
View original BBCode
U R focused
very nice work
i admire your workman ship, it turned out very nice. as some others said and i agree that you should have dyed the carpet and the bottom of the doors black as well as the headliner and upper panels just to continue with the black and cinamon theme.. and uuh wheneva u ready to take on another interior i got a car for u lol
View original BBCode
i admire your workman ship, it turned out very nice. as some others said and i agree that you should have dyed the carpet and the bottom of the doors black as well as the headliner and upper panels just to continue with the black and cinamon theme.. and uuh wheneva u ready to take on another interior i got a car for u lol
SumYungM35;464952 wrote:This guy has no idea... Man read the thread before you go bashing builds
Sent from my SAMSUNG-SGH-I747 using Tapatalk 2
Im well aware of what he did. Exactly what i said.
Sent from my SAMSUNG-SGH-I717 using Tapatalk 2
View original BBCode
[QUOTE=SumYungM35;464952]This guy has no idea... Man read the thread before you go bashing builds

Sent from my SAMSUNG-SGH-I747 using Tapatalk 2[/QUOTE]

Im well aware of what he did. Exactly what i said.

Sent from my SAMSUNG-SGH-I717 using Tapatalk 2
damn came out clean..makes me want to dye my interior black on my y33
View original BBCode
damn came out clean..makes me want to dye my interior black on my y33


