My Fiberglass DIY endeavor- bumper repair
So I have embarked on this journey to learn a bit about kit repair and building. I started with a pre-hacked custom kit, ChargeSpeed from Japan. The standard bB fogs were replaced by previous owner with Fabulous fog housings. The kit was beat to shit by the previous owner. I don't know if he was on coils or what, but he didn't drive right. This kit will be going on my xB and I am on air. After measuring, the kit extends about 2" lower than the stock lip kit. Here are some pics:
The day I got it:

Rear mock up(sorry for the crude pic):

More mock ups:


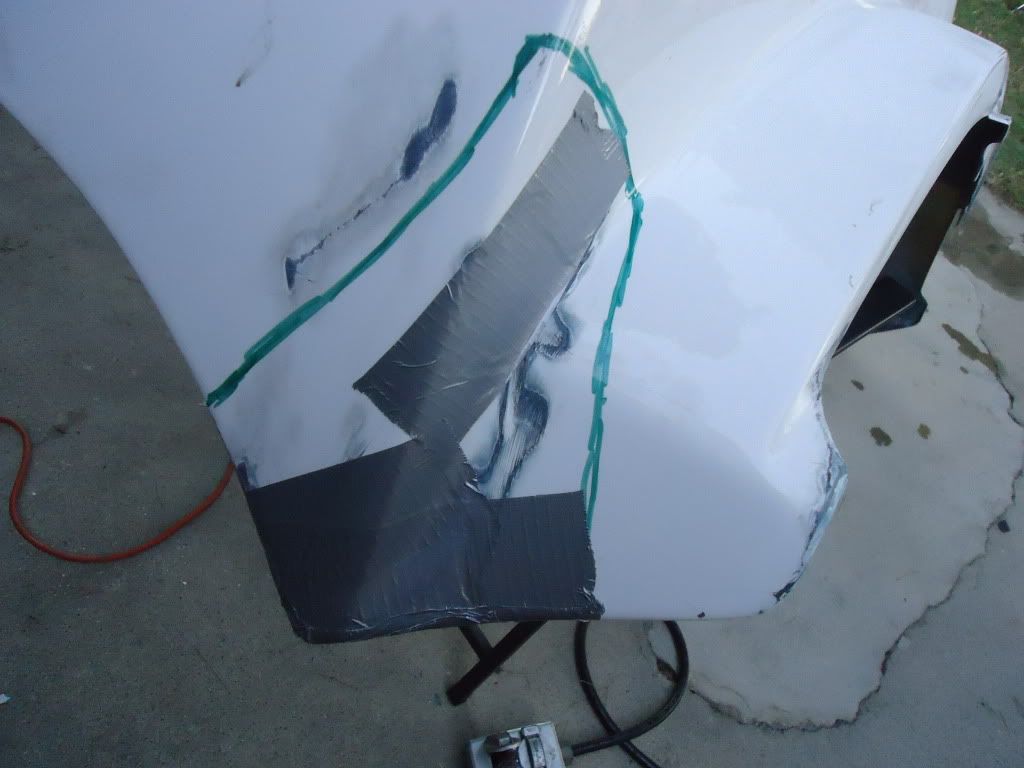
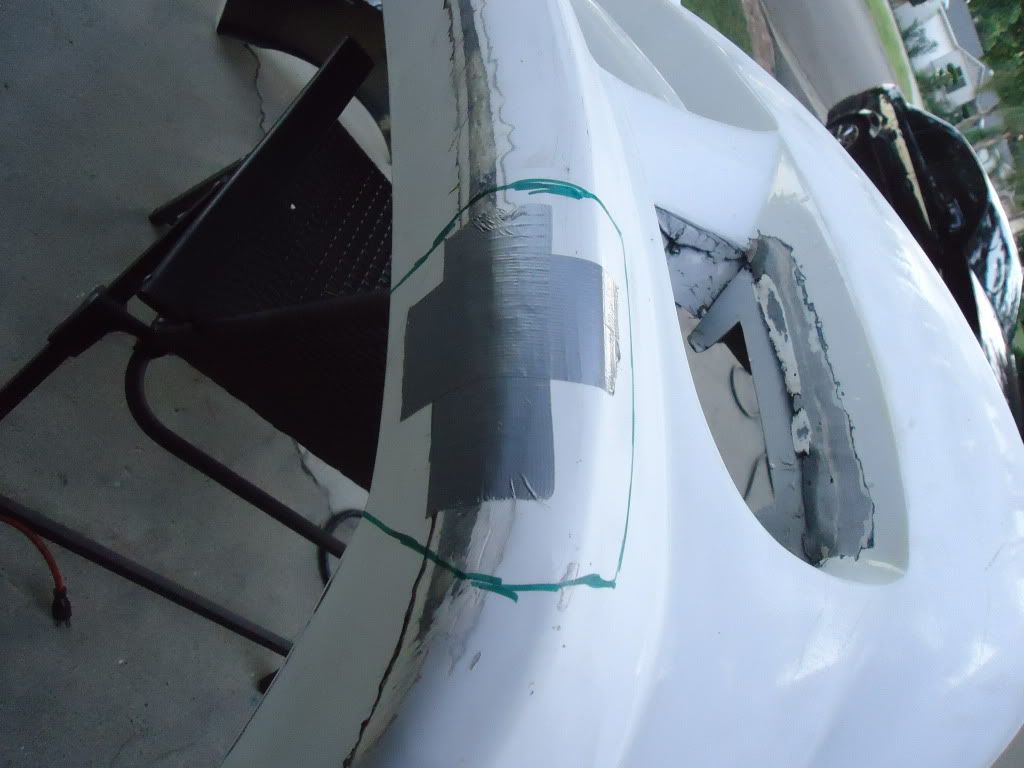
Damage:


Basically, there are four areas of concern: 2 along the bottom(of minor importance aside from structural support) and 2 along the top egdes(MAJOR concern as this is where the fender meets the kit...completely visable).
Overall areas to be worked on:

View original BBCode
So I have embarked on this journey to learn a bit about kit repair and building.  I started with a pre-hacked custom kit, ChargeSpeed from Japan.  The standard bB fogs were replaced by previous owner with Fabulous fog housings.  The kit was beat to shit by the previous owner.  I don't know if he was on coils or what, but he didn't drive right.  This kit will be going on my xB and I am on air.  After measuring, the kit extends about 2" lower than the stock lip kit.  Here are some pics:

The day I got it:
[IMG]http://i246.photobucket.com/albums/gg111/szell001/Chargespeed/Picture-076.jpg[/IMG]

Rear mock up(sorry for the crude pic):
[IMG]http://i246.photobucket.com/albums/gg111/szell001/Chargespeed/025-1.jpg[/IMG]

More mock ups:
[IMG]http://i246.photobucket.com/albums/gg111/szell001/Kit%20flow/056.jpg[/IMG]
[IMG]http://i246.photobucket.com/albums/gg111/szell001/Kit%20flow/057.jpg[/IMG]
[IMG]http://i246.photobucket.com/albums/gg111/szell001/Kit%20flow/052.jpg[/IMG]

Damage:
[IMG]http://i246.photobucket.com/albums/gg111/szell001/Kit%20flow/DSC01424.jpg[/IMG]
[IMG]http://i246.photobucket.com/albums/gg111/szell001/Kit%20flow/DSC01423.jpg[/IMG]
[IMG]http://i246.photobucket.com/albums/gg111/szell001/Kit%20flow/DSC01421.jpg[/IMG]
[IMG]http://i246.photobucket.com/albums/gg111/szell001/Kit%20flow/DSC01428.jpg[/IMG]

Basically, there are four areas of concern: 2 along the bottom(of minor importance aside from structural support) and 2 along the top egdes(MAJOR concern as this is where the fender meets the kit...completely visable).

Overall areas to be worked on:
[IMG]http://i246.photobucket.com/albums/gg111/szell001/Kit%20flow/DSC01431.jpg[/IMG]
View original BBCode
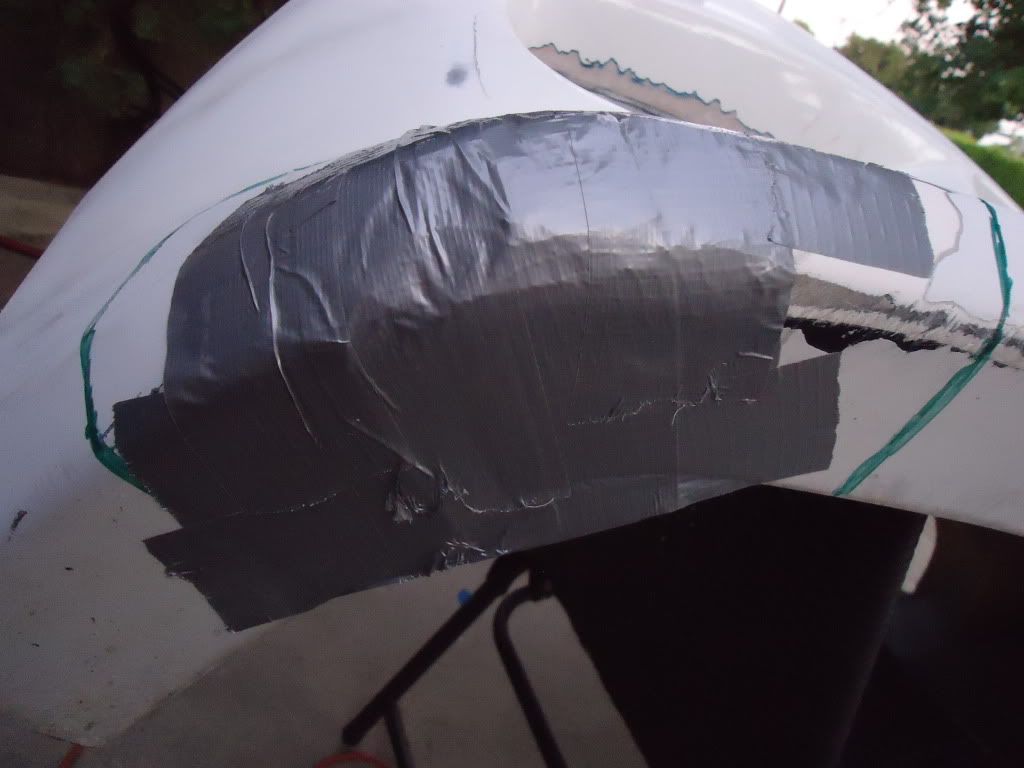
I started with the bottom portion to both gain support and a bit of experience.  I placed duct tape over the areas where material was either fragile or missing altogether.  This created a structure so I could make a mold for general shaping.  Any details can later be taken care of with fiberglass filler and kitty hair.

[IMG]http://i246.photobucket.com/albums/gg111/szell001/Kit%20flow/DSC01426.jpg[/IMG]
[IMG]http://i246.photobucket.com/albums/gg111/szell001/Kit%20flow/DSC01427.jpg[/IMG]
[IMG]http://i246.photobucket.com/albums/gg111/szell001/Kit%20flow/DSC01429.jpg[/IMG]

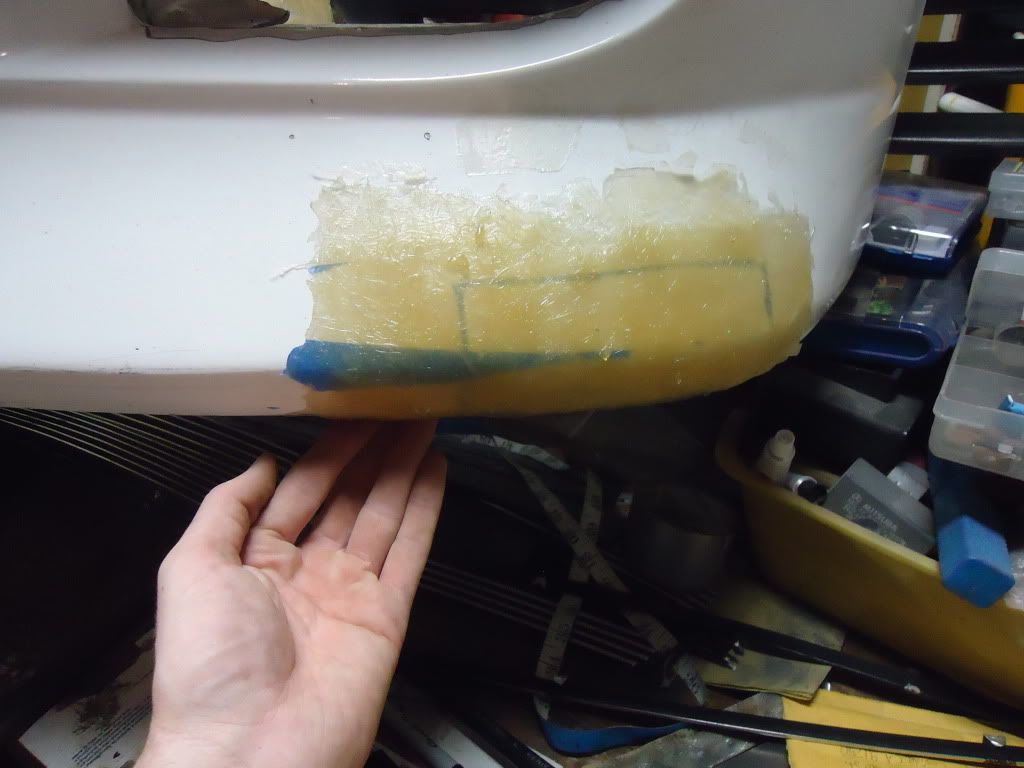
I then placed 2-3 layers of blue 3M painter's tape over the duct taped sections.  This will act as gel coat for the removal of the molds.  Then I made molds by brushing resin over the taped areas and layering FG on top of that.

[IMG]http://i246.photobucket.com/albums/gg111/szell001/DSC01444.jpg[/IMG]
[IMG]http://i246.photobucket.com/albums/gg111/szell001/DSC01441.jpg[/IMG]
[IMG]http://i246.photobucket.com/albums/gg111/szell001/DSC01443.jpg[/IMG]


I sectioned out all of the areas of concern as those will no longer be usable:
[IMG]http://i246.photobucket.com/albums/gg111/szell001/fg%20work/DSC_0654.jpg[/IMG]

The molds are lined with a new 2-3 layers of 3M painters tape, sticky side sticks to the inside of the mold, again to act as gel coat.

I then used the molds that fit on the areas and lined them up as best as possible.  I drilled through the mold and the body kit and placed a sheet metal screw into the hole.  This creates a firm bond and helps maintain structure so there is minimal flexing while bending the kit.  (Sorry no pics of this process yet)

Glassed and with molds removed:
[IMG]http://i246.photobucket.com/albums/gg111/szell001/fg%20work/DSC_0637.jpg[/IMG]
[IMG]http://i246.photobucket.com/albums/gg111/szell001/fg%20work/DSC_0639.jpg[/IMG]
[IMG]http://i246.photobucket.com/albums/gg111/szell001/fg%20work/DSC_0644.jpg[/IMG]
[IMG]http://i246.photobucket.com/albums/gg111/szell001/fg%20work/DSC_0643.jpg[/IMG]
[IMG]http://i246.photobucket.com/albums/gg111/szell001/fg%20work/DSC_0649.jpg[/IMG]
[IMG]http://i246.photobucket.com/albums/gg111/szell001/fg%20work/DSC_0650.jpg[/IMG]
[IMG]http://i246.photobucket.com/albums/gg111/szell001/fg%20work/DSC_0651.jpg[/IMG]
Here's where I am running into some trouble...the corners of the kit are going to be a bitch. The driver's side has been sectioned and is ready to fill, but you can tell from the pics, there is some foundation material missing which will make the section shorter. I don't want this to effect the curve of the kit so later on it won't line up with the fender.


And for the passenger side, the FG is split, but in layers.


I guess I need some advice from anyone that has done this sort of thing before. What can I use for support on the side with missing material to insure that it is structurally sound and aesthetically pleasing once glassed? Do I have to bolt it up to the car and secure it that way?
as for the layered section...I can't just fill the sections with resin and let it sit right? Do I junk the whole edge and begin anew, or do I keep as much of the available material and work around that?
Thanks in advance!
View original BBCode
Here's where I am running into some trouble...the corners of the kit are going to be a bitch.  The driver's side has been sectioned and is ready to fill, but you can tell from the pics, there is some foundation material missing which will make the section shorter.  I don't want this to effect the curve of the kit so later on it won't line up with the fender.

[IMG]http://i246.photobucket.com/albums/gg111/szell001/fg%20work/DSC_0654.jpg[/IMG]
[IMG]http://i246.photobucket.com/albums/gg111/szell001/fg%20work/DSC_0657.jpg[/IMG]

And for the passenger side, the FG is split, but in layers.
[IMG]http://i246.photobucket.com/albums/gg111/szell001/fg%20work/DSC_0659.jpg[/IMG]
[IMG]http://i246.photobucket.com/albums/gg111/szell001/fg%20work/DSC_0660.jpg[/IMG]
[IMG]http://i246.photobucket.com/albums/gg111/szell001/fg%20work/DSC_0662.jpg[/IMG]

I guess I need some advice from anyone that has done this sort of thing before.  What can I use for support on the side with missing material to insure that it is structurally sound and aesthetically pleasing once glassed?  Do I have to bolt it up to the car and secure it that way?

as for the layered section...I can't just fill the sections with resin and let it sit right?   Do I junk the whole edge and begin anew, or do I keep as much of the available material and work around that?

Thanks in advance!
Damn did one hell of a job so far.. Don't know much about bumper repairs though :(
View original BBCode
Damn did one hell of a job so far.. Don't know much about bumper repairs though :(
Here is an update. I didn't really get any help, so I decided just to go for it. I posted some pics of the process that I use and how it works sorta. Let me know what you guys think:

The back covered with 3M tape.

Shortened screws in the areas where FG will be covering it. Dremeled off the tip and ground it down flush:

Small hole repaired as well:

Back glassed:

Piece unscrewed and removed mold:

edge lined up:

Let me know what you guys think! I will tackle the other corner tomorrow probably.
View original BBCode
Here is an update. I didn't really get any help, so I decided just to go for it. I posted some pics of the process that I use and how it works sorta. Let me know what you guys think:

[IMG]http://i246.photobucket.com/albums/gg111/szell001/fg%20work/DSC_0664-1.jpg[/IMG]
The back covered with 3M tape.
[IMG]http://i246.photobucket.com/albums/gg111/szell001/fg%20work/DSC_0663.jpg[/IMG]


Shortened screws in the areas where FG will be covering it. Dremeled off the tip and ground it down flush:

[IMG]http://i246.photobucket.com/albums/gg111/szell001/fg%20work/DSC_0667.jpg[/IMG]

Small hole repaired as well:
[IMG]http://i246.photobucket.com/albums/gg111/szell001/fg%20work/DSC_0669.jpg[/IMG]

Back glassed:
[IMG]http://i246.photobucket.com/albums/gg111/szell001/fg%20work/DSC_0671.jpg[/IMG]

Piece unscrewed and removed mold:

[IMG]http://i246.photobucket.com/albums/gg111/szell001/fg%20work/DSC_0673.jpg[/IMG]

edge lined up:
[IMG]http://i246.photobucket.com/albums/gg111/szell001/fg%20work/DSC_0688.jpg[/IMG]

Let me know what you guys think!  I will tackle the other corner tomorrow probably.
looks good. you could save yourself a lot of time i bet by skipping the mold step and just reenforcing the damage directly from the backside (fiberglass filler for shape). for areas that could potentially change the shape i like to bolt the bumper on and i've found foil tape gives you the most structure to build off.
View original BBCode
looks good. you could save yourself a lot of time i bet by skipping the mold step and just reenforcing the damage directly from the backside (fiberglass filler for shape). for areas that could potentially change the shape i like to bolt the bumper on and i've found foil tape gives you the most structure to build off.
Yep I agree. Looking good tho. Nice work.

 Foil tape. Nice suggestion. I will have to try that next time.
View original BBCode
Yep I agree. Looking good tho. Nice work.
Foil tape. Nice suggestion. I will have to try that next time.
:biggthumpup:nice thread...I am taking notes since I just cracked my side skirts earlier today haha
View original BBCode
:biggthumpup:nice thread...I am taking notes since I just cracked my side skirts earlier today haha
LowNdSlow;410948 wrote::biggthumpup:nice thread...I am taking notes since I just cracked my side skirts earlier today haha
Sorry to hear about the whip. Hopefully I can help:thumbsup:
westsype;410859 wrote:Yep I agree. Looking good tho. Nice work.
Foil tape. Nice suggestion. I will have to try that next time.
Thanks man.
OG;410742 wrote:looks good. you could save yourself a lot of time i bet by skipping the mold step and just reenforcing the damage directly from the backside (fiberglass filler for shape). for areas that could potentially change the shape i like to bolt the bumper on and i've found foil tape gives you the most structure to build off.
I agree with most of what you said. For the typical repair, I think glassing the back would be fine. The problem is I found this today:


What I'm left with:


Now for most of the missing material, backing the open space with something would work just fine(previous 3 holes). When I was sectioning out the bad areas today I found 2 things:
1.a lot of the shaping was filler that would need to be taken off anyway
and
2. there were multiple layers from previous "repair" that offered little support and were crumbling under mild pressure.
Simply backing over these areas would not creat anything more than more problems. The stuff would probably hold for a couple of months, but once it was exposed to elements, I would be in the same situation. For this specific case, I am very glad I made the mold...especially since there is no longer any existing material from which to build. Hell, making all 4 molds made having the ONE I needed worth the time spent. I think that's why I made molds in the first place. Wishful thinking on my part maybe...but glad I have this one nonetheless.
I am glad everything is out now tho. The parts that have been fixed makes the entire bumper a lot more stable. The previous area were shattered in layers and although it remained intact, it was very unstable and not suitable for paint. I will finish up the corner and buy some fiberglass filler this week and start shaping the outside. I might even fuck with some kitty hair. Trying to keep as much bondo out as possible.
View original BBCode
[QUOTE=LowNdSlow;410948]:biggthumpup:nice thread...I am taking notes since I just cracked my side skirts earlier today haha[/QUOTE]

Sorry to hear about the whip.  Hopefully I can help:thumbsup:

[QUOTE=westsype;410859]Yep I agree. Looking good tho. Nice work.

Foil tape. Nice suggestion. I will have to try that next time.[/QUOTE]

Thanks man.

[QUOTE=OG;410742]looks good. you could save yourself a lot of time i bet by skipping the mold step and just reenforcing the damage directly from the backside (fiberglass filler for shape). for areas that could potentially change the shape i like to bolt the bumper on and i've found foil tape gives you the most structure to build off.[/QUOTE]

I agree with most of what you said.  For the typical repair, I think glassing the back would be fine.  The problem is I found this today:

[IMG]http://i246.photobucket.com/albums/gg111/szell001/fg%20work/DSC_0690.jpg[/IMG]
[IMG]http://i246.photobucket.com/albums/gg111/szell001/fg%20work/DSC_0692.jpg[/IMG]
[IMG]http://i246.photobucket.com/albums/gg111/szell001/fg%20work/DSC_0694.jpg[/IMG]
[IMG]http://i246.photobucket.com/albums/gg111/szell001/fg%20work/DSC_0700.jpg[/IMG]
[IMG]http://i246.photobucket.com/albums/gg111/szell001/fg%20work/DSC_0699.jpg[/IMG]
[IMG]http://i246.photobucket.com/albums/gg111/szell001/fg%20work/DSC_0702.jpg[/IMG]

What I'm left with:
[IMG]http://i246.photobucket.com/albums/gg111/szell001/fg%20work/DSC_0698.jpg[/IMG]
[IMG]http://i246.photobucket.com/albums/gg111/szell001/fg%20work/DSC_0703.jpg[/IMG]

Now for most of the missing material, backing the open space with something would work just fine(previous 3 holes).  When I was sectioning out the bad areas today I found 2 things:
1.a lot of the shaping was filler that would need to be taken off anyway
and
2. there were multiple layers from previous "repair" that offered little support and were crumbling under mild pressure.

Simply backing over these areas would not creat anything more than more problems.  The stuff would probably hold for a couple of months, but once it was exposed to elements, I would be in the same situation.  For this specific case, I am very glad I made the mold...especially since there is no longer any existing material from which to build.  Hell, making all 4 molds made having the ONE I needed worth the time spent.  I think that's why I made molds in the first place.  Wishful thinking on my part maybe...but glad I have this one nonetheless.

I am glad everything is out now tho.  The parts that have been fixed makes the entire bumper a lot more stable.  The previous area were shattered in layers and although it remained intact, it was very unstable and not suitable for paint.  I will finish up the corner and buy some fiberglass filler this week and start shaping the outside.  I might even fuck with some kitty hair.  Trying to keep as much bondo out as possible.
yeah, no point in repairing a bad repair. good call on that part.
View original BBCode
yeah, no point in repairing a bad repair. good call on that part.
I did some more work today and got a lot done. I will need to finish the surface, but the main foundation is there now and I am more than half done I suppose:
I took the old piece that still fit really well and I screwed it to the kit to help align the mold:

Mold aligned:

I then removed the dead arm and fully secured the mold using screws and then shaved em. Glass done with mold still in place:

About 5 layers deep:

Mold removed after resin was tacky:


Edge comparison(obviously work needs to be done, but you get it):


I will be shaving the outside down as there is a bit of extra resin. I am going to glass a single layer on the outside, smooth, and then use fiber filler. Then primer, then paint.
View original BBCode
I did some more work today and got a lot done.  I will need to finish the surface, but the main foundation is there now and I am more than half done I suppose:

I took the old piece that still fit really well and I screwed it to the kit to help align the mold:
[IMG]http://i246.photobucket.com/albums/gg111/szell001/fg%20work/DSC_0707.jpg[/IMG]

Mold aligned:
[IMG]http://i246.photobucket.com/albums/gg111/szell001/fg%20work/DSC_0708.jpg[/IMG]

I then removed the dead arm and fully secured the mold using screws and then shaved em.  Glass done with mold still in place:
[IMG]http://i246.photobucket.com/albums/gg111/szell001/fg%20work/DSC_0710.jpg[/IMG]

About 5 layers deep:
[IMG]http://i246.photobucket.com/albums/gg111/szell001/fg%20work/DSC_0712.jpg[/IMG]

Mold removed after resin was tacky:
[IMG]http://i246.photobucket.com/albums/gg111/szell001/fg%20work/DSC_0713.jpg[/IMG]
[IMG]http://i246.photobucket.com/albums/gg111/szell001/fg%20work/DSC_0715.jpg[/IMG]
[IMG]http://i246.photobucket.com/albums/gg111/szell001/fg%20work/DSC_0719.jpg[/IMG]
[IMG]http://i246.photobucket.com/albums/gg111/szell001/fg%20work/DSC_0722.jpg[/IMG]


Edge comparison(obviously work needs to be done, but you get it):
[IMG]http://i246.photobucket.com/albums/gg111/szell001/fg%20work/DSC_0723.jpg[/IMG]
[IMG]http://i246.photobucket.com/albums/gg111/szell001/fg%20work/DSC_0724.jpg[/IMG]

I will be shaving the outside down as there is a bit of extra resin.  I am going to glass a single layer on the outside, smooth, and then use fiber filler.  Then primer, then paint.
Good thinking and approach. I will try your technique and OG's foil tape suggestion on my bumper.
View original BBCode
Good thinking and approach. I will try your technique and OG's foil tape suggestion on my bumper.
View original BBCode
Thanks guys. Here are some updates from my progress today. I sanded a bit, found some holes, filled some stuff....I am really pleased with how this is progressing. Let me know your thoughts.

[IMG]http://i246.photobucket.com/albums/gg111/szell001/fg%20work/DSC_0725.jpg[/IMG]
[IMG]http://i246.photobucket.com/albums/gg111/szell001/fg%20work/DSC_0726.jpg[/IMG]
[IMG]http://i246.photobucket.com/albums/gg111/szell001/fg%20work/DSC_0729.jpg[/IMG]
[IMG]http://i246.photobucket.com/albums/gg111/szell001/fg%20work/DSC_0732.jpg[/IMG]
[IMG]http://i246.photobucket.com/albums/gg111/szell001/fg%20work/DSC_0731.jpg[/IMG]
[IMG]http://i246.photobucket.com/albums/gg111/szell001/fg%20work/DSC_0735.jpg[/IMG]
[IMG]http://i246.photobucket.com/albums/gg111/szell001/fg%20work/DSC_0734.jpg[/IMG]
[IMG]http://i246.photobucket.com/albums/gg111/szell001/fg%20work/DSC_0737.jpg[/IMG]
[IMG]http://i246.photobucket.com/albums/gg111/szell001/fg%20work/DSC_0739.jpg[/IMG]
[IMG]http://i246.photobucket.com/albums/gg111/szell001/fg%20work/DSC_0740.jpg[/IMG]
[IMG]http://i246.photobucket.com/albums/gg111/szell001/fg%20work/DSC_0741.jpg[/IMG]
[IMG]http://i246.photobucket.com/albums/gg111/szell001/fg%20work/DSC_0744.jpg[/IMG]
[IMG]http://i246.photobucket.com/albums/gg111/szell001/fg%20work/DSC_0751.jpg[/IMG]
[IMG]http://i246.photobucket.com/albums/gg111/szell001/fg%20work/DSC_0745.jpg[/IMG]
[IMG]http://i246.photobucket.com/albums/gg111/szell001/fg%20work/DSC_0752.jpg[/IMG]

I sanded most of the excess down and was able to smooth a lot out. Some parts of the kit were a little thin for my liking, so I decided to layer on the outside for some. I am going to sand/grind some more tomorrow, and then buy some fiber bondo filler and maker everything smooth.

I ran into a bit of a snag because there is some spider webbing I did not grind down earlier. Now that I have worked with the kit a bit, I can tell what I need to do now. There is some delamination under the cracked paint that took place during the injury to the kit. In some of the pics you can see the white fiberglass, that is the "dead" glass. That needs to be ground down so that it is not the weakest layer under the new paint. Then I am going to go over the areas with 1-2 layers of FG then smooth that. I think I will need about another week and I can send it to paint.
lots of work that will pay off!
View original BBCode
lots of work that will pay off!
OG;410742 wrote:looks good. you could save yourself a lot of time i bet by skipping the mold step and just reenforcing the damage directly from the backside (fiberglass filler for shape). for areas that could potentially change the shape i like to bolt the bumper on and i've found foil tape gives you the most structure to build off.
Yeah I thought so to about the molds. One other thing that's great with large section repairs is polyurethane foam, it's easy to work with and has a lot of structure.
View original BBCode
[QUOTE=OG;410742]looks good. you could save yourself a lot of time i bet by skipping the mold step and just reenforcing the damage directly from the backside (fiberglass filler for shape). for areas that could potentially change the shape i like to bolt the bumper on and i've found foil tape gives you the most structure to build off.[/QUOTE]
Yeah I thought so to about the molds. One other thing that's great with large section repairs is polyurethane foam, it's easy to work with and has a lot of structure.[FONT=Arial][SIZE=2][/SIZE][/FONT]
Did some more grinding and filling on the kit last night. I am going to pick up some fiber bondo body filler and hopefully get this thing into the final stages with weekend. Started on my FFF grille combo last night too. The previous owner had the JDM shaped eyelids chopped and had US lids added on. I will be reverting back to JDM:thelaw:


Can't wait till this shit is done lol. It is really coming along well and I am happy with the work. I used the same technique as I did with the kit on the grille. It looks solid.
View original BBCode
Did some more grinding and filling on the kit last night. I am going to pick up some fiber bondo body filler and hopefully get this thing into the final stages with weekend. Started on my FFF grille combo last night too. The previous owner had the JDM shaped eyelids chopped and had US lids added on. I will be reverting back to JDM:thelaw:

[IMG]http://i246.photobucket.com/albums/gg111/szell001/fg%20work/DSC_0753.jpg[/IMG]
[IMG]http://i246.photobucket.com/albums/gg111/szell001/fg%20work/DSC_0757.jpg[/IMG]

Can't wait till this shit is done lol. It is really coming along well and I am happy with the work. I used the same technique as I did with the kit on the grille. It looks solid.
nice! love the work. I am no master at fiberglass.. but you look like you know whats up
View original BBCode
nice! love the work. I am no master at fiberglass.. but you look like you know whats up
View original BBCode
Thanks man. I am not a pro, but I am able to tell it's coming out pretty good:biggthumpup:
[IMG]http://i246.photobucket.com/albums/gg111/szell001/fg%20work/th_DSC_0760.jpg[/IMG]
[IMG]http://i246.photobucket.com/albums/gg111/szell001/fg%20work/th_DSC_0761.jpg[/IMG]
[IMG]http://i246.photobucket.com/albums/gg111/szell001/fg%20work/th_DSC_0762.jpg[/IMG]

New glass:
[IMG]http://i246.photobucket.com/albums/gg111/szell001/fg%20work/th_DSC_0758.jpg[/IMG]
[IMG]http://i246.photobucket.com/albums/gg111/szell001/fg%20work/th_DSC_0759.jpg[/IMG]
[IMG]http://i246.photobucket.com/albums/gg111/szell001/fg%20work/th_DSC_0764.jpg[/IMG]

Will be shaping later today. I sandwhiched the driver's side so I am going to attempt to get the Grille/lid in one fell swoop.
Great work dude, this is impressive.
View original BBCode
Great work dude, this is impressive.
View original BBCode
^thanks dewd.  This grille is 99% done.  Just needs filler and primer.  The glass is so smooth it could almost be painted directly on the surface...

[IMG]http://i246.photobucket.com/albums/gg111/szell001/fg%20work/DSC_0776.jpg[/IMG]
[IMG]http://i246.photobucket.com/albums/gg111/szell001/fg%20work/DSC_0775.jpg[/IMG]
[IMG]http://i246.photobucket.com/albums/gg111/szell001/fg%20work/DSC_0781.jpg[/IMG]
[IMG]http://i246.photobucket.com/albums/gg111/szell001/fg%20work/DSC_0782.jpg[/IMG]


I filled the holes and glassed over the meeting point on the pass side.  I am going to grind some off tomorrow, apply the filler and smooth everything perfect.  I will finish up the bumper too.
Nice work
View original BBCode
Nice work
Great job (- -)b
View original BBCode
Great job (- -)b
Nice work,

Personally i would have also cut out all the loose pieces of glass and all the deteriorated pieces bc resin doesnt like to hold that kind of things together bc of all the air pockets.

also good job on the mold. I would have done it a little differently but none the less it came out good.

the one thing that I always do with any type of non metal repair is to bevel the outside layer of the repair area. if its a straight cut, the filler and or resin could end up shrinking just a little bit and showing a shadow/line/or repair edge through your paint. for all the imperfections such as air bubbles i use fibertech then filler.

shoots
View original BBCode
Nice work,
Personally i would have also cut out all the loose pieces of glass and all the deteriorated pieces bc resin doesnt like to hold that kind of things together bc of all the air pockets.
also good job on the mold. I would have done it a little differently but none the less it came out good.
the one thing that I always do with any type of non metal repair is to bevel the outside layer of the repair area. if its a straight cut, the filler and or resin could end up shrinking just a little bit and showing a shadow/line/or repair edge through your paint. for all the imperfections such as air bubbles i use fibertech then filler.
shoots
^Thanks man. I just bought a bunch of stuff: Fiber bondo, glazing putty, and bondo primer. I am hoping to get this thing going soon. They threw a bunch of extra work at us at the job so day have been long. Sorry for lagging guys! The weather isnt helping much either. I'll be back up here in a couple.
View original BBCode
^Thanks man. I just bought a bunch of stuff: Fiber bondo, glazing putty, and bondo primer. I am hoping to get this thing going soon. They threw a bunch of extra work at us at the job so day have been long. Sorry for lagging guys! The weather isnt helping much either. I'll be back up here in a couple.
View original BBCode
Updates.

[IMG]http://i246.photobucket.com/albums/gg111/szell001/fg%20work/DSC_0966.jpg[/IMG]
[IMG]http://i246.photobucket.com/albums/gg111/szell001/fg%20work/DSC_0965.jpg[/IMG]
[IMG]http://i246.photobucket.com/albums/gg111/szell001/fg%20work/DSC_0942.jpg[/IMG]
[IMG]http://i246.photobucket.com/albums/gg111/szell001/fg%20work/DSC_0943.jpg[/IMG]
[IMG]http://i246.photobucket.com/albums/gg111/szell001/fg%20work/DSC_0944.jpg[/IMG]
[IMG]http://i246.photobucket.com/albums/gg111/szell001/fg%20work/DSC_0945.jpg[/IMG]
[IMG]http://i246.photobucket.com/albums/gg111/szell001/fg%20work/DSC_0946.jpg[/IMG]
[IMG]http://i246.photobucket.com/albums/gg111/szell001/fg%20work/DSC_0948.jpg[/IMG]
[IMG]http://i246.photobucket.com/albums/gg111/szell001/fg%20work/DSC_0951.jpg[/IMG]
[IMG]http://i246.photobucket.com/albums/gg111/szell001/fg%20work/DSC_0953.jpg[/IMG]
[IMG]http://i246.photobucket.com/albums/gg111/szell001/fg%20work/DSC_0955.jpg[/IMG]
[IMG]http://i246.photobucket.com/albums/gg111/szell001/fg%20work/DSC_0957.jpg[/IMG]
[IMG]http://i246.photobucket.com/albums/gg111/szell001/fg%20work/DSC_0958.jpg[/IMG]

Keep you guys posted on the rest of the progress in the next few days.
looking good man, when u prime it though add a little bit of bulldog adhesive promoter, that'll help it stick better to the fiberglass..
View original BBCode
looking good man, when u prime it though add a little bit of bulldog adhesive promoter, that'll help it stick better to the fiberglass..
kuWuPt;416374 wrote:looking good man, when u prime it though add a little bit of bulldog adhesive promoter, that'll help it stick better to the fiberglass..
Thanks a lot for that info. I will check it out.
Mudded:


I am going to even everything out and get started on the rest today.
View original BBCode
[QUOTE=kuWuPt;416374]looking good man, when u prime it though add a little bit of bulldog adhesive promoter, that'll help it stick better to the fiberglass..[/QUOTE]

Thanks a lot for that info.  I will check it out.

Mudded:

[IMG]http://i246.photobucket.com/albums/gg111/szell001/fg%20work/DSC_0967.jpg[/IMG]
[IMG]http://i246.photobucket.com/albums/gg111/szell001/fg%20work/DSC_0970.jpg[/IMG]

I am going to even everything out and get started on the rest today.
View original BBCode
More updates:

[IMG]http://i246.photobucket.com/albums/gg111/szell001/fg%20work/DSC_0971.jpg[/IMG]
[IMG]http://i246.photobucket.com/albums/gg111/szell001/fg%20work/DSC_0973.jpg[/IMG]
[IMG]http://i246.photobucket.com/albums/gg111/szell001/fg%20work/DSC_0975.jpg[/IMG]
[IMG]http://i246.photobucket.com/albums/gg111/szell001/fg%20work/DSC_0977.jpg[/IMG]
[IMG]http://i246.photobucket.com/albums/gg111/szell001/fg%20work/DSC_0978.jpg[/IMG]
[IMG]http://i246.photobucket.com/albums/gg111/szell001/fg%20work/DSC_0982.jpg[/IMG]
[IMG]http://i246.photobucket.com/albums/gg111/szell001/fg%20work/DSC_0983.jpg[/IMG]
[IMG]http://i246.photobucket.com/albums/gg111/szell001/fg%20work/DSC_0985.jpg[/IMG]
[IMG]http://i246.photobucket.com/albums/gg111/szell001/fg%20work/DSC_0987.jpg[/IMG]
It's getting there, just "a few" holes/lines left :biggthumpup:
I know how much work is needed in this 'cuz I've done it a few times. Just be patient enough to finish it up right... 'coz those little imperfections are what will eat at you =)
View original BBCode
It's getting there, just "a few" holes/lines left :biggthumpup:
I know how much work is needed in this 'cuz I've done it a few times. Just be patient enough to finish it up right... 'coz those little imperfections are what will eat at you =)
once done. make a mold of the bumpers haha
View original BBCode
once done. make a mold of the bumpers haha
Great work so far. I've done work like this before so I can appreciate the time you are spending on it. I know you are bagged so this wont be aproblem for you but something I've done to really help strengthen bumpers I've worked on especially if they are cars slammed without air is fiberglassing in some rope on the backside of bottom front edge of the bumper. It acts like a backbone if done right and makes the front solid and harder to break. Also sanding done before your glass or bondo fully dries saves you a lot of time as well since grinding and sanding are so time consuming.
View original BBCode
Great work so far. I've done work like this before so I can appreciate the time you are spending on it. I know you are bagged so this wont be aproblem for you but something I've done to really help strengthen bumpers I've worked on especially if they are cars slammed without air is fiberglassing in some rope on the backside of bottom front edge of the bumper. It acts like a backbone if done right and makes the front solid and harder to break. Also sanding done before your glass or bondo fully dries saves you a lot of time as well since grinding and sanding are so time consuming.
View original BBCode
Thanks guys!  I am trying to be patient lol.  I am actually only using the following tools:
-Dremel with cut off wheel and grinding wheel
-"Mouse" Black and Decker sander
-Sanding block

If you have done this stuff, you know how long it would take without air tools.  I am pretty satisfied with how everything is coming along.  I did some reinforcement today.

[IMG]http://i246.photobucket.com/albums/gg111/szell001/fg%20work/DSC_0989.jpg[/IMG]
[IMG]http://i246.photobucket.com/albums/gg111/szell001/fg%20work/DSC_0991.jpg[/IMG]
[IMG]http://i246.photobucket.com/albums/gg111/szell001/fg%20work/DSC_0992.jpg[/IMG]
[IMG]http://i246.photobucket.com/albums/gg111/szell001/fg%20work/DSC_0995.jpg[/IMG]
[IMG]http://i246.photobucket.com/albums/gg111/szell001/fg%20work/DSC_0996.jpg[/IMG]
[IMG]http://i246.photobucket.com/albums/gg111/szell001/fg%20work/DSC_0997.jpg[/IMG]
[IMG]http://i246.photobucket.com/albums/gg111/szell001/fg%20work/DSC_1000.jpg[/IMG]
[IMG]http://i246.photobucket.com/albums/gg111/szell001/fg%20work/DSC_1004.jpg[/IMG]
[IMG]http://i246.photobucket.com/albums/gg111/szell001/fg%20work/DSC_1005.jpg[/IMG]
[IMG]http://i246.photobucket.com/albums/gg111/szell001/fg%20work/DSC_1001.jpg[/IMG]
[IMG]http://i246.photobucket.com/albums/gg111/szell001/fg%20work/DSC_1002.jpg[/IMG]


Motto:
[IMG]http://i246.photobucket.com/albums/gg111/szell001/fg%20work/DSC_1008.jpg[/IMG]
whitej47;416852 wrote:Thanks guys! I am trying to be patient lol. I am actually only using the following tools:
-Dremel with cut off wheel and grinding wheel
-"Mouse" Black and Decker sander
-Sanding block
Yea I know how it is, I use the same exact tools but I upgraded the Dremel to a power drill with cutoff wheels and grinding heads.
View original BBCode
[QUOTE=whitej47;416852]Thanks guys!  I am trying to be patient lol.  I am actually only using the following tools:
-Dremel with cut off wheel and grinding wheel
-"Mouse" Black and Decker sander
-Sanding block

[/QUOTE]

Yea I know how it is, I use the same exact tools but I upgraded the Dremel to a power drill with cutoff wheels and grinding heads.
View original BBCode
Ugghhh one part to go lol:

[IMG]http://i246.photobucket.com/albums/gg111/szell001/fg%20work/DSC_1009.jpg[/IMG]
[IMG]http://i246.photobucket.com/albums/gg111/szell001/fg%20work/DSC_1012.jpg[/IMG]


Comparison pics:
[IMG]http://i246.photobucket.com/albums/gg111/szell001/fg%20work/DSC_1019.jpg[/IMG]
[IMG]http://i246.photobucket.com/albums/gg111/szell001/fg%20work/DSC_1020.jpg[/IMG]
[IMG]http://i246.photobucket.com/albums/gg111/szell001/fg%20work/DSC_1029.jpg[/IMG]
[IMG]http://i246.photobucket.com/albums/gg111/szell001/fg%20work/DSC_1030.jpg[/IMG]
[IMG]http://i246.photobucket.com/albums/gg111/szell001/fg%20work/DSC_1024.jpg[/IMG]
[IMG]http://i246.photobucket.com/albums/gg111/szell001/fg%20work/DSC_1026.jpg[/IMG]

Overall:
[IMG]http://i246.photobucket.com/albums/gg111/szell001/fg%20work/DSC_1021.jpg[/IMG]

B/A:
[IMG]http://i246.photobucket.com/albums/gg111/szell001/Kit%20flow/DSC01422.jpg[/IMG]
[IMG]http://i246.photobucket.com/albums/gg111/szell001/fg%20work/DSC_1019.jpg[/IMG]
wow awesome work!!
View original BBCode
wow awesome work!!
View original BBCode
Thanks man!

I have a few updates.  Ppl are always talking about reinforcing their front bumper, I went ahead and did the front lip for good measure.  The underlying part was a little weak.  I have a few more updates as far as shaping, but I have to take some more pics tonight.

[IMG]http://i246.photobucket.com/albums/gg111/szell001/fg%20work/DSC_1118.jpg[/IMG]

[IMG]http://i246.photobucket.com/albums/gg111/szell001/fg%20work/DSC_1119.jpg[/IMG]
[IMG]http://i246.photobucket.com/albums/gg111/szell001/fg%20work/DSC_1120.jpg[/IMG]
[IMG]http://i246.photobucket.com/albums/gg111/szell001/fg%20work/DSC_1127.jpg[/IMG]
[IMG]http://i246.photobucket.com/albums/gg111/szell001/fg%20work/DSC_1130.jpg[/IMG]
[IMG]http://i246.photobucket.com/albums/gg111/szell001/fg%20work/DSC_1132.jpg[/IMG]
[IMG]http://i246.photobucket.com/albums/gg111/szell001/fg%20work/DSC_1131.jpg[/IMG]
[IMG]http://i246.photobucket.com/albums/gg111/szell001/fg%20work/DSC_1133.jpg[/IMG]
View original BBCode
Updates...almost done.

[IMG]http://i246.photobucket.com/albums/gg111/szell001/fg%20work/DSC_1160.jpg[/IMG]
[IMG]http://i246.photobucket.com/albums/gg111/szell001/fg%20work/DSC_1159.jpg[/IMG]
[IMG]http://i246.photobucket.com/albums/gg111/szell001/fg%20work/DSC_1162.jpg[/IMG]
[IMG]http://i246.photobucket.com/albums/gg111/szell001/fg%20work/DSC_1147.jpg[/IMG]
[IMG]http://i246.photobucket.com/albums/gg111/szell001/fg%20work/DSC_1149.jpg[/IMG]
[IMG]http://i246.photobucket.com/albums/gg111/szell001/fg%20work/DSC_1150.jpg[/IMG]
Man, such an unbelieveable amount of work went into this. Cant wait to see it finished!
View original BBCode
Man, such an unbelieveable amount of work went into this. Cant wait to see it finished!
View original BBCode
I have been lagging a bit due to some customer projects and other issues("cold" wether, haha). I shaved the mount holes on my side skirts the previous owner had drilled. I also reinforced the corners for a strong bond. Found a painter locally that will hook it up and he is a real good good to work with. I am going to end up prepping most of my car.


[IMG]http://i246.photobucket.com/albums/gg111/szell001/fg%20work/DSC_13522.jpg[/IMG]
[IMG]http://i246.photobucket.com/albums/gg111/szell001/fg%20work/DSC_13492.jpg[/IMG]
[IMG]http://i246.photobucket.com/albums/gg111/szell001/fg%20work/DSC_13502.jpg[/IMG]


[IMG]http://i246.photobucket.com/albums/gg111/szell001/fg%20work/DSC_13512.jpg[/IMG]

Car needs to be done in the next few weeks as far as prep goes. I will be giving a few updates here and there, but I am going to mainly update my build thread once the car is being prepped.Good work man. Definitely a lot of work but it will look good when it's done.
View original BBCode
Good work man. Definitely a lot of work but it will look good when it's done.
nice work so far....cant wait to see the finished product. i have done many fiber glass repairs and i can tell you have put alot of work into it. nice job!
View original BBCode
nice work so far....cant wait to see the finished product. i have done many fiber glass repairs and i can tell you have put alot of work into it. nice job!
View original BBCode
Rear doin' work:

[IMG]http://i246.photobucket.com/albums/gg111/szell001/AAMy%20Build/DSC_1622.jpg[/IMG]
[IMG]http://i246.photobucket.com/albums/gg111/szell001/AAMy%20Build/DSC_1626-2.jpg[/IMG]
[IMG]http://i246.photobucket.com/albums/gg111/szell001/AAMy%20Build/DSC_1669.jpg[/IMG]
[IMG]http://i246.photobucket.com/albums/gg111/szell001/AAMy%20Build/DSC_1668.jpg[/IMG][IMG]http://i246.photobucket.com/albums/gg111/szell001/AAMy%20Build/DSC_1670.jpg[/IMG]
[IMG]http://i246.photobucket.com/albums/gg111/szell001/AAMy%20Build/DSC_1673.jpg[/IMG]

In the next coming days I will be building bridges for the exhaust tips how they come from the company.  Adds stability and will prevent cracking down the road.  It's just about read for spray.  Everything lines up really well.
nice!
View original BBCode
nice!
Coming along great:biggthumpup:
View original BBCode
Coming along great:biggthumpup:
View original BBCode
Thanks guys. Here are some step-wise progress pics over the past week regarding progression of the rear bumper:

[IMG]http://i246.photobucket.com/albums/gg111/szell001/AAMy%20Build/DSC_1612.jpg[/IMG]
[IMG]http://i246.photobucket.com/albums/gg111/szell001/AAMy%20Build/DSC_1633.jpg[/IMG]
[IMG]http://i246.photobucket.com/albums/gg111/szell001/AAMy%20Build/DSC_1637-1.jpg[/IMG]
[IMG]http://i246.photobucket.com/albums/gg111/szell001/AAMy%20Build/DSC_1669.jpg[/IMG]
[IMG]http://i246.photobucket.com/albums/gg111/szell001/AAMy%20Build/DSC_1671.jpg[/IMG]
[IMG]http://i246.photobucket.com/albums/gg111/szell001/AAMy%20Build/DSC_1672.jpg[/IMG]
[IMG]http://i246.photobucket.com/albums/gg111/szell001/AAMy%20Build/DSC_1673.jpg[/IMG]


Then rounded out and built tunnels:

[IMG]http://i246.photobucket.com/albums/gg111/szell001/AAMy%20Build/DSC_1621-1.jpg[/IMG]
[IMG]http://i246.photobucket.com/albums/gg111/szell001/AAMy%20Build/DSC_1626-3.jpg[/IMG]
[IMG]http://i246.photobucket.com/albums/gg111/szell001/AAMy%20Build/DSC_1629-1.jpg[/IMG]
[IMG]http://i246.photobucket.com/albums/gg111/szell001/AAMy%20Build/DSC_1628-1.jpg[/IMG]
[IMG]http://i246.photobucket.com/albums/gg111/szell001/AAMy%20Build/DSC_1632-1.jpg[/IMG]
[IMG]http://i246.photobucket.com/albums/gg111/szell001/AAMy%20Build/DSC_1635.jpg[/IMG]
[IMG]http://i246.photobucket.com/albums/gg111/szell001/AAMy%20Build/DSC_1636.jpg[/IMG]
[IMG]http://i246.photobucket.com/albums/gg111/szell001/AAMy%20Build/DSC_1634-1.jpg[/IMG]
I like the upside down angle tips. Goes well with the bumper :biggthumpup:
View original BBCode
I like the upside down angle tips. Goes well with the bumper :biggthumpup:
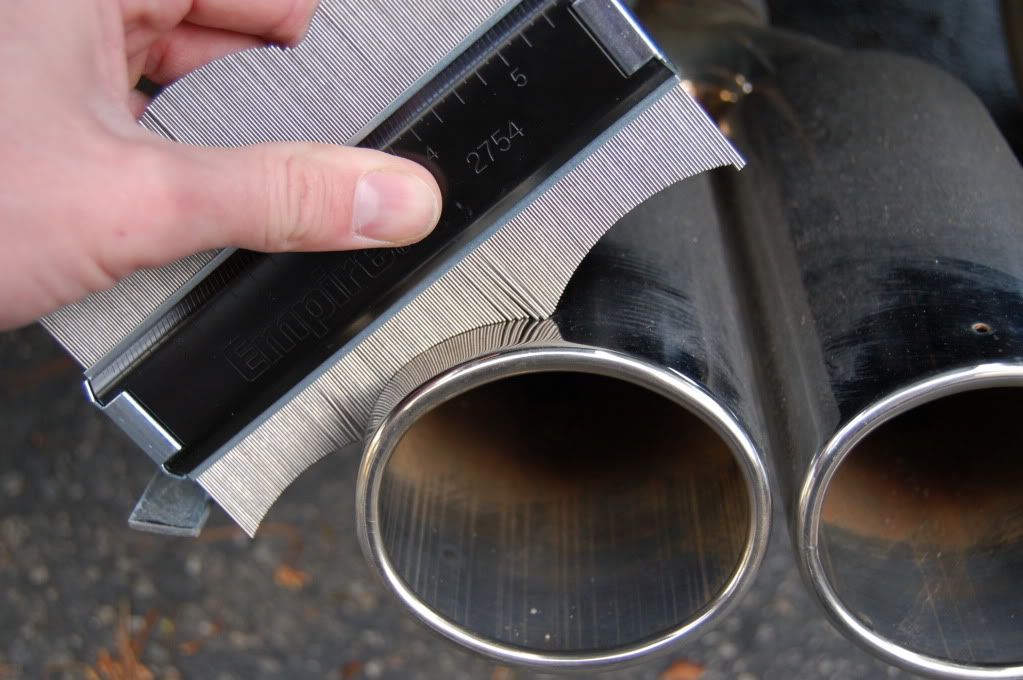
that empire ruler.. i need one
View original BBCode
that empire ruler.. i need one
Home depot $7.  One of the best molding tools I own.

CAR IS IN PAINT!
View original BBCode
Home depot $7. One of the best molding tools I own.
CAR IS IN PAINT!
woot woot!
View original BBCode
woot woot!
man your definitely goin next level on that kit. nice work bro.
View original BBCode
man your definitely goin next level on that kit. nice work bro.
Thanks guys.
Teaser, check my build thread for more mods and updates regarding the painting process. They should lay basecoat and first clear this week:dance:

Turns out the license plate was shaved when the kit came from Japan. The rear plate shave was really strong, but when the painter went to remove the 4 layers of paint:pat:, there were a few cracks from missing glass underneath. I will be getting a fresh coat of primer and filler on the entire kit!
View original BBCode
Thanks guys.

Teaser, check my build thread for more mods and updates regarding the painting process.  They should lay basecoat and first clear this week:dance:

[IMG]http://i246.photobucket.com/albums/gg111/szell001/AAMy%20Build/DSC_1723.jpg[/IMG]

Turns out the license plate was shaved when the kit came from Japan.  The rear plate shave was really strong, but when the painter went to remove the 4 layers of paint:pat:, there were a few cracks from missing glass underneath.  I will be getting a fresh coat of primer and filler on the entire kit!
FYI
This is the exact reason when you get a new part, you mock it up, then immediately reinforce it. Saves you a TON of headache downt he road.

for those of you that didnt think of it
View original BBCode
FYI
This is the exact reason when you get a new part, you mock it up, then immediately reinforce it. Saves you a TON of headache downt he road.
for those of you that didnt think of it
View original BBCode
Back in bizzniz

[IMG]http://i246.photobucket.com/albums/gg111/szell001/DSC_1879.jpg[/IMG]
[IMG]http://i246.photobucket.com/albums/gg111/szell001/DSC_1878.jpg[/IMG]
[IMG]http://i246.photobucket.com/albums/gg111/szell001/DSC_1873.jpg[/IMG]
Looks great! good job
View original BBCode
Looks great! good job
Kouki Monster;445365 wrote:that empire ruler.. i need one
Me too !!!!
View original BBCode
[QUOTE=Kouki Monster;445365]that empire ruler.. i need one[/QUOTE]


Me too !!!!
Great work! What color is that?:biggthumpup:
View original BBCode
Great work! What color is that?:biggthumpup:
It is a stock color actually. Dupont and PPG. 5 clear coat layers with color sanding between. MUCH better quality than OEM, but you guys knew that. It is a dark gray base but has pink, aqua, silver, and purple flake in it. Painter said it is a 3 stage pearl mixed in. Most people don't believe it's an OEM color
View original BBCode
It is a stock color actually. Dupont and PPG. 5 clear coat layers with color sanding between. MUCH better quality than OEM, but you guys knew that. It is a dark gray base but has pink, aqua, silver, and purple flake in it. Painter said it is a 3 stage pearl mixed in. Most people don't believe it's an OEM color
Impressive. my fear of fiberglass work is no longer an issue. You made this look fairly simple with a little determination and a lot of patience I think I can tackle a project like this.
View original BBCode
Impressive. my fear of fiberglass work is no longer an issue. You made this look fairly simple with a little determination and a lot of patience I think I can tackle a project like this.
Well done chap..
View original BBCode
Well done chap..
Nice work!!
View original BBCode
Nice work!!
View original BBCode
[IMG]http://i246.photobucket.com/albums/gg111/szell001/DSC_1874-3.jpg[/IMG]
[IMG]http://i246.photobucket.com/albums/gg111/szell001/DSC_1880-3.jpg[/IMG]
kit came out great. love the paint.
View original BBCode
kit came out great. love the paint.
wow, looks bad ass. I'd def want to have an xb like this. All that work def paid off.
View original BBCode
wow, looks bad ass. I'd def want to have an xb like this. All that work def paid off.
Thanks all. I have yet to see a pic where the pearl is captured, but it is amazing paint in person. Hope to make it to a few local meets to show it off.
View original BBCode
Thanks all. I have yet to see a pic where the pearl is captured, but it is amazing paint in person. Hope to make it to a few local meets to show it off.
man what a killer thread!! well done
View original BBCode
man what a killer thread!! well done