can't find it through search?? Clock trim
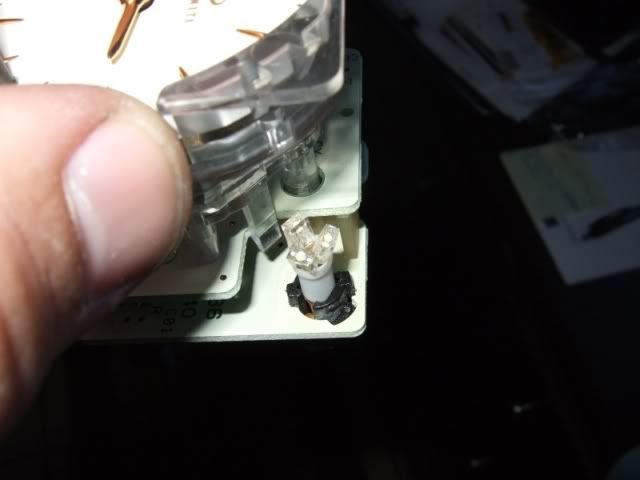
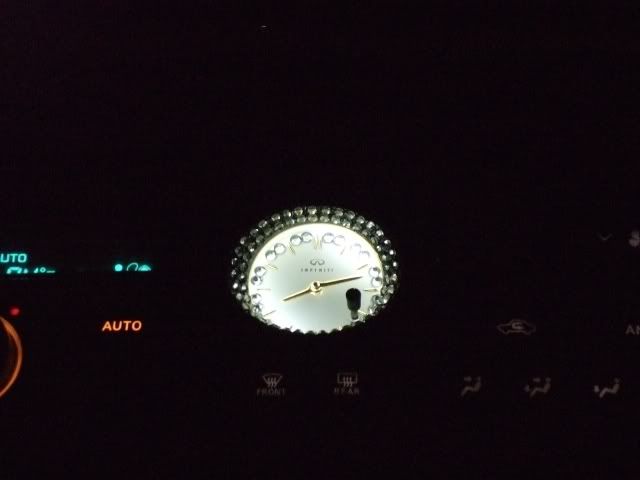
EDITED-Pics below of the LED's in the Clock and the start of the Swarovski upgrade. I know its been done.
Thanks to Zion for the inspiration and the help.
burgy;129462 wrote:.....and I won't even ask on NICO since those guys are STOCK nuts and would sh%# if I told them I was modding the dash and clock.
How do you remove the vents over the center stack on a Y33? I know that there are the two screws just behind the cup holder for the center console, but I don't want to F up my dash trying to get the top vents in the dash out before I take out my clock etc.... Thanks
View original BBCode
EDITED-Pics below of the LED's in the Clock and the start of the Swarovski upgrade. I know its been done.

Thanks to Zion for the inspiration and the help.


[quote=burgy;129462].....and I won't even ask on NICO since those guys are STOCK nuts and would sh%# if I told them I was modding the dash and clock.

How do you remove the vents over the center stack on a Y33? I know that there are the two screws just behind the cup holder for the center console, but I don't want to F up my dash trying to get the top vents in the dash out before I take out my clock etc.... Thanks[/quote]
its easy mayn..just get flat head screw driver and ply between the dash and the upper vents..as soon as you see it moving start pulling it out..it comes out really easy..then there will be I think about 8 screws on the center part..top and bottom..unscrew and pull it out. Then you will have to disconect every thing and unblot the clock...here is my clock..PIMPN Bling!!!

View original BBCode
its easy mayn..just get flat head screw driver and ply between the dash and the upper vents..as soon as you see it moving start pulling it out..it comes out really easy..then there will be I think about 8 screws on the center part..top and bottom..unscrew and pull it out. Then you will have to disconect every thing and unblot the clock...here is my clock..PIMPN Bling!!!

[IMG]http://i83.photobucket.com/albums/j298/q45t07/clockbling.jpg[/IMG]
Yeah, I know your clock too well!!!  it was my inspiration. Usually I won't copy others ideas, but I like yours to much.  I will be doing the same thing to mine but with Black Diamond Swarovski's instead.

also, so the vents come straight out or do they come out and up on an angle?
View original BBCode
Yeah, I know your clock too well!!! it was my inspiration. Usually I won't copy others ideas, but I like yours to much. I will be doing the same thing to mine but with Black Diamond Swarovski's instead.
also, so the vents come straight out or do they come out and up on an angle?
bump this up because I can't find out how the bottom is held in if it is screws, how do I get to them?? does the wood trim around the shifter and ashtray need to come off first???
View original BBCode
bump this up because I can't find out how the bottom is held in if it is screws, how do I get to them?? does the wood trim around the shifter and ashtray need to come off first???
i've never done a y33 but it sounds like most other nissans. you'll need to work your way up from the shifter trim and down from the center vents.
View original BBCode
i've never done a y33 but it sounds like most other nissans. you'll need to work your way up from the shifter trim and down from the center vents.
Yeah, I figured that part out but I can't seem to find the FSM online that shows how to remove the trim around the shifter....Thanks
Found the FSM..
http://www.nicoclub.com/FSM/Q45/1999_Q45/1999_Q45/bt.pdf
it really is as easy as it shows. 1 hint though, activate the shift unlock and put the shifter into 1 before you start to take the trim out...:smiley-rofl:
By the way, think this is too much since I will be doing the clock trim as well??

as you can see if you look close, it isn't aligned perfect because I haven't glued it in yet. I'm just not sure if I want all that on the inside of the clock and then two rows on the dash trim around also???
I originally wanted to just put one at the end of each hour but the minute hand hits them so they won't fit....
View original BBCode
Yeah, I figured that part out but I can't seem to find the FSM online that shows how to remove the trim around the shifter....Thanks


Found the FSM..[URL]http://www.nicoclub.com/FSM/Q45/1999_Q45/1999_Q45/bt.pdf[/URL]
it really is as easy as it shows.  1 hint though, activate the shift unlock and put the shifter into 1 before you start to take the trim out...:smiley-rofl:

By the way, think this is too much since I will be doing the clock trim as well??

[IMG]http://i66.photobucket.com/albums/h255/burgy240/Parts%20for%20sale/JoesCar048.jpg[/IMG]

as you can see if you look close, it isn't aligned perfect  because I haven't glued it in yet. I'm just not sure if I want all that on the inside of the clock and then two rows on the dash trim around also???

I originally wanted to just put one at the end of each hour but the minute hand hits them so they won't fit....
Some pics of the LED's and what they look like in the car. You can see some different colors in the HVAC because we were playing with different bulbs and colors etc.

The beginning of the Swarovski.

I will be doing the top half after the bottom dries and sets..

View original BBCode
Some pics of the LED's and what they look like in the car.  You can see some different colors in the HVAC because we were playing with different bulbs and colors etc.
[IMG]http://i66.photobucket.com/albums/h255/burgy240/Parts%20for%20sale/JoesCar051.jpg[/IMG]
[IMG]http://i66.photobucket.com/albums/h255/burgy240/Parts%20for%20sale/JoesCar052.jpg[/IMG]
The beginning of the Swarovski.
[IMG]http://i66.photobucket.com/albums/h255/burgy240/Parts%20for%20sale/JoesCar061.jpg[/IMG]
I will be doing the top half after the bottom dries and sets..
[IMG]http://i66.photobucket.com/albums/h255/burgy240/Parts%20for%20sale/JoesCar057.jpg[/IMG]
i would skip the crystals on the face personally.
View original BBCode
i would skip the crystals on the face personally.
^Yeah, but I'm done now...
View original BBCode
^Yeah, but I'm done now...

[IMG]http://i66.photobucket.com/albums/h255/burgy240/JoesCar069.jpg[/IMG]
I so want to put LED's in my interior. But don't have the patience for the wiring lol.
View original BBCode
I so want to put LED's in my interior. But don't have the patience for the wiring lol.
Damicci;227744 wrote:I so want to put LED's in my interior. But don't have the patience for the wiring lol.
www.superbriteleds.com
Viola, take out every bulb you can find a replacement for and do it.
View original BBCode
[quote=Damicci;227744]I so want to put LED's in my interior. But don't have the patience for the wiring lol.[/quote]

[url]www.superbriteleds.com[/url]

Viola, take out every bulb you can find a replacement for and do it.
^Exactly, no need to wire anything, if you have any problems it just means your chassis ground isn't great. Other than that it was easy. I also did LED's in all 4 doors and both rear dome light as well as the two map lights.
VIPFlame;227712 wrote:that looks good burgy!
Thanks, its even better in person. My girl was sooo against it, but after its done she likes it too.
View original BBCode
^Exactly, no need to wire anything, if you have any problems it just means your chassis ground isn't great.  Other than that it was easy.  I also did LED's in all 4 doors and both rear dome light as well as the two map lights.

[quote=VIPFlame;227712]that looks good burgy![/quote]
Thanks, its even better in person.  My girl was sooo against it, but after its done she likes it too.
