UINVERSAL AIR FRONT STRUT BUILD UP
The UAS front strut kit is oneof the most Universal Kits around.. The Kit will pretty much mount up to any strut with some cutting and welding involved.
Special Tool that you will need is Basic tool set, die grinder with cut off wheel, Disk sander and welder
You can use this as a referance.. IF attempting this task on your own..
1 You may use your factory or after Market Struts.. here we used some KYB's..
View original BBCode
The UAS front strut kit is oneof the most Universal Kits around.. The Kit will pretty much mount up to any strut with some cutting and welding involved.

Special Tool that you will need is Basic tool set, die grinder with cut off wheel, Disk sander and welder

You can use this as a referance.. IF attempting this task on your own..

[B]1 You may use your factory or after Market Struts.. here we used some KYB's..[/B]

[IMG]http://img.photobucket.com/albums/v649/eight08customs/Air%20installs/previa/CIMG1119.jpg[/IMG]
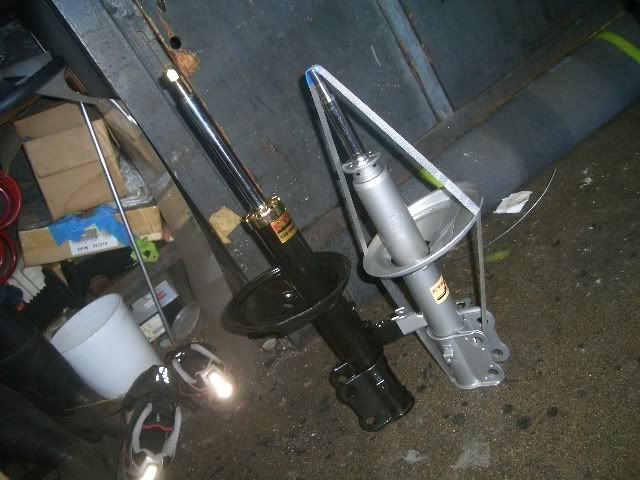
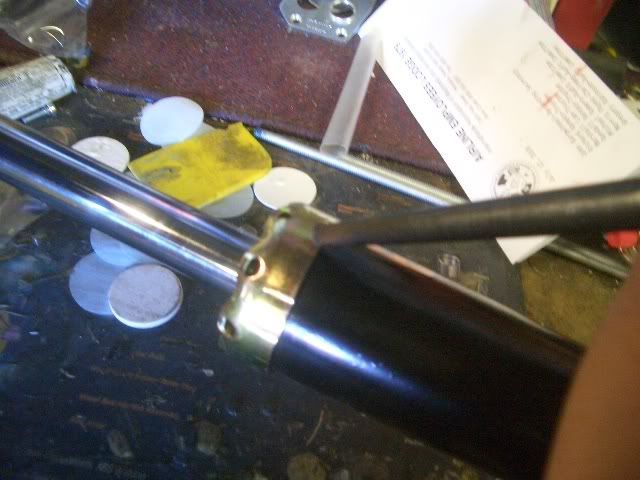
2 First you have to remove the collar.. Notice the pic in the first post one
The black strut is an older version in which has the collar..
The Sliver strut is a newer version in which there is no collar but you willhave to sand or grind that peice at the top where the collar used to be..
You must remove collar so that bag can slide over strut assembly
Using a Punch and Hammer hit off the collar..


View original BBCode
2 First you have to remove the collar.. Notice the pic in the first post one

The black strut is an older version in which has the collar..
The Sliver strut is a newer version in which there is no collar but you willhave to sand or grind that peice at the top where the collar used to be..

You must remove collar so that bag can slide over strut assembly

Using a Punch and Hammer hit off the collar..

[IMG]http://img.photobucket.com/albums/v649/eight08customs/Air%20installs/previa/CIMG1121.jpg[/IMG]

[IMG]http://img.photobucket.com/albums/v649/eight08customs/Air%20installs/previa/CIMG1122.jpg[/IMG]

[IMG]http://img.photobucket.com/albums/v649/eight08customs/Air%20installs/previa/CIMG1123.jpg[/IMG]
View original BBCode
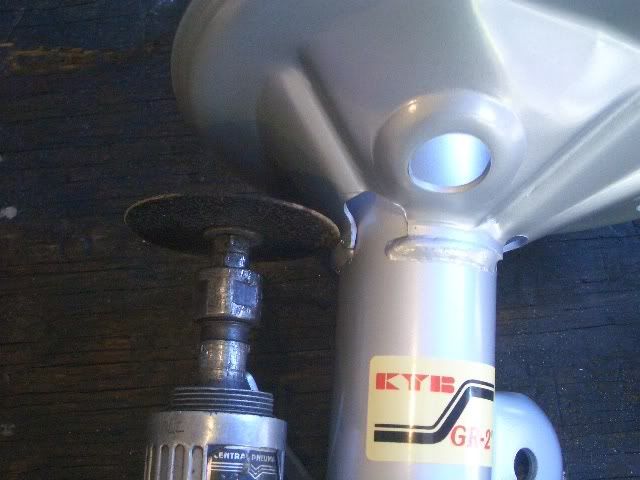
Next you have to remove the stock spring perch..

You will need a grinder for this step..

[IMG]http://img.photobucket.com/albums/v649/eight08customs/Air%20installs/previa/CIMG1124.jpg[/IMG]

[B]Cut perch at fatory weld making sure to leave part of the weld there becuase that is where your new perch will rest on and you have someplace to reweld the new perch.[/B] [B]Just cut right around[/B]
[IMG]http://img.photobucket.com/albums/v649/eight08customs/Air%20installs/previa/CIMG1126.jpg[/IMG]

[B]tap with hammer to break off perch and it should sperate[/B]
[IMG]http://img.photobucket.com/albums/v649/eight08customs/Air%20installs/previa/CIMG1125.jpg[/IMG]

[IMG]http://img.photobucket.com/albums/v649/eight08customs/Air%20installs/previa/CIMG1127.jpg[/IMG]

[B]IF your stut looks like this this is the part you have to grind down to make sure the bag can slide over..[/B]
[IMG]http://img.photobucket.com/albums/v649/eight08customs/Air%20installs/previa/CIMG1128.jpg[/IMG]
View original BBCode
[B]THis is the bag assembly with new perches that the bags will bolt up to[/B]
[IMG]http://img.photobucket.com/albums/v649/eight08customs/Air%20installs/previa/CIMG1132-1.jpg[/IMG]

Test fit first before welding up.

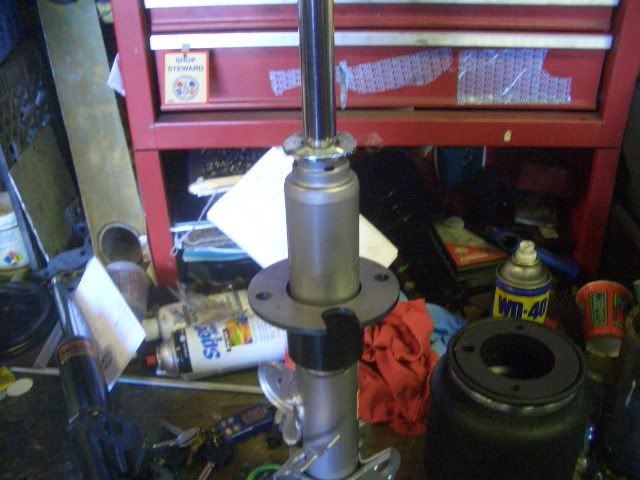
[B]slide the tube over the strut[/B]
[IMG]http://img.photobucket.com/albums/v649/eight08customs/Air%20installs/previa/CIMG1133-1.jpg[/IMG]

[B]than slide new perch over the tube.[/B]
[IMG]http://img.photobucket.com/albums/v649/eight08customs/Air%20installs/previa/CIMG1134.jpg[/IMG]

[B]it should look like this[/B]
[B][IMG]http://img.photobucket.com/albums/v649/eight08customs/Air%20installs/previa/CIMG1135.jpg[/IMG][/B]

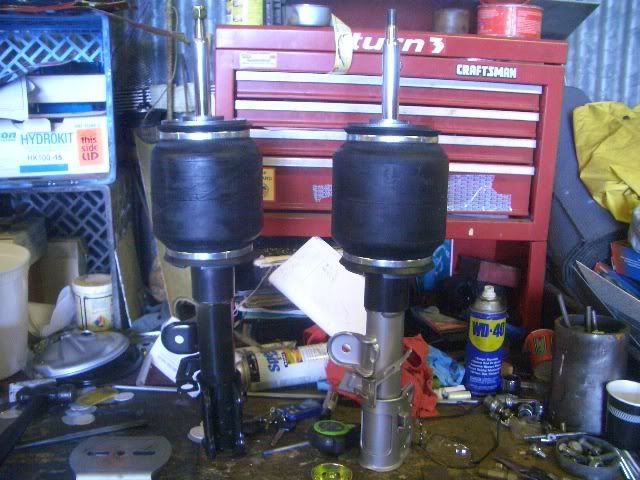
[B]Now slide the bag over[/B]
[IMG]http://img.photobucket.com/albums/v649/eight08customs/Air%20installs/previa/CIMG1136.jpg[/IMG]

install bag upside down.. with the fitting facing up for now.. push to down to make sure when the bag bottoms out.. the metal sleave on the inside of the bag is flush with the top of the strut.. this makes sure you have full downward travel to get the lower hight possible.  IF its ok time to tack weld..  weld tube and perch than tack weld for more the new perch to sturt .. weld on the old weld..

Test fit on car and make sure there is clearance with new perch ad the tire.. if all ok weld it up and your ready to go..

[IMG]http://img.photobucket.com/albums/v649/eight08customs/Air%20installs/previa/CIMG1137.jpg[/IMG]
To get the lowest ride hight the kit come with a bearing to shim the strut bearing cap to clear the bolt used to fasten the bags at the top..
I will post later on what to do.. using some washers as spacers and sanding the bottom of the strut bearing so that it will clear those bolt heads..
also.. Note... when putting in the fitting into the bag.. make sure you dont over tighten fitting becuase plate will crack and you wil have an airleak..
View original BBCode
To get the lowest ride hight the kit come with a bearing to shim the strut bearing cap to clear the bolt used to fasten the bags at the top..

I will post later on what to do.. using some washers as spacers and sanding the bottom of the strut bearing so that it will clear those bolt heads..

[B][COLOR=red]also.. Note... when putting in the fitting into the bag.. make sure you dont over tighten fitting becuase plate will crack and you wil have an airleak..[/COLOR][/B]
very nice detailed write up eight08customs! this is great for the do it yourselfers:biggthumpup:
View original BBCode
very nice detailed write up eight08customs! this is great for the do it yourselfers:biggthumpup:
Silly question, or more like a dumb question...you do not weld the tube onto the strut now do you? Because that shock is pressurized...

Very very helpfull thread...I will definitly use this as a reference :)
View original BBCode
Silly question, or more like a dumb question...you do not weld the tube onto the strut now do you? Because that shock is pressurized...
Very very helpfull thread...I will definitly use this as a reference :)
hondaboi;192480 wrote:Silly question, or more like a dumb question...you do not weld the tube onto the strut now do you? Because that shock is pressurized...
Very very helpfull thread...I will definitly use this as a reference :)
yes you do weld it.. just tack weld not fully weld it.. your welding on the old weld bead.. and make sure you use a mig welder.. uses less heat.. or even a Heli arc..
I welded manyof these up already.. there not really pressurized.. there oiled filled..
View original BBCode
[quote=hondaboi;192480]Silly question, or more like a dumb question...you do not weld the tube onto the strut now do you? Because that shock is pressurized...

Very very helpfull thread...I will definitly use this as a reference :)[/quote]

yes you do weld it.. just tack weld not fully weld it.. your welding on the old weld bead.. and make sure you use a mig welder.. uses less heat.. or even a Heli arc..

I welded manyof these up already.. there not really pressurized.. there oiled filled..
Ohh..this is the first I have heard someone weld a shock. hehe...

May I ask how HOT (amps) do you weld it and what process do you use? TIG or MIG?

Do you have a picture of it welded?

Thank you.
View original BBCode
Ohh..this is the first I have heard someone weld a shock. hehe...
May I ask how HOT (amps) do you weld it and what process do you use? TIG or MIG?
Do you have a picture of it welded?
Thank you.
hondaboi;192587 wrote:Ohh..this is the first I have heard someone weld a shock. hehe...
May I ask how HOT (amps) do you weld it and what process do you use? TIG or MIG?
Do you have a picture of it welded?
Thank you.
just use the amount of heat to make the metal melt... process is just tack.. and cool... dont go welding it full blast .. than it will heat up.. Tacking it you dont create that much heat.. becuase you let it cool down before making the next tack.. your doing it just to hold it inplace.. so it dont rattle..
View original BBCode
[quote=hondaboi;192587]Ohh..this is the first I have heard someone weld a shock. hehe...

May I ask how HOT (amps) do you weld it and what process do you use? TIG or MIG?

Do you have a picture of it welded?

Thank you.[/quote]

just use the amount of heat to make the metal melt... process is just tack.. and cool... dont go welding it full blast .. than it will heat up.. Tacking it you dont create that much heat.. becuase you let it cool down before making the next tack.. your doing it just to hold it inplace.. so it dont rattle..
very nice.

i would not recommend just anybody weld on a strut, most have pressurized nitrogen (those gr2s do for sure). for the amateurs, just trim the lower spring perch and place the tube onto it, ensuring it sits evenly. riding low is cool, but that extra inch isn't worth your eye, or finger, or life. pros can do stuff others can not, that's what makes 'em pros.
View original BBCode
very nice.
i would not recommend just anybody weld on a strut, most have pressurized nitrogen (those gr2s do for sure). for the amateurs, just trim the lower spring perch and place the tube onto it, ensuring it sits evenly. riding low is cool, but that extra inch isn't worth your eye, or finger, or life. pros can do stuff others can not, that's what makes 'em pros.
Kool...thank you for the assistance!

I have a silly question, you talk about the bearing and stuff, I honestly dont know where that goes and how does it give you a extra few inches of lowering??

Would you be able to explain to me?

Thank you again.
View original BBCode
Kool...thank you for the assistance!
I have a silly question, you talk about the bearing and stuff, I honestly dont know where that goes and how does it give you a extra few inches of lowering??
Would you be able to explain to me?
Thank you again.
Great write up Marshall!!!
View original BBCode
Great write up Marshall!!!
Nice write up, I love fabrication photos.
View original BBCode
Nice write up, I love fabrication photos.
hondaboi;192964 wrote:Kool...thank you for the assistance!
I have a silly question, you talk about the bearing and stuff, I honestly dont know where that goes and how does it give you a extra few inches of lowering??
Would you be able to explain to me?
Thank you again.
the upper strut bearring is at the top of the strut.. the one with the one nut that holds sprng on.. and has three studds at the top that bolt the assmbly to the strut tower of the car.
when you swap out the spring to the UAS bags.. the top section of the bag is bolted to the top plate..
Those bolts now are sitting higher.. The kit comes a bearing to make clearnce to that the strut brng dosent rub those bolts.. the brng sill bring that upper brng up about 1.5 inch..
What I do is dont use the bearing provided in the kit and on a belt sander, I cut down the underside of the strut brng that rubs that bolt at the top of the bag.. than to make sure the under side of teh strut brng has something to ride on is use 2 to 3 large washers..
By doing this i know it might no sound like much but you can bring the car down about 1 inch more..
THe easy fix for this would to just buy Pillowball mounts..
View original BBCode
[quote=hondaboi;192964]Kool...thank you for the assistance!

I have a silly question, you talk about the bearing and stuff, I honestly dont know where that goes and how does it give you a extra few inches of lowering??

Would you be able to explain to me?

Thank you again.[/quote]


the upper strut bearring is at the top of the strut.. the one with the one nut that holds sprng on.. and has three studds at the top that bolt the assmbly to the strut tower of the car.

when you swap out the spring to the UAS bags.. the top section of the bag is bolted to the top plate..

Those bolts now are sitting higher.. The kit comes a bearing to make clearnce to that the strut brng dosent rub those bolts.. the brng sill bring that upper brng up about 1.5 inch..

What I do is dont use the bearing provided in the kit and on a belt sander, I  cut down the underside of the strut brng that rubs that bolt at the top of the bag.. than to make sure the under side of teh strut brng has something to ride on is use 2 to 3 large washers..

By doing this i know it might no sound like much but you can bring the car down about 1 inch more..

THe easy fix for this would to just buy Pillowball mounts..
Hmmm....im really stupid at this, but if you have a picture that can show this, I might understand it better.

I understand it a bit, but not fully.

Sorry about my silliness!! You dont have to do this if you do not want to.
View original BBCode
Hmmm....im really stupid at this, but if you have a picture that can show this, I might understand it better.
I understand it a bit, but not fully.
Sorry about my silliness!! You dont have to do this if you do not want to.
this is the upper sturt Moutn Bearnig
IF you look at the pic that says rear.. notice the round section where the hole is.. the edge will rub the top side of the bags bolts.. you have to grind that part smaller so that it clears the bolts and dont rub..
I didnt take actuall pics on what i did.. the next one I'll make sure ill take step by step pics..

View original BBCode
this is the upper sturt Moutn Bearnig

IF you look at the pic that says rear.. notice the round section where the hole is.. the edge will rub the top side of the bags bolts.. you have to grind that part smaller so that it clears the bolts and dont rub..

I didnt take actuall pics on what i did.. the next one I'll make sure ill take step by step pics..

[IMG]http://img.drivewire.com/PRO-F/W01331614673KYB.JPG[/IMG]
Hmm....ok, I somewhat get it now better than before..

Man, I feel embarassed!! I dont know these things :)

Thank you again, and hopefully when the time comes for me to install air suspension, I will fully understand it.

Thank you again!!
View original BBCode
Hmm....ok, I somewhat get it now better than before..
Man, I feel embarassed!! I dont know these things :)
Thank you again, and hopefully when the time comes for me to install air suspension, I will fully understand it.
Thank you again!!
Great writeup Marshall.
I need pillowball mounts too.

!!!
View original BBCode
Great writeup Marshall.

I need pillowball mounts too.

[img]http://www.napsusa.com/Nukabe/pictures/pilo_upmt_cp9.jpg[/img]!!!
Here's my hacked OEM strut:

And my assembled front assembly

View original BBCode
Here's my hacked OEM strut:

[img]http://c2.ac-images.myspacecdn.com/images02/53/l_c026995daed54a10884159f47cbeece5.jpg[/img]

And my assembled front assembly

[img]http://c2.ac-images.myspacecdn.com/images02/35/l_82f4a1b369244faeaad61b9e15fc56d5.jpg[/img]
Ok, so how do you mount UAS on coilovers? Can't weld the mounts to the aluminum right?
View original BBCode
Ok, so how do you mount UAS on coilovers? Can't weld the mounts to the aluminum right?
you just sit it on the perch.
View original BBCode
you just sit it on the perch.
Really? Wow. I was totally over thinking it.

It won't rattle and be noisy?
View original BBCode
Really? Wow. I was totally over thinking it.
It won't rattle and be noisy?
so if you have coilovers you dont need those brackets? jsut drop the bags and call it done?
View original BBCode
so if you have coilovers you dont need those brackets? jsut drop the bags and call it done?
you use the brackets, but no welding involved.
View original BBCode
you use the brackets, but no welding involved.
Thanks brain.

Anyone have pics of one installed?
View original BBCode
Thanks brain.
Anyone have pics of one installed?
very helpful info. thanks
View original BBCode
very helpful info. thanks