Another SoCaL Estima Project
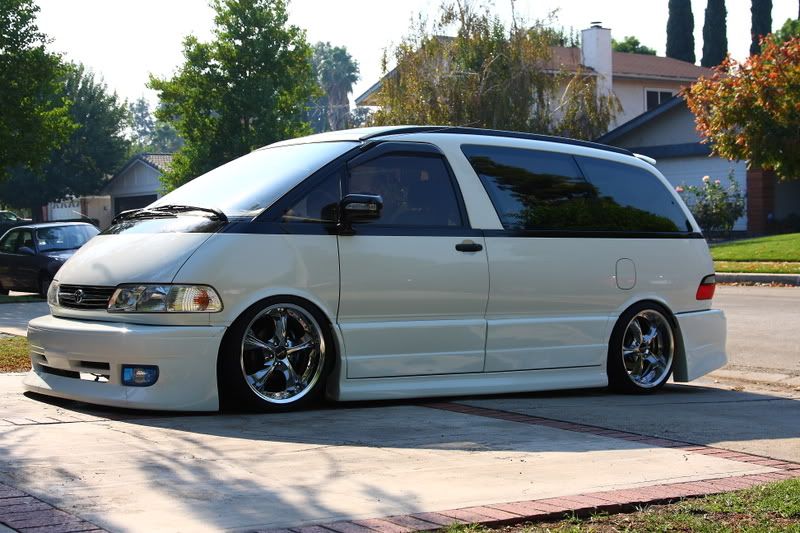
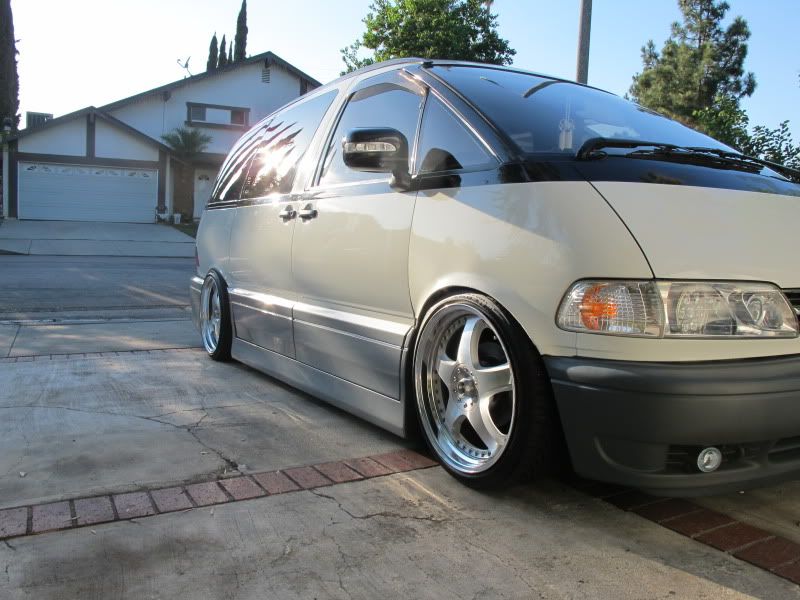
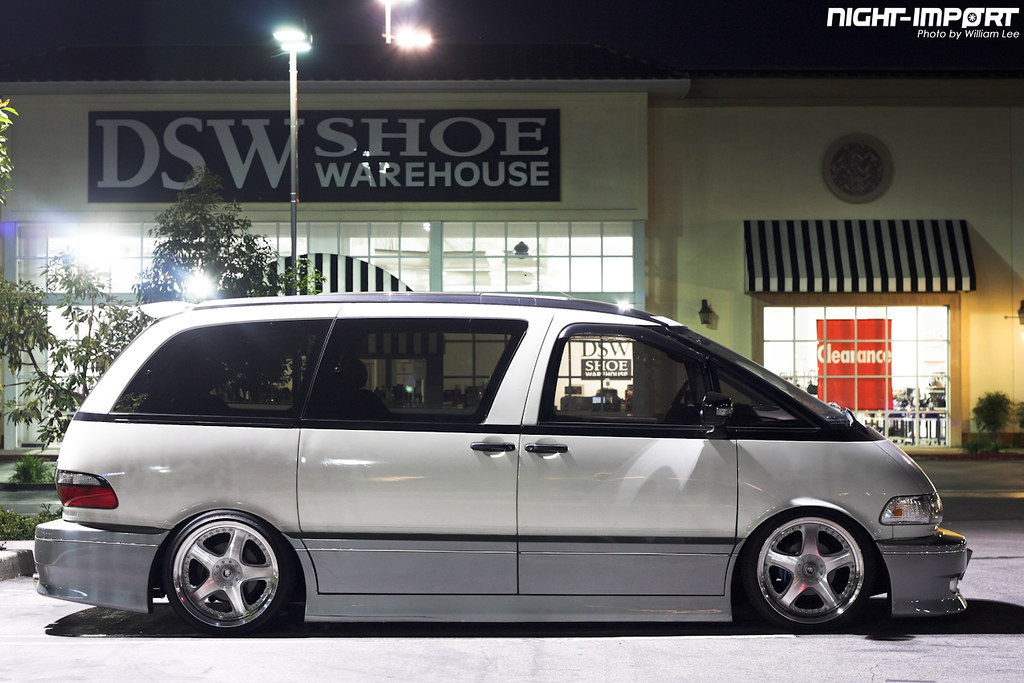
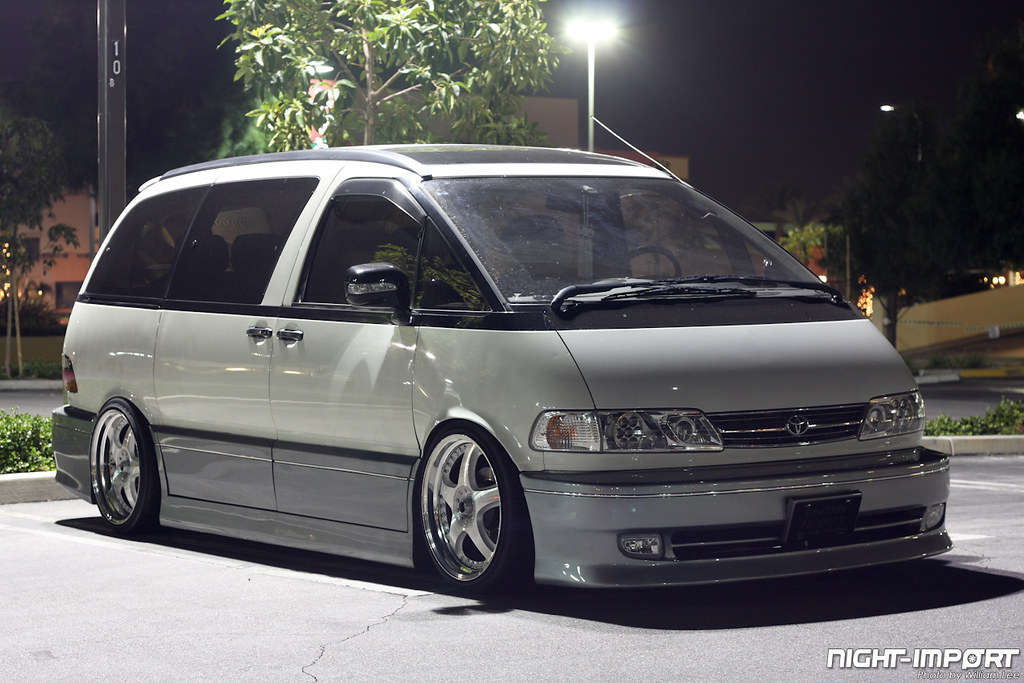
96 Previa
Here's a few work in progress pics. Don't mind the massive wheel gap. It will eventually be lowered on Air Bomber that I've been sitting on for a year.
Wheels are Amistad Brights 19x8, 19x9 +38
Unknown used body kit from Upgarage.


Can somebody pls photoshop this slammed? Maybe that will give me the incentive to work on the suspension sooner. I took out the spare & mounted the air tank. Currently working on the compressor wiring.

View original BBCode
96 Previa
Here's a few work in progress pics.  Don't mind the massive wheel gap.  It will eventually be lowered on Air Bomber that I've been sitting on for a year.

Wheels are Amistad Brights 19x8, 19x9 +38
Unknown used body kit from Upgarage.

[IMG]http://i2.photobucket.com/albums/y37/normandie/IMG_1185.jpg[/IMG]

[IMG]http://i2.photobucket.com/albums/y37/normandie/IMG_1182.jpg[/IMG]


[IMG]http://i2.photobucket.com/albums/y37/normandie/IMG_1188.jpg[/IMG]


Can somebody pls photoshop this slammed?  Maybe that will give me the incentive to work on the suspension sooner. I took out the spare & mounted the air tank.  Currently working on the compressor wiring.

[IMG]http://i2.photobucket.com/albums/y37/normandie/IMG_1179.jpg[/IMG]
normandie, the suspension should've been your first mod. Body kit?!? I have mixed feelings about the kit since it looks to me like a knockoff.
View original BBCode
normandie, the suspension should've been your first mod. Body kit?!? I have mixed feelings about the kit since it looks to me like a knockoff.
koool...another VAN!

welcome :)
View original BBCode
koool...another VAN!
welcome :)
quickie photochop


View original BBCode
quickie photochop

[IMG]http://img.photobucket.com/albums/v695/dvsmethodz/previa.jpg[/IMG]

[IMG]http://http://img.photobucket.com/albums/v695/dvsmethodz/previa.jpg[/IMG]
normandie;126887 wrote:

View original BBCode
[quote=normandie;126887]


[IMG]http://i2.photobucket.com/albums/y37/normandie/IMG_1188.jpg[/IMG]


[/quote]


[IMG]http://img.photobucket.com/albums/v695/dvsmethodz/previachop-1.jpg[/IMG]

A quicky from me too..level it son!! Haha...btw, it's a Fabulous copy from the looks of it.
View original BBCode
[IMG]http://www.vipemporium.com/customer/estimachop.jpg[/IMG]
A quicky from me too..level it son!!  Haha...btw, it's a Fabulous copy from the looks of it.
^^^oooh damn..that looks way better than my attempt:biggthumpup:
View original BBCode
^^^oooh damn..that looks way better than my attempt:biggthumpup:
Wow.........full bodykit (door panel US converted), front headlights and rear tail conversion, side mirror signal, "Estima" Badge.......all out of no where!  Looking good!  Did those "Overfenders" also come with the kit?  With those Offsets I would of thought you could probally do a mild fender roll and sell them to me!  LOL

Anyways......really like the look of it.....regardless of whether the kit may be a knock off.  I think that it looks sweet!  Kind of surprised how the 19's look like they are being swallowed up.  Have you thought of some different shoes in 20's?  I think with that big kit it would flow very nicely.  Just my .02 cents.

All you need is the Air, Exhaust, Wheels? and we will have our 1st "completed" EGG.  Thought that either Shawn or Alan was going to be the first........I think that it will be between you and Alan as to who will have the first "completed" EGG......but then again it is never really "complete" right?  LOL

dvsmeth0dz.........what does your EGG look like?  I see you are also from the 808.

Sukoshiyoshi
View original BBCode
Wow.........full bodykit (door panel US converted), front headlights and rear tail conversion, side mirror signal, "Estima" Badge.......all out of no where! Looking good! Did those "Overfenders" also come with the kit? With those Offsets I would of thought you could probally do a mild fender roll and sell them to me! LOL
Anyways......really like the look of it.....regardless of whether the kit may be a knock off. I think that it looks sweet! Kind of surprised how the 19's look like they are being swallowed up. Have you thought of some different shoes in 20's? I think with that big kit it would flow very nicely. Just my .02 cents.
All you need is the Air, Exhaust, Wheels? and we will have our 1st "completed" EGG. Thought that either Shawn or Alan was going to be the first........I think that it will be between you and Alan as to who will have the first "completed" EGG......but then again it is never really "complete" right? LOL
dvsmeth0dz.........what does your EGG look like? I see you are also from the 808.
Sukoshiyoshi
sukoshiyoshi;126915 wrote:
dvsmeth0dz.........what does your EGG look like? I see you are also from the 808.
Sukoshiyoshi
Yoshi...he meant his PS attempt. But who knows..maybe he does have an egg..haha.
View original BBCode
[QUOTE=sukoshiyoshi;126915]
dvsmeth0dz.........what does your EGG look like?  I see you are also from the 808.

Sukoshiyoshi[/QUOTE]
Yoshi...he meant his PS attempt.  But who knows..maybe he does have an egg..haha.
i think they look good but i don't drive/ own one. i wouldnt mind building one up though. my gf drives a sienna and always wondered how that would look on bags and a kit, but i know it doesn't meet VIP standards. yeah im from the 808 and sure will miss it when i leave =(
View original BBCode
i think they look good but i don't drive/ own one. i wouldnt mind building one up though. my gf drives a sienna and always wondered how that would look on bags and a kit, but i know it doesn't meet VIP standards. yeah im from the 808 and sure will miss it when i leave =(
normandie;126887 wrote:

View original BBCode
[quote=normandie;126887]

[IMG]http://i2.photobucket.com/albums/y37/normandie/IMG_1185.jpg[/IMG]
[/quote]


[IMG]http://img.photobucket.com/albums/v695/dvsmethodz/frontestima.jpg[/IMG]
Get the camber in there to tuck the fitment!!

(not trying to show you up..just giving pointers) =)
View original BBCode
Get the camber in there to tuck the fitment!!
[IMG]http://www.vipemporium.com/customer/estimachop2.jpg[/IMG]

(not trying to show you up..just giving pointers) =)
HOT HOT HOT HOT...get it slammed...awesome job for cali VAN..!! real or fakey..that ish is hot...get er done and on the streets...
View original BBCode
HOT HOT HOT HOT...get it slammed...awesome job for cali VAN..!! real or fakey..that ish is hot...get er done and on the streets...
My bad......I thought his "attempt" he was reffering to his EGG........LOL

Anyways........do you have any rubbing issues with your sliding door with those "Overfenders"?

Sukoshiyoshi
View original BBCode
My bad......I thought his "attempt" he was reffering to his EGG........LOL
Anyways........do you have any rubbing issues with your sliding door with those "Overfenders"?
Sukoshiyoshi
:biggthumpup: , cant wait to see it dumped and see it in person. good job
View original BBCode
:biggthumpup: , cant wait to see it dumped and see it in person. good job
Thanks for the photoshop work, you guys are good.

As far as the body kit, can you actually tell if it's a knock-off just by looking at a pic?  Or is it because it's from Upgarage?  Anyway, knock-off or not, I'd take this anytime over the stock previa's bumpers & side panels.  I've been dragging on doing the suspension for too long now, and that was the first mod I bought.  One of these days, I'll finally finish it.

No rubbing issues on the sliding door with the overfenders, probably still have 1/2 inch clearance.

Here's the current mod list:

Exterior:
Estima Headlights, Corner Lights & Grille
Estima tail lights
JDM window visor
Unknown Used body kit from Upgarage
Overfender kit
Blue film on fogs
Side mirror winker & power folding mirrors
Estima Badge & Bigger Toyota emblem
Painted calipers

Wheels:
Amistad Brights 19x8, 19x9 +38 offset
Falken FK452  235/35/19

Interior:
Genstar mirror with compass & temp
Estima center console

Sound system:
Eclipse AVN 5435 with dvd & navi
Old School Soundstream 300SX amp
6.5 Phoenix Gold rsd65cs components – front doors
5.25 Diamond Audio D352i Coax – front
5.25 Pioneer Coax – rear
Infinity Basslink II subwoofer
Raammat BXT sound deadener on doors & body panel

Need to install:
Air Bomber suspension
Cusco lateral rod
Anceltion Esvein exhaust
Fabulous seat covers
View original BBCode
Thanks for the photoshop work, you guys are good.
As far as the body kit, can you actually tell if it's a knock-off just by looking at a pic? Or is it because it's from Upgarage? Anyway, knock-off or not, I'd take this anytime over the stock previa's bumpers & side panels. I've been dragging on doing the suspension for too long now, and that was the first mod I bought. One of these days, I'll finally finish it.
No rubbing issues on the sliding door with the overfenders, probably still have 1/2 inch clearance.
Here's the current mod list:
Exterior:
Estima Headlights, Corner Lights & Grille
Estima tail lights
JDM window visor
Unknown Used body kit from Upgarage
Overfender kit
Blue film on fogs
Side mirror winker & power folding mirrors
Estima Badge & Bigger Toyota emblem
Painted calipers
Wheels:
Amistad Brights 19x8, 19x9 +38 offset
Falken FK452 235/35/19
Interior:
Genstar mirror with compass & temp
Estima center console
Sound system:
Eclipse AVN 5435 with dvd & navi
Old School Soundstream 300SX amp
6.5 Phoenix Gold rsd65cs components – front doors
5.25 Diamond Audio D352i Coax – front
5.25 Pioneer Coax – rear
Infinity Basslink II subwoofer
Raammat BXT sound deadener on doors & body panel
Need to install:
Air Bomber suspension
Cusco lateral rod
Anceltion Esvein exhaust
Fabulous seat covers
Well, the style looks like the Fabulous kit for TCR Estima (Version 1 which they don't show on their site anymore). But the way to tell would be on the back side of the aero. Next time you have it off, look on the backside for any logos or stickers under the resin, or under the lips for any indentations of a logo. That's really the only way.
View original BBCode
Well, the style looks like the Fabulous kit for TCR Estima (Version 1 which they don't show on their site anymore). But the way to tell would be on the back side of the aero. Next time you have it off, look on the backside for any logos or stickers under the resin, or under the lips for any indentations of a logo. That's really the only way.
elpresidente;126925 wrote:Get the camber in there to tuck the fitment!!
(not trying to show you up..just giving pointers) =)
lol..its all good, i tried adding camber to it but it didnt look right.=) good job btw:biggthumpup:
View original BBCode
[QUOTE=elpresidente;126925]Get the camber in there to tuck the fitment!!
[IMG]http://www.vipemporium.com/customer/estimachop2.jpg[/IMG]

(not trying to show you up..just giving pointers) =)[/QUOTE]

lol..its all good, i tried adding camber to it but it didnt look right.=)  good job btw:biggthumpup:
i really like it alot, i would rock different wheels.

Question -- Where are u located?
and how did u do the door panel conversion?
View original BBCode
i really like it alot, i would rock different wheels.
Question -- Where are u located?
and how did u do the door panel conversion?
pm sent
View original BBCode
pm sent
ffgarage;127086 wrote:i really like it alot, i would rock different wheels.
Question -- Where are u located?
and how did u do the door panel conversion?
I live in Tarzana in the San Fernando Valley.
As far as the door panel conversion, I used the driver's side panel & sideskirt as a reverse template on where to cut. Once separated, the sideskirt and the door panel will need to be built up with fiberglass & body filler. It's time consuming as I am not an expert in this but the results turned out okay. I'm sure a body shop will do a much better job.
View original BBCode
[QUOTE=ffgarage;127086]i really like it alot, i would rock different wheels.

Question -- Where are u located?
and how did u do the door panel conversion?[/QUOTE]

I live in Tarzana in the San Fernando Valley.

As far as the door panel conversion,  I used the driver's side panel & sideskirt as a reverse template on where to cut.  Once separated, the sideskirt and the door panel will need to be built up with fiberglass & body filler.  It's time consuming as I am not an expert in this but the results turned out okay.  I'm sure a body shop will do a much better job.
Looking good.. Even if it's a knock kit, props to you on a good starting point..I really liked on how you just came out and susprised everyone. You at least have alot of other JDM goodies on there..

Keep us posted on the build..
View original BBCode
Looking good.. Even if it's a knock kit, props to you on a good starting point..I really liked on how you just came out and susprised everyone. You at least have alot of other JDM goodies on there..
Keep us posted on the build..
yeah, cool. the suspension is a must. But prolly the most complete I've seen here. Could very well be a copy of Fabulous. would be inset on the front plate mount. But who cares anymore? to a point anyway. WE live in a knockoff world. tastefully done and it'll be hard to tell. I lose out to cars using knock off stuff all the time. it's all about quantity over quality. Can't even justify it here in Chicago. But I like it.
View original BBCode
yeah, cool. the suspension is a must. But prolly the most complete I've seen here. Could very well be a copy of Fabulous. would be inset on the front plate mount. But who cares anymore? to a point anyway. WE live in a knockoff world. tastefully done and it'll be hard to tell. I lose out to cars using knock off stuff all the time. it's all about quantity over quality. Can't even justify it here in Chicago. But I like it.
Anybody have a pic of the Fabulous version 1 kit for the TCR? I for one would really like to know what the kit is a knock-off of. Shawnthemonster thought it was closer to the Garson Geraid. Here's the original pic when I first acquired the kit. I think it was taken from upgarage.

I thought that if the kit came from Japan, it was authentic. Big mistake. Little did I know that there was a proliferation of knock-off's there too. I should have done more research. Oh well, live and learn.
View original BBCode
Anybody have a pic of the Fabulous version 1 kit for the TCR?  I for one would really like to know what the kit is a knock-off of.  Shawnthemonster thought it was closer to the Garson Geraid.  Here's the original pic when I first acquired the kit.  I think it was taken from upgarage.

[IMG]http://i2.photobucket.com/albums/y37/normandie/ESTIMATCR2001.jpg[/IMG]

I thought that if the kit came from Japan, it was authentic.  Big mistake.  Little did I know that there was a proliferation of knock-off's there too.  I should have done more research.  Oh well, live and learn.
you could go a bit deeper with those offsets too. :)

it'll look great once you get those bags on!
View original BBCode
you could go a bit deeper with those offsets too. :)
it'll look great once you get those bags on!
Your rear bumper is funny lookin, i hate how it flares up.
View original BBCode
Your rear bumper is funny lookin, i hate how it flares up.
Norman,
do u want to get this to replace your rear?

Let me know!
Alan
View original BBCode
Norman,

do u want to get this to replace your rear?

[IMG]http://i2.photobucket.com/albums/y10/rracing/DSC01532.jpg[/IMG]

Let me know!

Alan
View original BBCode
[IMG]http://i2.photobucket.com/albums/y10/rracing/DSC01533.jpg[/IMG]
19,900 Yen......that is dirt cheap.  If I had stumbled upon it I would of jumped on it in a heart beat!  Let me know if you want to get "rid of it".........

Sukoshiyoshi
View original BBCode
19,900 Yen......that is dirt cheap. If I had stumbled upon it I would of jumped on it in a heart beat! Let me know if you want to get "rid of it".........
Sukoshiyoshi
EstimaStyleWgnClub;128500 wrote:Norman,
do u want to get this to replace your rear?
Let me know!
Alan
Alan, thanks for the offer but I'll use my current bumper for now since it matches the front. It will probably look better once the van is lowered.
sukoshiyoshi;128504 wrote:19,900 Yen......that is dirt cheap. If I had stumbled upon it I would of jumped on it in a heart beat! Let me know if you want to get "rid of it".........
Sukoshiyoshi
Gotta remember 19,900 yen is before US shipping & seller's cut. And it's a "knockoff", haha.
View original BBCode
[QUOTE=EstimaStyleWgnClub;128500]Norman,

do u want to get this to replace your rear?


Let me know!

Alan[/QUOTE]

Alan, thanks for the offer but I'll use my current bumper for now since it matches the front.  It will probably look better once the van is lowered.

[QUOTE=sukoshiyoshi;128504]19,900 Yen......that is dirt cheap.  If I had stumbled upon it I would of jumped on it in a heart beat!  Let me know if you want to get "rid of it".........

Sukoshiyoshi[/QUOTE]

Gotta remember 19,900 yen is before US shipping & seller's cut. And it's a "knockoff", haha.
mdenoga;126890 wrote:normandie, the suspension should've been your first mod. Body kit?!? I have mixed feelings about the kit since it looks to me like a knockoff.
who cares?
it looks good .. minus the gap
View original BBCode
[quote=mdenoga;126890]normandie, the suspension should've been your first mod. Body kit?!? I have mixed feelings about the kit since it looks to me like a knockoff.[/quote]
who cares?
it looks good .. minus the gap
Looks pretty clean to me cant wait to see it on the air setup...
View original BBCode
Looks pretty clean to me cant wait to see it on the air setup...
$200.00 for a kit.......knock off or not...you can't go wrong.  I would rock it any day!  But that is just me.

Nevertheless looking forward in seeing this project completed.

Sukoshiyoshi
View original BBCode
$200.00 for a kit.......knock off or not...you can't go wrong. I would rock it any day! But that is just me.
Nevertheless looking forward in seeing this project completed.
Sukoshiyoshi
EstimaStyleWgnClub;128500 wrote:Norman,
do u want to get this to replace your rear?
Let me know!
Alan
hey alan..
how much you selling this?!
i got rear ended...so my bumper was screwed!!! might need a new bumper.
View original BBCode
[QUOTE=EstimaStyleWgnClub;128500]Norman,

do u want to get this to replace your rear?

[IMG]http://i2.photobucket.com/albums/y10/rracing/DSC01532.jpg[/IMG]

Let me know!

Alan[/QUOTE]

hey alan..

how much you selling this?!

i got rear ended...so my bumper was screwed!!! might need a new bumper.
i like the van with the lights, the rims are ok to my mind, and i am not liken the kit that much. But hey, its a Estima
View original BBCode
i like the van with the lights, the rims are ok to my mind, and i am not liken the kit that much. But hey, its a Estima
don't feel bad for what you bought! Like I said before. more completed than anyone else showing off their Previa's
View original BBCode
don't feel bad for what you bought! Like I said before. more completed than anyone else showing off their Previa's
Any new updates on your suspension install?

Sukoshiyoshi
View original BBCode
Any new updates on your suspension install?
Sukoshiyoshi
Looks pretty good but also in need of a paint match
View original BBCode
Looks pretty good but also in need of a paint match
JDMJim;129745 wrote:don't feel bad for what you bought! Like I said before. more completed than anyone else showing off their Previa's
true that (but not for long ;) )
he will get the air in and then thats that. anything else in store?
View original BBCode
[QUOTE=JDMJim;129745]don't feel bad for what you bought! Like I said before. more completed than anyone else showing off their Previa's[/QUOTE]

true that (but not for long ;) )

he will get the air in and then thats that. anything else in store?
sukoshiyoshi;129949 wrote:Any new updates on your suspension install?
Sukoshiyoshi
Not much, just the air tank mounted & compressor wiring finished. Next is running air lines. I do all the install myself that's why it's slow, haha.
shawnthemonster;130444 wrote:true that (but not for long ;) )
he will get the air in and then thats that. anything else in store?
Need to install this anceltion esvein exhaust too.

View original BBCode
[QUOTE=sukoshiyoshi;129949]Any new updates on your suspension install?

Sukoshiyoshi[/QUOTE]
Not much, just the air tank mounted & compressor wiring finished.  Next is running air lines.  I do all the install myself that's why it's slow, haha.

[QUOTE=shawnthemonster;130444]true that (but not for long ;) )

he will get the air in and then thats that. anything else in store?[/QUOTE]

Need to install this anceltion esvein exhaust too.

[IMG]http://i2.photobucket.com/albums/y37/normandie/anceltionmuffler1.jpg[/IMG]
I think it looks sick. Keep up the good work. This is one of the first done up ones ive seen in a long time here in the states. Good job!
View original BBCode
I think it looks sick. Keep up the good work. This is one of the first done up ones ive seen in a long time here in the states. Good job!
View original BBCode
Air Bomber suspension finally installed:

[IMG]http://i2.photobucket.com/albums/y37/normandie/2008Nov16_5358.jpg[/IMG]

[img]http://images.crysjanmom.multiply.com/image/5/photos/123/600x600/7/2008-Nov-16-5349.JPG?et=dE%2CR8jsVWQ4kGplDhHsRtg&nmid=135486971[/img]

[img]http://images.crysjanmom.multiply.com/image/5/photos/123/600x600/4/2008-Nov-16-5356.JPG?et=%2BBa39M0OJgNXGxWYc2Kr3Q&nmid=135486971[/img]

[img]http://images.crysjanmom.multiply.com/image/4/photos/123/600x600/8/IMG-4950.JPG?et=2x57NRvry3xfo6kSzZUu%2CQ&nmid=135486971[/img]
Looks very nice.
View original BBCode
Looks very nice.
Normandie looking good. I'll be up in your area this weekend for my sister's wedding. I'll call you if I can hang out.
View original BBCode
Normandie looking good. I'll be up in your area this weekend for my sister's wedding. I'll call you if I can hang out.
officially wet myself..dammit...super hot!!!
View original BBCode
officially wet myself..dammit...super hot!!!
Its almost winter and man so many EGGS are HAtching!!!

Looking good man..Knock off or not.. as long your happy with your ride thats what counts most..

the main thing is that if you do enter shows and it is a knock off dont go sellling these judges now days that its a genuine kit.. I had a few guys with Scions while i was judging claim it was real but wheni told them to prove it they couldnt..

There one why to make a knock off not a knocked off anymore.. just hack it up and make it your own..
i see some battle scars onthe front bumper.. if your going to fix it might as well make it your own

Keep up the good work!!!! make me wana find a egg to hatch my self!
View original BBCode
Its almost winter and man so many EGGS are HAtching!!!
Looking good man..Knock off or not.. as long your happy with your ride thats what counts most..
the main thing is that if you do enter shows and it is a knock off dont go sellling these judges now days that its a genuine kit.. I had a few guys with Scions while i was judging claim it was real but wheni told them to prove it they couldnt..
There one why to make a knock off not a knocked off anymore.. just hack it up and make it your own..
i see some battle scars onthe front bumper.. if your going to fix it might as well make it your own
Keep up the good work!!!! make me wana find a egg to hatch my self!
Looks 100X better now that it is slammed.

Sukoshiyoshi
View original BBCode
Looks 100X better now that it is slammed.
Sukoshiyoshi
i think itd look sick if the whole upper half of the car was painted black
View original BBCode
i think itd look sick if the whole upper half of the car was painted black
AHH...looks soo nice.

I noticed you took out your fender flares...looks better without it in my opinion.

Why why why do I have to be poor!  I just resigned my parttime job today to concentrate on schooling!! AHH, too bad for me :)
View original BBCode
AHH...looks soo nice.
I noticed you took out your fender flares...looks better without it in my opinion.
Why why why do I have to be poor! I just resigned my parttime job today to concentrate on schooling!! AHH, too bad for me :)
Damn I love it... always loved these.... and white's my favorite color for cars....
View original BBCode
Damn I love it... always loved these.... and white's my favorite color for cars....
Thanks for the comments, everybody! Appreciate them.
mdenoga;205372 wrote:Normandie looking good. I'll be up in your area this weekend for my sister's wedding. I'll call you if I can hang out.
Are you bringing the van?
eight08customs;205411 wrote:Its almost winter and man so many EGGS are HAtching!!!
Looking good man..Knock off or not.. as long your happy with your ride thats what counts most..
the main thing is that if you do enter shows and it is a knock off dont go sellling these judges now days that its a genuine kit.. I had a few guys with Scions while i was judging claim it was real but wheni told them to prove it they couldnt..
There one why to make a knock off not a knocked off anymore.. just hack it up and make it your own..
i see some battle scars onthe front bumper.. if your going to fix it might as well make it your own
Keep up the good work!!!! make me wana find a egg to hatch my self!
Marshall,
Thank you. Your work on the hawaii previas are what pushed me to finish the install. The rear bolt-on brackets was the solution I've been waiting for a long time! Bumper battle scars was from a piece of tire on the freeway that I ran over, and this was with the stock suspension.
hondaboi;205436 wrote:AHH...looks soo nice.
I noticed you took out your fender flares...looks better without it in my opinion.
Why why why do I have to be poor! I just resigned my parttime job today to concentrate on schooling!! AHH, too bad for me :)
I still have to roll the fenders, so I took the fender flares off. Just be patient, it took me years to get to this point.
View original BBCode
Thanks for the comments, everybody!  Appreciate them.


[QUOTE=mdenoga;205372]Normandie looking good. I'll be up in your area this weekend for my sister's wedding. I'll call you if I can hang out.[/QUOTE]  Are you bringing the van?

[QUOTE=eight08customs;205411]Its almost winter and man so many EGGS are HAtching!!!

Looking good man..Knock off or not.. as long your happy with your ride thats what counts most..

the main thing is that if you do enter shows and it is a knock off dont go sellling these judges now days that its a genuine kit.. I had a few guys with Scions while i was judging claim it was real but wheni told them to prove it they couldnt..

There one why to make a knock off not a knocked off anymore.. just hack it up and make it your own..
i see some battle scars onthe front bumper.. if your going to fix it might as well make it your own

Keep up the good work!!!! make me wana find a egg to hatch my self![/QUOTE]

Marshall,
Thank you.  Your work on the hawaii previas are what pushed me to finish the install.  The rear bolt-on brackets was the solution I've been waiting for a long time!  Bumper battle scars was from a piece of tire on the freeway that I ran over, and this was with the stock suspension.

[QUOTE=hondaboi;205436]AHH...looks soo nice.

I noticed you took out your fender flares...looks better without it in my opinion.

Why why why do I have to be poor!  I just resigned my parttime job today to concentrate on schooling!! AHH, too bad for me :)[/QUOTE]
I still have to roll the fenders, so I took the fender flares off.  Just be patient,  it took me years to get to this point.
sukoshiyoshi;205431 wrote:Looks 100X better now that it is slammed.
Sukoshiyoshi
Thanks,
You've set the bar with your egg, I'm just trying to keep up, haha. Yes, air suspension makes a big difference. What psi do you run? The ride is bouncy right now, and I think I will need to change the rear shocks to shorter ones.
View original BBCode
[QUOTE=sukoshiyoshi;205431]Looks 100X better now that it is slammed.

Sukoshiyoshi[/QUOTE]


Thanks,

You've set the bar with your egg, I'm just trying to keep up, haha.  Yes, air suspension makes a big difference.  What psi do you run?  The ride is bouncy right now, and I think I will need to change the rear shocks to shorter ones.
I am still playing around with my settings.....currently I have the fronts at 54 psi and the rears at 40 psi for "ride height".  The ride is not that bad........a little more stiff than how I had my Coil-Overs settings at.  I have not "bottomed out" on any thing on the roads at that psi.......but would really like to go lower.  Even at those psi levels I still have "some" wheel gap.  Would really love to roll "tuck" but am concerned about "bottoming out" on the oil pan guard or "cutting" the tires, or damaging my Overfenders.....yada, yada, yada.  I Have not attempted to go up driveways at the psi and always raise it back up when I do.  Why damage or scrape anything when you don't have to right?

I don't know about setting any bar.........just trying to keep up with all you guys.  Keep on the "look out".......I ain't talking "rumors" when I am saying that a Egg is going to be debuting here in the 808 complete with Air Sus, Full Aero, Body/Paint and "other" goodies in her.....and it ain't going to be mine.

Keep up the great project and look forward in checking in to see updates.  Also any luck with any where willing to do an extended hinge for you?  Also you planning on putting back on the Overfenders?  If not I may know someone who may be in need of a set......well depending on which wheels and offsets he decides to run.

Sukoshiyoshi
View original BBCode
I am still playing around with my settings.....currently I have the fronts at 54 psi and the rears at 40 psi for "ride height". The ride is not that bad........a little more stiff than how I had my Coil-Overs settings at. I have not "bottomed out" on any thing on the roads at that psi.......but would really like to go lower. Even at those psi levels I still have "some" wheel gap. Would really love to roll "tuck" but am concerned about "bottoming out" on the oil pan guard or "cutting" the tires, or damaging my Overfenders.....yada, yada, yada. I Have not attempted to go up driveways at the psi and always raise it back up when I do. Why damage or scrape anything when you don't have to right?
I don't know about setting any bar.........just trying to keep up with all you guys. Keep on the "look out".......I ain't talking "rumors" when I am saying that a Egg is going to be debuting here in the 808 complete with Air Sus, Full Aero, Body/Paint and "other" goodies in her.....and it ain't going to be mine.
Keep up the great project and look forward in checking in to see updates. Also any luck with any where willing to do an extended hinge for you? Also you planning on putting back on the Overfenders? If not I may know someone who may be in need of a set......well depending on which wheels and offsets he decides to run.
Sukoshiyoshi
I'm running 90 psi on the fronts & 60 in the rears.  I do have firestone bags though.  Those psi's are what Shin from Airrunner USA recommends.  Shawn might still be able to get the hinge extenders & oil pan guard, but I am in no rush.

I know about the other hawaii egg, as I've been following it also on the other site.  I'm sure it will be great once finished.

By the way,  my aero kit wil be for sale next month, once the other one arrives.  Hopefully, the new kit will be a first in Socal, if not the US.  And it's not a replica/knockoff either, haha!
View original BBCode
I'm running 90 psi on the fronts & 60 in the rears. I do have firestone bags though. Those psi's are what Shin from Airrunner USA recommends. Shawn might still be able to get the hinge extenders & oil pan guard, but I am in no rush.
I know about the other hawaii egg, as I've been following it also on the other site. I'm sure it will be great once finished.
By the way, my aero kit wil be for sale next month, once the other one arrives. Hopefully, the new kit will be a first in Socal, if not the US. And it's not a replica/knockoff either, haha!
Looks sick son your definitely doing your thing...keep it going
View original BBCode
Looks sick son your definitely doing your thing...keep it going
dang .. look at all these eggs.. maybe i should post some pics of mine.. looks clean btw!
View original BBCode
dang .. look at all these eggs.. maybe i should post some pics of mine.. looks clean btw!
NICE EGG!!!

Really like how it looks!!
View original BBCode
NICE EGG!!!
Really like how it looks!!
looks sick. im glad some are coming together.
View original BBCode
looks sick. im glad some are coming together.
what kit are you getting? i think that kit looks great.
View original BBCode
what kit are you getting? i think that kit looks great.
^^^^^I agree......just curious....how much you willing to sell for?

Sukoshiyoshi
View original BBCode
^^^^^I agree......just curious....how much you willing to sell for?
Sukoshiyoshi
and btw how hard was it on modifying the door panels to to fit on our lhd models?
View original BBCode
and btw how hard was it on modifying the door panels to to fit on our lhd models?
seeing all these eggs makes me want to dump my wagon and get a previa
View original BBCode
seeing all these eggs makes me want to dump my wagon and get a previa
shawnthemonster;205863 wrote:and btw how hard was it on modifying the door panels to to fit on our lhd models?
I used the driver’s side door panels/sideskirt as a reference to figure out how much needs to be built up on the passenger side. Use a dremel, hack saw, die grinder (Whatever is available) to separate the door panel from the sideskirt. Depending on the aero kit, you will need to add a bottom piece to the door panel and also build up the sideskirt.
The technique I used may not be the best but worked for what I needed done. Let’s say you need a 24”x 4”inch fiberglass to add. I used an appropriate size mdf board and screw 1” wood slats on the side to contain the resin. Spray that with adhesive and cover with aluminum foil. Use a roller to make sure that the foil is smooth. You are now ready to pour in the resin & fiberglass cloth. Build it up to about 3/16” thick.
Once set, pop the piece out. You can now trim this to the exact size you want and attach to the piece being modified with more resin & tape. Use body filler to smooth out.
Hope this helps.
View original BBCode
[QUOTE=shawnthemonster;205863]and btw how hard was it on modifying the door panels to  to fit on our lhd models?[/QUOTE]


I used the driver’s side door panels/sideskirt as a reference to figure out how much needs to be built up on the passenger side.  Use a dremel, hack saw, die grinder (Whatever is available) to separate the door panel from the sideskirt.  Depending on the aero kit, you will need to add a bottom piece to the door panel and also build up the sideskirt.

The technique I used may not be the best but worked for what I needed done. Let’s say you need a 24”x 4”inch fiberglass to add.  I used an appropriate size mdf board and screw 1” wood slats on the side to contain the resin.  Spray that with adhesive and cover with aluminum foil.  Use a roller to make sure that the foil is smooth. You are now ready to pour in the resin & fiberglass cloth.  Build it up to about 3/16” thick.

Once set, pop the piece out.  You can now trim this to the exact size you want and attach to the piece being modified with more resin & tape.  Use body filler to smooth out.

Hope this helps.
that is definitely hard.. i basically did the same thing.
View original BBCode
that is definitely hard.. i basically did the same thing.
F* sick normandie... makes me wanna keep mine ugh!
View original BBCode
F* sick normandie... makes me wanna keep mine ugh!
nice!!! i can't til i finish school so i can start on my egg
View original BBCode
nice!!! i can't til i finish school so i can start on my egg
View original BBCode
Pics of the new "used" aero kit:

[IMG]http://i2.photobucket.com/albums/y37/normandie/jpfront.jpg[/IMG]

[IMG]http://i2.photobucket.com/albums/y37/normandie/jprear.jpg[/IMG]

[IMG]http://i2.photobucket.com/albums/y37/normandie/jp.jpg[/IMG]
Nice
View original BBCode
Nice
awsome!! soo...are you selling your old kit??? curious how much?
View original BBCode
awsome!! soo...are you selling your old kit??? curious how much?
mmm.. junction produce for Previa... can't wait to see it in white!
View original BBCode
mmm.. junction produce for Previa... can't wait to see it in white!
Sorry duble post........internet....suuuuper slow.

Sukoshiyoshi
View original BBCode
Sorry duble post........internet....suuuuper slow.
Sukoshiyoshi
Glad to see that this project is still evolving.  JP Egg........I wish I had the dinero when the full JP aero was offered to me at a sweet price.  You know that you can't go wrong with JP.  I noticed that you only have the front and rear bumpers, are you going to keep the door caps and side skirts that you currently have?  Or did you also pick up JP door caps and side skirts?  Also who was able to bring these in for you?  Much Props on dropping the dollars for shipping!

Sukoshiyoshi
View original BBCode
Glad to see that this project is still evolving. JP Egg........I wish I had the dinero when the full JP aero was offered to me at a sweet price. You know that you can't go wrong with JP. I noticed that you only have the front and rear bumpers, are you going to keep the door caps and side skirts that you currently have? Or did you also pick up JP door caps and side skirts? Also who was able to bring these in for you? Much Props on dropping the dollars for shipping!
Sukoshiyoshi
I have the complete kit. In the process of modifying the passenger door caps & side panel right now.
Joji from www.bidschoice.com brought in the kit. They are in SoCal so I was able to save on shipping by picking up the kit when it arrived.
View original BBCode
I have the complete kit.  In the process of modifying the passenger door caps & side panel right now.

Joji from [url]www.bidschoice.com[/url]  brought in the kit.  They are in SoCal so I was able to save on shipping by picking up the kit when it arrived.
nice kit.. joji is a cool guy got me ton of parts and came through with the only set of garson dolchis in the us thats on my ccar
View original BBCode
nice kit.. joji is a cool guy got me ton of parts and came through with the only set of garson dolchis in the us thats on my ccar
I believe someone already asked about your "previous" kit but are you going to be selling?  If so, how much you looking to sell for?

Sukoshiyoshi
View original BBCode
I believe someone already asked about your "previous" kit but are you going to be selling? If so, how much you looking to sell for?
Sukoshiyoshi
Junction Produce. Good shit!!!
View original BBCode
Junction Produce. Good shit!!!
Damn steppin up to the real deal holyfield!!!
View original BBCode
Damn steppin up to the real deal holyfield!!!
hondaboi;228127 wrote:awsome!! soo...are you selling your old kit??? curious how much?
sukoshiyoshi;228705 wrote:I believe someone already asked about your "previous" kit but are you going to be selling? If so, how much you looking to sell for?
Sukoshiyoshi
Not worth the hassle to ship. Maybe if someone will pick it up, I might consider selling. Haven't decided on a price, and I figure not to get much from it anyway.
View original BBCode
[QUOTE=hondaboi;228127]awsome!! soo...are you selling your old kit??? curious how much?[/QUOTE]

[QUOTE=sukoshiyoshi;228705]I believe someone already asked about your "previous" kit but are you going to be selling?  If so, how much you looking to sell for?

Sukoshiyoshi[/QUOTE]

Not worth the hassle to ship.  Maybe if someone will pick it up, I might consider selling.  Haven't decided on a price, and I figure not to get much from it anyway.
so dont you have this kit on yet?
View original BBCode
so dont you have this kit on yet?
shawnthemonster;231305 wrote:so dont you have this kit on yet?
No. It's taking too much time modifying the passenger side doorpanel/sideskirt. Any updates on your avanzare estima?
View original BBCode
[QUOTE=shawnthemonster;231305]so dont you have this kit on yet?[/QUOTE]

No.  It's taking too much time modifying the passenger side doorpanel/sideskirt.  Any updates on your avanzare estima?
soon... as soon as it warms up here :)
View original BBCode
soon... as soon as it warms up here :)
Most jdm aero kits will need to be modified in order to work with the US previa. The passenger side skirt and body panel is one piece as shown in this reference topline photo:

This will need to be separated so you can open the rear passenger sliding door. I try to do all the work myself, using basic garage tools. You will need a dremel with a cutting wheel & grinding wheel, a grinder, fiberglass mat & resin, and a good body filler. A palm sander is very handy and several grades of sandpaper.
Home Depot carries the fiberglass mat & resin. I highly recommend Evercoat Rage Gold body filler as it is very easy to work with, compared to bondo.
I use a grinder with a cutting wheel to separate the sideskirt from the body panel. They are very good for making straight cuts and will not bind like a dremel. Use the dremel for cutting around curves. Once the pieces are separated, they will need to be built up with fiberglass. Use 2 pieces of flat wood (48" x 3") joined at an angle ("L" shape) to make the mold. Cut the parts to fit, tack it in place using super glue and add more resin & mat to attach to the aero parts.
This pics show the parts that needs to be build up. This is after fiberglassing & body filler (light green).


After primer & rattle can paint: The good thing about the parts that will be added is that you won't see it when the doors are closed.


Panels & sideskirts installed. I use 3m heavy duty double sided tape from the local auto parts store to attach the body panels.

View original BBCode
Most jdm aero kits will need to be modified in order to work with the US previa.  The passenger side skirt and body panel is one piece as shown in this reference topline photo:

[IMG]http://i2.photobucket.com/albums/y37/normandie/topline.jpg[/IMG]

This will need to be separated so you can open the rear passenger sliding door.  I try to do all the work myself, using basic garage tools.  You will need a dremel with a cutting wheel & grinding wheel, a grinder, fiberglass mat & resin, and a good body filler.  A palm sander is very handy and several grades of sandpaper.

Home Depot carries the fiberglass mat & resin.  I highly recommend Evercoat Rage Gold body filler as it is very easy to work with, compared to bondo.

I use a grinder with a cutting wheel to separate the sideskirt from the body panel.  They are very good for making straight cuts and will not bind like a dremel.  Use the dremel for cutting around curves.  Once the pieces are separated, they will need to be built up with fiberglass.  Use 2 pieces of flat wood  (48" x 3") joined at an angle ("L" shape) to make the mold.  Cut the parts to fit, tack it in place using super glue and add more resin & mat to attach to the aero parts.

This pics show the parts that needs to be build up.  This is after fiberglassing & body filler (light green).

[IMG]http://i2.photobucket.com/albums/y37/normandie/IMG_2469.jpg[/IMG]


[IMG]http://i2.photobucket.com/albums/y37/normandie/IMG_2471.jpg[/IMG]


[IMG]http://i2.photobucket.com/albums/y37/normandie/IMG_2473.jpg[/IMG]

After primer & rattle can paint:  The good thing about the parts that will be added is that you won't see it when the doors are closed.


[IMG]http://i2.photobucket.com/albums/y37/normandie/IMG_2484.jpg[/IMG]


[IMG]http://i2.photobucket.com/albums/y37/normandie/IMG_2485.jpg[/IMG]

Panels & sideskirts installed.  I use 3m heavy duty double sided tape from the local auto parts store to attach the body panels.

[IMG]http://i2.photobucket.com/albums/y37/normandie/IMG_2489.jpg[/IMG]thanks normandie..... i will be doing this very soon with my kit so i would like all the examples i can get. . its been a hard thing for me to get the balls to start cutting into my kit. but i will soon. so is it possible to screw in the door panels as well as just 3Ming them?
View original BBCode
thanks normandie..... i will be doing this very soon with my kit so i would like all the examples i can get. . its been a hard thing for me to get the balls to start cutting into my kit. but i will soon. so is it possible to screw in the door panels as well as just 3Ming them?
normandie;228389 wrote:I have the complete kit. In the process of modifying the passenger door caps & side panel right now.
Joji from www.bidschoice.com brought in the kit. They are in SoCal so I was able to save on shipping by picking up the kit when it arrived.
can you pm me his contact info? i'll tell him you sent me his way so you can get the credit for spreading the word on vsc!:biggthumpup:
View original BBCode
[quote=normandie;228389]I have the complete kit.  In the process of modifying the passenger door caps & side panel right now.

Joji from [URL="http://www.bidschoice.com"]www.bidschoice.com[/URL]  brought in the kit.  They are in SoCal so I was able to save on shipping by picking up the kit when it arrived.[/quote]

can you pm me his contact info? i'll tell him you sent me his way so you can get the credit for spreading the word on vsc!:biggthumpup:
ALEXTHESUS*PECT;233024 wrote:can you pm me his contact info? i'll tell him you sent me his way so you can get the credit for spreading the word on vsc!:biggthumpup:
Go to www.bidschoice.com, then click on the link www.wheelchoice.com. Joji's number is listed on the bottom of the page.
View original BBCode
[QUOTE=ALEXTHESUS*PECT;233024]can you pm me his contact info? i'll tell him you sent me his way so you can get the credit for spreading the word on vsc!:biggthumpup:[/QUOTE]


Go to [url]www.bidschoice.com[/url], then click on the link [url]www.wheelchoice.com[/url].  Joji's number is listed on the bottom of the page.
normandie, the car looks great. thank you for posting this up. it will help alot of previa owners. Cant wait to see the rest of the kit installed. I'm glad someone is getting their van done compared to people like me =p. I'm jealous. Good job.
View original BBCode
normandie, the car looks great. thank you for posting this up. it will help alot of previa owners. Cant wait to see the rest of the kit installed. I'm glad someone is getting their van done compared to people like me =p. I'm jealous. Good job.
Thank you for the update photos.  Much props on your mad skills.  I wish I had DIY skills like you.  But it is okay because I got some good friends who go skills.  LOL  Looking forward in seeing you new kit.  It is going to look sweet!  1st JP Egg in the states?  Have you thought about JP wheels as a "theme"?

Sukoshiyoshi
View original BBCode
Thank you for the update photos. Much props on your mad skills. I wish I had DIY skills like you. But it is okay because I got some good friends who go skills. LOL Looking forward in seeing you new kit. It is going to look sweet! 1st JP Egg in the states? Have you thought about JP wheels as a "theme"?
Sukoshiyoshi
sukoshiyoshi;233268 wrote:Thank you for the update photos. Much props on your mad skills. I wish I had DIY skills like you. But it is okay because I got some good friends who go skills. LOL Looking forward in seeing you new kit. It is going to look sweet! 1st JP Egg in the states? Have you thought about JP wheels as a "theme"?
Sukoshiyoshi
Scaras would be sweet, if only I can afford it.
View original BBCode
[QUOTE=sukoshiyoshi;233268]Thank you for the update photos.  Much props on your mad skills.  I wish I had DIY skills like you.  But it is okay because I got some good friends who go skills.  LOL  Looking forward in seeing you new kit.  It is going to look sweet!  1st JP Egg in the states?  Have you thought about JP wheels as a "theme"?

Sukoshiyoshi[/QUOTE]

Scaras would be sweet, if only I can afford it.
FOG LIGHTS:
The JP kit did not come with foglights. I wasn’t ready to spend more than $500 for the Junction Produce fogs so I had to improvise. First, I bought a set of Mercedes Benz W210 fogs form ebay since they look to be the same shape. Unfortunately, the lights were bigger and do not fit the bumper opening.
I have a set of PIAA fog lights from several years back and decided to install them for now. Since the PIAA’s are smaller, I decided to build a shroud for them.
The shrouds are built from fiberglass:

fog light opening cut and after applying body filler:

Primed and painted:

Test fitting the light:

Bumper test fit:

Fog light test:

View original BBCode
FOG LIGHTS:

The JP kit did not come with foglights.  I wasn’t ready to spend more than $500 for the Junction Produce fogs so I had to improvise.  First, I bought a set of Mercedes Benz W210 fogs form ebay since they look to be the same shape.  Unfortunately, the lights were bigger and do not fit the bumper opening.

I have a set of PIAA fog lights from several years back and decided to install them for now.  Since the PIAA’s are smaller, I decided to build a shroud for them.

The shrouds are built from fiberglass:

[IMG]http://i2.photobucket.com/albums/y37/normandie/IMG_2657.jpg[/IMG]

fog light opening cut and after applying body filler:

[IMG]http://i2.photobucket.com/albums/y37/normandie/IMG_2706.jpg[/IMG]

Primed and painted:

[IMG]http://i2.photobucket.com/albums/y37/normandie/IMG_2709.jpg[/IMG]

Test fitting the light:

[IMG]http://i2.photobucket.com/albums/y37/normandie/IMG_2712.jpg[/IMG]

Bumper test fit:

[IMG]http://i2.photobucket.com/albums/y37/normandie/IMG_2718.jpg[/IMG]

Fog light test:

[IMG]http://i2.photobucket.com/albums/y37/normandie/IMG_2719.jpg[/IMG]
great job.... i think you should paint the bezels flat black....
View original BBCode
great job.... i think you should paint the bezels flat black....
That is straight up pimpin!  Mad props on your DIY skills!

Sukoshiyoshi
View original BBCode
That is straight up pimpin! Mad props on your DIY skills!
Sukoshiyoshi
nice fogs big pimping.. piaa 1000x's
View original BBCode
nice fogs big pimping.. piaa 1000x's
Anceltion Esvein exhaust installed:
This is a straight bolt on. I had these installed months ago, but it was too loud and I took it out after one day.
This time the muffler shop took out the second cat and replaced it with a small glasspack to quiet it down. The glasspack didn't help much, still a very deep and loud sound, way too loud for my taste. I'll try to find another shop that might be able to remedy the loudness. I'm way too old for loud exhaust. It looks great though.


View original BBCode
Anceltion Esvein exhaust installed:
This is a straight bolt on.  I had these installed months ago, but it was too loud and I took it out after one day.
This time the muffler shop took out the second cat and replaced it with a small glasspack to quiet it down.  The glasspack didn't help much, still a very deep and loud sound, way too loud for my taste.  I'll try to find another shop that might be able to remedy the loudness.  I'm way too old for loud exhaust.  It looks great though.

[IMG]http://i2.photobucket.com/albums/y37/normandie/IMG_2717.jpg[/IMG]

[IMG]http://i2.photobucket.com/albums/y37/normandie/IMG_2715.jpg[/IMG]

[IMG]http://i2.photobucket.com/albums/y37/normandie/IMG_2716.jpg[/IMG]
:signdammit:you are making me want a van so bad
View original BBCode
:signdammit:you are making me want a van so bad
That's a great looking exhaust.
View original BBCode
That's a great looking exhaust.
woooahh!! looking nice!! keep it up, I am sooooooo jelous! haha
View original BBCode
woooahh!! looking nice!! keep it up, I am sooooooo jelous! haha
Suggestion on "toning" down the Exhaust.  Do you currently still have your spare tire under there?  If not, and if you don't mind then "hacking" your exhaust, have then install a "U Shaped" exhaust where the Spare would normally sit.  That would allow you to run an additional exhaust which should help.  I was also offered the same suggestion after removing the 2nd cat and replacing with an exhaust as well.  Only problem was that my Air Sus was going under there so that was not an option.  Just a thought.

Sukoshiyoshi
View original BBCode
Suggestion on "toning" down the Exhaust. Do you currently still have your spare tire under there? If not, and if you don't mind then "hacking" your exhaust, have then install a "U Shaped" exhaust where the Spare would normally sit. That would allow you to run an additional exhaust which should help. I was also offered the same suggestion after removing the 2nd cat and replacing with an exhaust as well. Only problem was that my Air Sus was going under there so that was not an option. Just a thought.
Sukoshiyoshi
Thanks everybody.

I also have my air suspension installed underneath,  so we'll see what other shops can do.  I have also applied sound deadener inside (raamat & closed cell foam) even before the muffler install.  I like to listen to music so I need this toned down.
View original BBCode
Thanks everybody.
I also have my air suspension installed underneath, so we'll see what other shops can do. I have also applied sound deadener inside (raamat & closed cell foam) even before the muffler install. I like to listen to music so I need this toned down.
Normandie, you've got the sickest van with a two-tone. BTW, whos 2nd gen is next to the van? Is that your other project =p
View original BBCode
Normandie, you've got the sickest van with a two-tone. BTW, whos 2nd gen is next to the van? Is that your other project =p
lets see some pics of the whole van at one time :)
View original BBCode
lets see some pics of the whole van at one time :)
mdenoga;236301 wrote:Normandie, you've got the sickest van with a two-tone. BTW, whos 2nd gen is next to the van? Is that your other project =p
Thanks Mike. My wife drives it, a 2001 GS430. Funny thing is I originally bought it in 2005 to modify vip style but ended up playing with the van.
shawnthemonster;236469 wrote:lets see some pics of the whole van at one time :)
I'll try to get more pics soon since the kit is finally installed.
View original BBCode
[QUOTE=mdenoga;236301]Normandie, you've got the sickest van with a two-tone. BTW, whos 2nd gen is next to the van? Is that your other project =p[/QUOTE]

Thanks Mike.  My wife drives it, a 2001 GS430.  Funny thing is I originally bought it in 2005 to modify vip style but ended up playing with the van.

[QUOTE=shawnthemonster;236469]lets see some pics of the whole van at one time :)[/QUOTE]
I'll try to get more pics soon since the kit is finally installed.
Latest DIY project: Front license plate mount
I wanted to do something like this.

Searched ebay for a front license plate mount. Got lucky and won a Bentley license plate holder for 2006-2008 Continental GT or Flying Spur. Factory painted Silver Pearl, part number 12283. No reserve. Free shipping. Total cost, $4.99.

Bell adjustable license plate mounting bracket from Autozone: $8.99.
http://www.bellautomotive.com/asp/product_details.asp?id=25345


I had to do some trimming with the brackets to get the desired tilt. The mounting bracket holes did not line up with the JP bumper holes which needed further modification.
Installed pic:

View original BBCode
Latest DIY project:  Front license plate mount

I wanted to do something like this.

[IMG]http://i2.photobucket.com/albums/y37/normandie/base_01.jpg[/IMG]

Searched ebay for a front license plate mount.  Got lucky and won a Bentley license plate holder for 2006-2008 Continental GT or Flying Spur.  Factory painted Silver Pearl,  part number 12283. No reserve. Free shipping.  Total cost, $4.99.

[img]http://i5.ebayimg.com/07/i/001/36/fd/2669_1.JPG[/img]

Bell adjustable license plate mounting bracket from Autozone:  $8.99.

[url]http://www.bellautomotive.com/asp/product_details.asp?id=25345[/url]
[img]http://www.bellautomotive.com/userdocs/uploads/7_46230.jpg[/img]

[IMG]http://i2.photobucket.com/albums/y37/normandie/IMG_2723.jpg[/IMG]

I had to do some trimming with the brackets to get the desired tilt.  The mounting bracket holes did not line up with the JP bumper holes which needed further modification.

Installed pic:

[IMG]http://i2.photobucket.com/albums/y37/normandie/IMG_0212.jpg[/IMG]
nice... love the fogs too.
View original BBCode
nice... love the fogs too.
man, i like the two-tone and the fogs (as what shawn said) and everything else hehe..

keep it up!! Im envious of your van!
View original BBCode
man, i like the two-tone and the fogs (as what shawn said) and everything else hehe..
keep it up!! Im envious of your van!
I love everything but the wheels... sorry... just my two cents... they look truckish
View original BBCode
I love everything but the wheels... sorry... just my two cents... they look truckish
Project is really coming together nicely!  That License Plate DIY modd came out looking sweet!  Question for you........are you planning on keeping the Egg two-toned?  Or are you planning to make her all white?  Think having her all white would look pretty sick (in a good way).  Also I agree with 20s burning and think that with different wheels she would look even sweeter.

But other than that.........your Egg looks exactly what I would like my Egg to look one day.  Will probally never happen.  LOL

Sukoshiyoshi
View original BBCode
Project is really coming together nicely! That License Plate DIY modd came out looking sweet! Question for you........are you planning on keeping the Egg two-toned? Or are you planning to make her all white? Think having her all white would look pretty sick (in a good way). Also I agree with 20s burning and think that with different wheels she would look even sweeter.
But other than that.........your Egg looks exactly what I would like my Egg to look one day. Will probally never happen. LOL
Sukoshiyoshi
sukoshiyoshi;237557 wrote:Project is really coming together nicely! That License Plate DIY modd came out looking sweet! Question for you........are you planning on keeping the Egg two-toned? Or are you planning to make her all white? Think having her all white would look pretty sick (in a good way). Also I agree with 20s burning and think that with different wheels she would look even sweeter.
But other than that.........your Egg looks exactly what I would like my Egg to look one day. Will probally never happen. LOL
Sukoshiyoshi
Two tone for now, until I save up for a complete color change.. Yeah new rims are also on the plan but will probably take a while.
View original BBCode
[QUOTE=sukoshiyoshi;237557]Project is really coming together nicely!  That License Plate DIY modd came out looking sweet!  Question for you........are you planning on keeping the Egg two-toned?  Or are you planning to make her all white?  Think having her all white would look pretty sick (in a good way).  Also I agree with 20s burning and think that with different wheels she would look even sweeter.

But other than that.........your Egg looks exactly what I would like my Egg to look one day.  Will probally never happen.  LOL

Sukoshiyoshi[/QUOTE]

Two tone for now, until I save up for a complete color change..  Yeah new rims are also on the plan but will probably take a while.
View original BBCode
More pics:

[IMG]http://i2.photobucket.com/albums/y37/normandie/IMG_0228.jpg[/IMG]

[IMG]http://i2.photobucket.com/albums/y37/normandie/IMG_0217.jpg[/IMG]

[IMG]http://i2.photobucket.com/albums/y37/normandie/IMG_0211.jpg[/IMG]

[IMG]http://i2.photobucket.com/albums/y37/normandie/IMG_0221.jpg[/IMG]
the wheels arent as bad when you see the whole van I have to admit
View original BBCode
the wheels arent as bad when you see the whole van I have to admit
I like the van two tone.
View original BBCode
I like the van two tone.
that project is hot to death.. two tone estima FTW
View original BBCode
that project is hot to death.. two tone estima FTW
hands down...sic...
View original BBCode
hands down...sic...
Thanks, Ron. Any plans in the future of building a previa too?
View original BBCode
Thanks, Ron. Any plans in the future of building a previa too?
hey what happened to your fender flares? who made them?
View original BBCode
hey what happened to your fender flares? who made them?
mdenoga;238093 wrote:I like the van two tone.
I agree, two-tone just screams classy lol
but i really like what you did with your front license plate mount.
Really digging the van. good job Normandie
View original BBCode
[QUOTE=mdenoga;238093]I like the van two tone.[/QUOTE]

I agree, two-tone just screams classy lol

but i really like what you did with your front license plate mount.

Really digging the van. good job Normandie
Added a 6.5" motorized Sony monitor:

manual paddle valves & gauge:

Garson front table for estima modified & converted for previa:

View original BBCode
Added a 6.5" motorized Sony monitor:

[IMG]http://i2.photobucket.com/albums/y37/normandie/JojosCar018.jpg[/IMG]

manual paddle valves & gauge:

[IMG]http://i2.photobucket.com/albums/y37/normandie/JojosCar015.jpg[/IMG]

Garson front table for estima modified & converted for previa:

[IMG]http://i2.photobucket.com/albums/y37/normandie/JojosCar022.jpg[/IMG]
looking clean man....
View original BBCode
looking clean man....
Your van looks Awesome! That table is deep.
View original BBCode
Your van looks Awesome! That table is deep.
That is really nice!
View original BBCode
That is really nice!
Very nice Normandie.
View original BBCode
Very nice Normandie.
Never noticed the Speakers in the Dash before........I have been wanting to do that for years.  Did you have to re-locate the Fuses?  The Table looks great as well.  You didn't want to go bigger with the Flip Down Monitor?

Regardless the Egg looks sweeter than ever.  Much Props to your ride and your DIY skills.

Sukoshiyoshi
View original BBCode
Never noticed the Speakers in the Dash before........I have been wanting to do that for years. Did you have to re-locate the Fuses? The Table looks great as well. You didn't want to go bigger with the Flip Down Monitor?
Regardless the Egg looks sweeter than ever. Much Props to your ride and your DIY skills.
Sukoshiyoshi
Thanks, everybody!

No need to re-locate the fuses as far as putting the dash speakers.  I had to take out the base for the obdII connector though.  The older previas only had dash speakers so it's just a matter of running speaker wires & dropping 4" speakers in.

Not sure if the rear a/c would be able to support a bigger monitor.  I had to make a new rear a/c control out of plexi and couldn't mount a bigger monitor because of the sunroof.
View original BBCode
Thanks, everybody!
No need to re-locate the fuses as far as putting the dash speakers. I had to take out the base for the obdII connector though. The older previas only had dash speakers so it's just a matter of running speaker wires & dropping 4" speakers in.
Not sure if the rear a/c would be able to support a bigger monitor. I had to make a new rear a/c control out of plexi and couldn't mount a bigger monitor because of the sunroof.
I had my Clarion 15 inch mounted right after the Rear AC Unit.  To give it more stability they slid a piece of wood in between the Liner and Roof and mounted it to that.

Sukoshiyoshi
View original BBCode
I had my Clarion 15 inch mounted right after the Rear AC Unit. To give it more stability they slid a piece of wood in between the Liner and Roof and mounted it to that.
Sukoshiyoshi
whered u get that table!?!?! that shit is dope!! damn socal previa meet time
View original BBCode
whered u get that table!?!?! that shit is dope!! damn socal previa meet time
esvipstyle;279904 wrote:whered u get that table!?!?! that shit is dope!! damn socal previa meet time
Got it used from yahoo auctions japan, took it all apart and flipped everything so it will work with the previa, then covered it in alligator skin vinyl.
Aren't you going to the autofashion meet?
View original BBCode
[QUOTE=esvipstyle;279904]whered u get that table!?!?! that shit is dope!! damn socal previa meet time[/QUOTE]

Got it used from yahoo auctions japan, took it all apart and flipped everything so it will work with the previa, then covered it in alligator skin vinyl.

Aren't you going to the autofashion meet?
sukoshiyoshi;279870 wrote:I had my Clarion 15 inch mounted right after the Rear AC Unit. To give it more stability they slid a piece of wood in between the Liner and Roof and mounted it to that.
Sukoshiyoshi
Pls. take a pic when you get the chance, I want to see how much room is needed to install a bigger monitor.
View original BBCode
[QUOTE=sukoshiyoshi;279870]I had my Clarion 15 inch mounted right after the Rear AC Unit.  To give it more stability they slid a piece of wood in between the Liner and Roof and mounted it to that.

Sukoshiyoshi[/QUOTE]

Pls. take a pic when you get the chance, I want to see how much room is needed to install a bigger monitor.
i am thinking abot it.. i have work. so well see whats up normandie!
View original BBCode
i am thinking abot it.. i have work. so well see whats up normandie!
Sounds good, I'll take a pic and send it to you.

Sukoshiyoshi
View original BBCode
Sounds good, I'll take a pic and send it to you.
Sukoshiyoshi
damn this van is so hot!
View original BBCode
damn this van is so hot!
What I'm working on right now. Q45 hid gatling projectors retrofitted to the estima headlights. High beams are valeo projectors with apollo shrouds.

Amber demon eyes:

View original BBCode
What I'm working on right now.  Q45 hid gatling projectors retrofitted to the estima headlights.  High beams are valeo projectors with apollo shrouds.

[IMG]http://i2.photobucket.com/albums/y37/normandie/011.jpg[/IMG]

Amber demon eyes:

[IMG]http://i2.photobucket.com/albums/y37/normandie/009.jpg[/IMG]
damn bro that looks clean.. me like :dance:
View original BBCode
damn bro that looks clean.. me like :dance:
Fuuuuudge, that's hard as shhhhhhhht
View original BBCode
Fuuuuudge, that's hard as shhhhhhhht
HELL YEAH, cool!
View original BBCode
HELL YEAH, cool!
looks great!
View original BBCode
looks great!
Haha "amber demon eyes" looks hot. Nice work!!!
- Are the inners amber or yellow?
View original BBCode
Haha "amber demon eyes" looks hot. Nice work!!!
- Are the inners amber or yellow?
Thanks. I modified the projector housing to run an extra 194 amber bulb which will turn on together with the parking lights.
View original BBCode
Thanks. I modified the projector housing to run an extra 194 amber bulb which will turn on together with the parking lights.
normandie;295553 wrote:Thanks. I modified the projector housing to run an extra 194 amber bulb which will turn on together with the parking lights.
Gotcha. Nice work (nice kitchen too)
View original BBCode
[QUOTE=normandie;295553]Thanks.   I modified the projector housing to run an extra 194  amber bulb which will turn on together with the parking lights.[/QUOTE]
Gotcha. Nice work (nice kitchen too)
Definitely coming together!
View original BBCode
Definitely coming together!
Sweet looking headlights!  My Wife just came back from Japan and brought me back some Wagonist and Style Wagon Mags.....headlights conversions and even using crystals in the housings seem to be the trend.  They even had a little DIY where instead of having to "bake" the lights in the oven, just to use a card board box, seal it up, cut a hole and use a dryer for 3 to 5 mins and pry open.

FYI I finally took pics of the overhead monitor (only took me a couple of months lol).  Now I need to go home and post them......maybe another 2 months to do that.  LOL

Sukoshiyoshi
View original BBCode
Sweet looking headlights! My Wife just came back from Japan and brought me back some Wagonist and Style Wagon Mags.....headlights conversions and even using crystals in the housings seem to be the trend. They even had a little DIY where instead of having to "bake" the lights in the oven, just to use a card board box, seal it up, cut a hole and use a dryer for 3 to 5 mins and pry open.
FYI I finally took pics of the overhead monitor (only took me a couple of months lol). Now I need to go home and post them......maybe another 2 months to do that. LOL
Sukoshiyoshi
love the lights!! gonna look sick when your done!! lol so far i only had the gutz to open up my fogs!! want to get a second pair of hdlts to fab up something like that!! good stuff!! also you dont need to bake it in the oven. i just used a heat gun but you gotta be really patient and carefull not to melt the plastic. it can be done pretty easy with the heat gun!!
View original BBCode
love the lights!! gonna look sick when your done!! lol so far i only had the gutz to open up my fogs!! want to get a second pair of hdlts to fab up something like that!! good stuff!! also you dont need to bake it in the oven. i just used a heat gun but you gotta be really patient and carefull not to melt the plastic. it can be done pretty easy with the heat gun!!
That retro looks really nice! Can't wait to see the finished pictures.
View original BBCode
That retro looks really nice! Can't wait to see the finished pictures.
Yeah, I signed up on hidplanet to learn. 225 degrees in the oven for about 10 minutes to soften the glue. Hardest part was hacking the jdm headlights since I didn't have extras if I screw up. Can't wait to get the ballasts mounted so I can start aiming them.
View original BBCode
Yeah, I signed up on hidplanet to learn. 225 degrees in the oven for about 10 minutes to soften the glue. Hardest part was hacking the jdm headlights since I didn't have extras if I screw up. Can't wait to get the ballasts mounted so I can start aiming them.
I double checked the Mag and the Dryer time is 5 - 10 mins and not the 3 - 5 Mins I posted earlier.

Sukoshiyoshi
View original BBCode
I double checked the Mag and the Dryer time is 5 - 10 mins and not the 3 - 5 Mins I posted earlier.
Sukoshiyoshi
sukoshiyoshi;295850 wrote:I double checked the Mag and the Dryer time is 5 - 10 mins and not the 3 - 5 Mins I posted earlier.
Sukoshiyoshi
I read about this before, I think they use the cardboard box method for bigger headlight assemblies that normally won't fit in a household oven.
View original BBCode
[QUOTE=sukoshiyoshi;295850]I double checked the Mag and the Dryer time is 5 - 10 mins and not the 3 - 5 Mins I posted earlier.

Sukoshiyoshi[/QUOTE]

I read about this before,  I think they use the cardboard box method  for bigger headlight assemblies that normally won't fit in a household oven.
Nice looking Retro Fit. Can't wait to see them installed! Van looks sick as well.
View original BBCode
Nice looking Retro Fit. Can't wait to see them installed! Van looks sick as well.
damm how did i miss this thread.
really sick build!!!:biggthumpup:

keep it up cant wait to see the headlights on the egg.
View original BBCode
damm how did i miss this thread.
really sick build!!!:biggthumpup:
keep it up cant wait to see the headlights on the egg.
Back of headlights sealed with aluminum tape. Also had to use home depot plumbing fittings to seal the back of the housing.

It took a lot of work to get this Q45 projectors to fit. Had to hack the top & bottom of the housing, and make a cover from plexiglass to accomodate the huge projectors.

Headlight lens polished with plasticx: Getting there, so far so good:

View original BBCode
Back of headlights sealed with aluminum tape.  Also had to use home depot plumbing fittings to seal the back of the housing.

[IMG]http://i2.photobucket.com/albums/y37/normandie/005.jpg[/IMG]


It took a lot of work to get this Q45 projectors to fit.  Had to hack the top & bottom of the housing, and make a cover from plexiglass to accomodate the huge projectors.
[IMG]http://i2.photobucket.com/albums/y37/normandie/003.jpg[/IMG]

Headlight lens polished with plasticx:  Getting there, so far so good:

[IMG]http://i2.photobucket.com/albums/y37/normandie/002.jpg[/IMG]
That looks sick. Its a lot of hard work, but it's really paid off for you bro, way to go
View original BBCode
That looks sick. Its a lot of hard work, but it's really paid off for you bro, way to go
now time to do one for me!!!!
View original BBCode
now time to do one for me!!!!
wow, they look great !! I love how you made the 5" projector to work inside the housing and made a room for them, I gave up and went with different way !!
View original BBCode
wow, they look great !! I love how you made the 5" projector to work inside the housing and made a room for them, I gave up and went with different way !!
Thanks everybody! Here's a few quick pics after finally getting it installed:


Parking lights on:

hid test:

I still need to do some fine tuning on aiming the headlights, which is a pain, since I have to take out the bumper & bumper trim just to get to them.
Overall, a very worthwhile project. Hid's are 100% better than the stock ones and I am very happy with the results.
View original BBCode
Thanks everybody!  Here's a few quick pics after finally getting it installed:

[IMG]http://i2.photobucket.com/albums/y37/normandie/011-1.jpg[/IMG]

[IMG]http://i2.photobucket.com/albums/y37/normandie/012.jpg[/IMG]

[IMG]http://i2.photobucket.com/albums/y37/normandie/013.jpg[/IMG]

Parking lights on:

[IMG]http://i2.photobucket.com/albums/y37/normandie/014.jpg[/IMG]

hid test:

[IMG]http://i2.photobucket.com/albums/y37/normandie/016.jpg[/IMG]

I still need to do some fine tuning on aiming the headlights, which is a pain, since I have to take out the bumper &  bumper trim just to get to them.

Overall, a very worthwhile project.  Hid's are 100% better than the stock ones and I am very happy with the results.
sickness!!!
View original BBCode
sickness!!!
Damn nomandie, nice work. Not only do they look good, but I'm sure the feeling of accomplishment and appreciation value (DiY) has you on cloud nine right now. Thanks for sharing.
View original BBCode
Damn nomandie, nice work. Not only do they look good, but I'm sure the feeling of accomplishment and appreciation value (DiY) has you on cloud nine right now. Thanks for sharing.
Those look sooooo money!

Keep up the good work Normandie
View original BBCode
Those look sooooo money!
Keep up the good work Normandie
Mad props
That's a big step ahead of the game
Those lights must be worth millions now =)
View original BBCode
Mad props
That's a big step ahead of the game
Those lights must be worth millions now =)
simply amazing!!! Plus you did it yourself!! Even more amazing!! If you want it done right you gotta do it yourself!!! Def inspires me to want to try it myself!!
View original BBCode
simply amazing!!! Plus you did it yourself!! Even more amazing!! If you want it done right you gotta do it yourself!!! Def inspires me to want to try it myself!!
damn, props for doing your own work, lights look fantastic
View original BBCode
damn, props for doing your own work, lights look fantastic
Straight pimpin!  The lights look sick!  Much props once again for not only doing if yourself but also willing to take the risk of cutting up the JDM headlights.  The results look nuts.

Sukoshiyoshi
View original BBCode
Straight pimpin! The lights look sick! Much props once again for not only doing if yourself but also willing to take the risk of cutting up the JDM headlights. The results look nuts.
Sukoshiyoshi
Nice results and great work! Very unique on that van! Very big thumbs up!:biggthumpup:
View original BBCode
Nice results and great work! Very unique on that van! Very big thumbs up!:biggthumpup:
Some where back on "page 7" a while back I said that I was going to post up pics of my Flip Down..........I am finally going to post it up. LOL

15 inch Clarion Flip Down with Split Screen Capability. You can also see my manini Clarion 7 inch Indash Touch Screen unit as well.
It is mounted to the head liner right behind of rear A/C unit. When installing they slid a piece of wood between the roof and the head liner to add some stability.
Don't mind the "rod" coming from the Steering Wheel......it's just my "CLUB" as a Theft Deterant, or if needs be to use it on a Thief. LOL
Sukoshiyoshi
View original BBCode
Some where back on "page 7" a while back I said that I was going to post up pics of my Flip Down..........I am finally going to post it up.  LOL

[IMG]http://i147.photobucket.com/albums/r285/sukoshiyoshi/Picture043.jpg[/IMG]

15 inch Clarion Flip Down with Split Screen Capability.  You can also see my manini Clarion 7 inch Indash Touch Screen unit as well.

It is mounted to the head liner right behind of rear A/C unit.  When installing they slid a piece of wood between the roof and the head liner to add some stability.

Don't mind the "rod" coming from the Steering Wheel......it's just my "CLUB" as a Theft Deterant, or if needs be to use it on a Thief.  LOL

Sukoshiyoshi
Yoshi, thanks for the pic. Looking at it, it's not going to work with my van because of the sunroof. That's why I had to mount my monitor right under the rear a/c. People still use the "club"?? haha.
View original BBCode
Yoshi, thanks for the pic. Looking at it, it's not going to work with my van because of the sunroof. That's why I had to mount my monitor right under the rear a/c. People still use the "club"?? haha.
Love the headlight mod.
View original BBCode
Love the headlight mod.
^^^^^Yup I be still using the CLUB.  I also got me a VIPER Alarm but for additional deterent I use the CLUB religiously.  A lot of thieves out there....got to protect as much as I can.

As for the mounting point, yeah if you got sunroof that would probally be a no go.  Wish I had that problem.......dual sunroof and captain chairs is what I wanted to get for ver 2.0......but stupid me with impluse shopping.

Sukoshiyoshi
View original BBCode
^^^^^Yup I be still using the CLUB. I also got me a VIPER Alarm but for additional deterent I use the CLUB religiously. A lot of thieves out there....got to protect as much as I can.
As for the mounting point, yeah if you got sunroof that would probally be a no go. Wish I had that problem.......dual sunroof and captain chairs is what I wanted to get for ver 2.0......but stupid me with impluse shopping.
Sukoshiyoshi
my favorite van so far.....
View original BBCode
my favorite van so far.....
Latest DIY: Previa extended sliding door hinge
Previa owners are limited to the width of rear wheels because of the sliding door clearance available. I am in the process of updating wheels so this problem needs to be addressed.
Pic of extended sliding door hinge from Japan: As this is for the jdm estima, this will not work with our previa’s, so everything has to be done in reverse. Tip: I printed the picture, and looked at it from the back. That will give you the reverse image that we are going to use.

Pic shows clearance on the stock previa:

I had to cut around the stock hinge to find out how much clearance is needed for the extended hinge:

Stock hinge cut up in 3 sections:

Parts from home depot after cutting to the parts that will be needed:
1 ¼ x ¼ thick flat bar
½ inch diameter metal tube

Mock up pics:


I brought the pieces to the local muffler shop to be welded.
Hinge installed: I had to cut additional metal from the sliding door to clear the hinge.


Clearance after installing the extended sliding door hinge:

View original BBCode
Latest DIY: Previa extended sliding door hinge

Previa owners are limited to the width of rear wheels because of the sliding door clearance available.  I am in the process of updating wheels so this problem needs to be addressed.

Pic of extended sliding door hinge from Japan:  As this is for the jdm estima, this will not work with our previa’s, so everything has to be done in reverse.  Tip: I printed the picture, and looked at it from the back.  That will give you the reverse image that we are going to use.

[IMG]http://i2.photobucket.com/albums/y37/normandie/longhinge2.jpg[/IMG]

Pic shows clearance on the stock previa:

[IMG]http://i2.photobucket.com/albums/y37/normandie/IMG_4915.jpg[/IMG]

I had to cut around the stock hinge to find out how much clearance is needed for the extended hinge:

[IMG]http://i2.photobucket.com/albums/y37/normandie/IMG_4913.jpg[/IMG]

Stock hinge cut up in 3 sections:

[IMG]http://i2.photobucket.com/albums/y37/normandie/IMG_4903.jpg[/IMG]

Parts from home depot after cutting to the parts that will be needed:

1 ¼ x  ¼  thick flat bar
½ inch diameter metal tube

[IMG]http://i2.photobucket.com/albums/y37/normandie/IMG_4905.jpg[/IMG]

Mock up pics:

[IMG]http://i2.photobucket.com/albums/y37/normandie/IMG_4908.jpg[/IMG]

[IMG]http://i2.photobucket.com/albums/y37/normandie/IMG_4909.jpg[/IMG]

[IMG]http://i2.photobucket.com/albums/y37/normandie/IMG_4911.jpg[/IMG]

[IMG]http://i2.photobucket.com/albums/y37/normandie/IMG_4912.jpg[/IMG]

I brought the pieces to the local muffler shop to be welded.


Hinge installed:  I had to cut additional metal from the sliding door to clear the hinge.

[IMG]http://i2.photobucket.com/albums/y37/normandie/IMG_4918.jpg[/IMG]

[IMG]http://i2.photobucket.com/albums/y37/normandie/IMG_4917.jpg[/IMG]

[IMG]http://i2.photobucket.com/albums/y37/normandie/IMG_4920.jpg[/IMG]

Clearance after installing the extended sliding door hinge:

[IMG]http://i2.photobucket.com/albums/y37/normandie/IMG_4919.jpg[/IMG]
good job man and you still have those fender flares too right? gonna look sick with new wheels
View original BBCode
good job man and you still have those fender flares too right? gonna look sick with new wheels
Thanks.  I'd rather not use the fender flares for a cleaner look but we'll see after doing the test fit with tires.

Special thanks to  shawnthemonster for providing the spare stock hinge.
View original BBCode
Thanks. I'd rather not use the fender flares for a cleaner look but we'll see after doing the test fit with tires.
Special thanks to shawnthemonster for providing the spare stock hinge.
Nice DIY project!  Is there anything that you can't do?  I was lucky enough to buy one that was already custom made for clearance for my wheels along with a custom Oil Pan Guard.  Oil Pan Guard no longer on due to riding too low and broke one of the "arms" on the Oil Pan Guard.  LOL  Did not know that you got some Fender Flares, Egg specific or universal?

What size and offsets are the new wheels going to be?  You didn't happen to be the other person who got the IRS are you?  I heard that there was more than one available.

Sukoshiyoshi
View original BBCode
Nice DIY project! Is there anything that you can't do? I was lucky enough to buy one that was already custom made for clearance for my wheels along with a custom Oil Pan Guard. Oil Pan Guard no longer on due to riding too low and broke one of the "arms" on the Oil Pan Guard. LOL Did not know that you got some Fender Flares, Egg specific or universal?
What size and offsets are the new wheels going to be? You didn't happen to be the other person who got the IRS are you? I heard that there was more than one available.
Sukoshiyoshi
I LOVE this van

you are so creative!
View original BBCode
I LOVE this van
you are so creative!
sukoshiyoshi;319126 wrote:Nice DIY project! Is there anything that you can't do? I was lucky enough to buy one that was already custom made for clearance for my wheels along with a custom Oil Pan Guard. Oil Pan Guard no longer on due to riding too low and broke one of the "arms" on the Oil Pan Guard. LOL Did not know that you got some Fender Flares, Egg specific or universal?
What size and offsets are the new wheels going to be? You didn't happen to be the other person who got the IRS are you? I heard that there was more than one available.
Sukoshiyoshi
Yoshi,
As far as I know, I'm the 3rd person to have the extended door hinge, besides you & Shawn. Hopefully the DIY will help other previa owners who wants to fit more aggressive wheels.
Fender flares are the old ones that I have. They are Egg specific but not as nice as the one you have. I am not ready for the IRS yet, we'll let Shawn do all the hard work first as far as fabrication to make it work, and then we'll jump in.
View original BBCode
[QUOTE=sukoshiyoshi;319126]Nice DIY project!  Is there anything that you can't do?  I was lucky enough to buy one that was already custom made for clearance for my wheels along with a custom Oil Pan Guard.  Oil Pan Guard no longer on due to riding too low and broke one of the "arms" on the Oil Pan Guard.  LOL  Did not know that you got some Fender Flares, Egg specific or universal?

What size and offsets are the new wheels going to be?  You didn't happen to be the other person who got the IRS are you?  I heard that there was more than one available.

Sukoshiyoshi[/QUOTE]

Yoshi,
As far as I know, I'm the 3rd person to have the extended door hinge, besides you & Shawn.  Hopefully the DIY will help other previa owners who wants to fit more aggressive wheels.

Fender flares are the old ones that I have.  They are Egg specific but not as nice as the one you have.  I am not ready for the IRS yet, we'll let Shawn do all the hard work first as far as fabrication to make it work, and then we'll jump in.
View original BBCode
[IMG]http://i2.photobucket.com/albums/y37/normandie/jojo004.jpg[/IMG]

[IMG]http://i2.photobucket.com/albums/y37/normandie/jojo001.jpg[/IMG]


step lip:

[IMG]http://i2.photobucket.com/albums/y37/normandie/jojo002.jpg[/IMG]
19X9.5 +35 and 19X11 + 35 and not planning to run fender flares, no IRS sounds like you got something up your sleeve.  I cheated and used my flares for my 19X9 +33 and 19X10 +34.  I am running 15 mm spacers on the front so actually it is 19X9 +18 on the fronts. But not running any spacers on the rear.  The fronts will easy you should have fun with the rears.....are you going to be shortening the rear end, widebody metal work......am I close?  With your skills not sure what you will pull out.  Taking the Egg yet again up another level.  Much props.

Sukoshiyoshi
View original BBCode
19X9.5 +35 and 19X11 + 35 and not planning to run fender flares, no IRS sounds like you got something up your sleeve. I cheated and used my flares for my 19X9 +33 and 19X10 +34. I am running 15 mm spacers on the front so actually it is 19X9 +18 on the fronts. But not running any spacers on the rear. The fronts will easy you should have fun with the rears.....are you going to be shortening the rear end, widebody metal work......am I close? With your skills not sure what you will pull out. Taking the Egg yet again up another level. Much props.
Sukoshiyoshi
A little off topic but have you ever thought of making a Custom Watts Linkage System for our Eggs?    All this rear end shifting and rubbing sucks!  If so please let me know......I would be interested in ordering one.

Sukoshiyoshi
View original BBCode
A little off topic but have you ever thought of making a Custom Watts Linkage System for our Eggs? All this rear end shifting and rubbing sucks! If so please let me know......I would be interested in ordering one.
Sukoshiyoshi
Yoshi,

You're giving me too much credit,  I'm a Controller, not a fabricator haha.  First off, I have no experience welding let alone fabricating a customs Watts system.  I just enjoy doing DIY stuff, even around the house.

The 19x11  +35 rear wheels were really not by choice, just couldn't pass up on the wheels when I found them at that time.  I did a quick test fit without the tires, and it didn't stick out as far as I thought.  The main concern is the inside part of the rim, which I'm sure will rub since I only had about 1/4 clearance.

I will try to hammer the inner fender in, or use spacers.  It's one of those instances were a much lower offset would be ideal.  I will probably have to use flares when done.
View original BBCode
Yoshi,
You're giving me too much credit, I'm a Controller, not a fabricator haha. First off, I have no experience welding let alone fabricating a customs Watts system. I just enjoy doing DIY stuff, even around the house.
The 19x11 +35 rear wheels were really not by choice, just couldn't pass up on the wheels when I found them at that time. I did a quick test fit without the tires, and it didn't stick out as far as I thought. The main concern is the inside part of the rim, which I'm sure will rub since I only had about 1/4 clearance.
I will try to hammer the inner fender in, or use spacers. It's one of those instances were a much lower offset would be ideal. I will probably have to use flares when done.
normandie;319343 wrote:Yoshi,
You're giving me too much credit, I'm a Controller, not a fabricator haha. First off, I have no experience welding let alone fabricating a customs Watts system. I just enjoy doing DIY stuff, even around the house.
The 19x11 +35 rear wheels were really not by choice, just couldn't pass up on the wheels when I found them at that time. I did a quick test fit without the tires, and it didn't stick out as far as I thought. The main concern is the inside part of the rim, which I'm sure will rub since I only had about 1/4 clearance.
I will try to hammer the inner fender in, or use spacers. It's one of those instances were a much lower offset would be ideal. I will probably have to use flares when done.
yeah the +35 offset should fit fine, i did that before, as long as the disk are low or super low its not gonna stick out as much. :shrug:
View original BBCode
[QUOTE=normandie;319343]Yoshi,

You're giving me too much credit, I'm a Controller, not a fabricator haha. First off, I have no experience welding let alone fabricating a customs Watts system. I just enjoy doing DIY stuff, even around the house.

The 19x11 +35 rear wheels were really not by choice, just couldn't pass up on the wheels when I found them at that time. I did a quick test fit without the tires, and it didn't stick out as far as I thought. The main concern is the inside part of the rim, which I'm sure will rub since I only had about 1/4 clearance.

I will try to hammer the inner fender in, or use spacers. It's one of those instances were a much lower offset would be ideal. I will probably have to use flares when done.[/QUOTE]


yeah the +35 offset should fit fine, i did that before, as long as the disk are low or super low its not gonna stick out as much. :shrug:
damn step lip. awesome. cant wait normandie.
View original BBCode
damn step lip. awesome. cant wait normandie.
Nice, next bash of pictures should be very interesting !!
View original BBCode
Nice, next bash of pictures should be very interesting !!
Wow Scaras! If you have trouble fitting those wheels I wouldn't mind trading you for my 19x9 19x10 +23 ones.
View original BBCode
Wow Scaras! If you have trouble fitting those wheels I wouldn't mind trading you for my 19x9 19x10 +23 ones.
whew best previa just got better!
View original BBCode
whew best previa just got better!
Thanks everybody!
Chrispy, please check your pm.
View original BBCode
Thanks everybody!
Chrispy, please check your pm.
that means you have to go two tone and make everything but the kit black.
View original BBCode
that means you have to go two tone and make everything but the kit black.
In the process of upgrading my air tank from a 3 to a 5 gallon. Bought a used firestone air tank from ebay and decided to spruce it up a little while waiting for the rest of the fittings to arrive:

I searched for an image of the "air bomber" logo on the internet and enlarged them on the copier:

Using krylon easy tack repositionable adhesive, hobby knife & a flexible ruler, I carefully cut out the outline of the design:


few light coats of silver paint:

Wait a few minutes to dry, then carefully lift the stencil. Finished product is not too bad, did it mostly in between commercial breaks while watching tv.

View original BBCode
In the process of upgrading my air tank from a 3 to a 5 gallon.  Bought a used firestone air tank from ebay and decided to spruce it up a little while waiting for the rest of the fittings to arrive:
[IMG]http://i2.photobucket.com/albums/y37/normandie/002-1.jpg[/IMG]

I searched for an image of the "air bomber" logo on the internet and enlarged them on the copier:
[IMG]http://i2.photobucket.com/albums/y37/normandie/001.jpg[/IMG]

Using  krylon easy tack repositionable adhesive, hobby knife & a flexible ruler, I carefully cut out the outline of the design:
[IMG]http://i2.photobucket.com/albums/y37/normandie/003-1.jpg[/IMG]

[IMG]http://i2.photobucket.com/albums/y37/normandie/004.jpg[/IMG]

few light coats of silver paint:
[IMG]http://i2.photobucket.com/albums/y37/normandie/005-1.jpg[/IMG]

Wait a few minutes to dry, then carefully lift the stencil.  Finished product is not too bad, did it mostly in between commercial breaks while watching tv.
[IMG]http://i2.photobucket.com/albums/y37/normandie/008.jpg[/IMG]
thats awesome. where are u mounting the tank? where the spare tire goes (meaning removing spare tire holder)?
View original BBCode
thats awesome. where are u mounting the tank? where the spare tire goes (meaning removing spare tire holder)?
Yes, tank is mounted underneath the van.
View original BBCode
Yes, tank is mounted underneath the van.
So 3 gal wasn't enough ??
View original BBCode
So 3 gal wasn't enough ??
No, I always seem to run out of air whenever I need to clear speed bumps and steep driveways. I'll try the 5 gallon tank with dual compressors. I'm even thinking of switching to 3/8 lines in front since 1/4 lines are so slow to raise the van.
View original BBCode
No, I always seem to run out of air whenever I need to clear speed bumps and steep driveways. I'll try the 5 gallon tank with dual compressors. I'm even thinking of switching to 3/8 lines in front since 1/4 lines are so slow to raise the van.
good job... got those new wheels on yet?
View original BBCode
good job... got those new wheels on yet?
normandie;323325 wrote:No, I always seem to run out of air whenever I need to clear speed bumps and steep driveways. I'll try the 5 gallon tank with dual compressors. I'm even thinking of switching to 3/8 lines in front since 1/4 lines are so slow to raise the van.
Good info there, have you install the tank how is the clearance with ground ??
View original BBCode
[QUOTE=normandie;323325]No, I always seem to run out of air whenever I need to clear speed bumps and steep driveways. I'll try the 5 gallon tank with dual compressors. I'm even thinking of switching to 3/8 lines in front since 1/4 lines are so slow to raise the van.[/QUOTE]

Good info there, have you install the tank how is the clearance with ground ??
I am also running my air system under my Egg (3 gallon tank) and there is quite a lot of room under there. With the removal of the spare tire even with a 5 gallon tank there should be ample clearance. Normandie will probally bottom out the rear bumper well before he even gets close to hitting the tank. Not that there is any clearance issues but there is always the Pancake style Tanks
http://www.kmwperformance.com/product/AL10995 its not a 5 gallon but should be more than enough.
Sukoshiyoshi
View original BBCode
I am also running my air system under my Egg (3 gallon tank) and there is quite a lot of room under there.  With the removal of the spare tire even with a 5 gallon tank there should be ample clearance.  Normandie will probally bottom out the rear bumper well before he even gets close to hitting the tank.  Not that there is any clearance issues but there is always the Pancake style Tanks [url]http://www.kmwperformance.com/product/AL10995[/url] its not a 5 gallon but should be more than enough.

Sukoshiyoshi
Looking good for something that won't be seen :O
View original BBCode
Looking good for something that won't be seen :O
View original BBCode
Finally fitted the scaras:

[IMG]http://i2.photobucket.com/albums/y37/normandie/004-1.jpg[/IMG]

[IMG]http://i2.photobucket.com/albums/y37/normandie/001-1.jpg[/IMG]

[IMG]http://i2.photobucket.com/albums/y37/normandie/003-2.jpg[/IMG]

[IMG]http://i2.photobucket.com/albums/y37/normandie/006.jpg[/IMG]
Looks damn nice!! See you at AF...
View original BBCode
Looks damn nice!! See you at AF...
damn thats clean man.. loving it....
View original BBCode
damn thats clean man.. loving it....
SO beautiful!!
View original BBCode
SO beautiful!!
looks like those wheels turned out great.
View original BBCode
looks like those wheels turned out great.
Vans and wags are definitely on the come up this year everywhere. Looks pimp
View original BBCode
Vans and wags are definitely on the come up this year everywhere. Looks pimp
Lovin all the Previas in this place.
View original BBCode
Lovin all the Previas in this place.
dammnnn nice normandie. where the front bumper? now all you need to complete this project are the jp fogs.
View original BBCode
dammnnn nice normandie. where the front bumper? now all you need to complete this project are the jp fogs.
Normandie, it's looking great! I'm glad it worked out for both of us. Hope those parts you ordered are the right ones. ;)
View original BBCode
Normandie, it's looking great! I'm glad it worked out for both of us. Hope those parts you ordered are the right ones. ;)
I love it !! :biggthumpup:
View original BBCode
I love it !! :biggthumpup:
Damn that's clean. I'm feeling the traditional Lexus two tone too.
View original BBCode
Damn that's clean. I'm feeling the traditional Lexus two tone too.
I saw you on the freeway a few days ago... tuesday I think it was, on the 101 freeway heading south in thousand oaks near the moorpark road exit... your ride is clean... I was in a 92 red civic hatch on black rims...
View original BBCode
I saw you on the freeway a few days ago... tuesday I think it was, on the 101 freeway heading south in thousand oaks near the moorpark road exit... your ride is clean... I was in a 92 red civic hatch on black rims...
genetic;347003 wrote:SO beautiful!!
AcUrALiTy;347154 wrote:Vans and wags are definitely on the come up this year everywhere. Looks pimp
Pagong;347171 wrote:Lovin all the Previas in this place.
jdmpalace;347261 wrote:I love it !! :biggthumpup:
NELSON09;347426 wrote:Damn that's clean. I'm feeling the traditional Lexus two tone too.
Thanks everybody! Just trying to keep up with my fellow van enthusiast!
View original BBCode
[QUOTE=genetic;347003]SO beautiful!![/QUOTE]

[QUOTE=AcUrALiTy;347154]Vans and wags are definitely on the come up this year everywhere. Looks pimp[/QUOTE]

[QUOTE=Pagong;347171]Lovin  all the Previas in this place.[/QUOTE]

[QUOTE=jdmpalace;347261]I love it !! :biggthumpup:[/QUOTE]

[QUOTE=NELSON09;347426]Damn that's clean. I'm feeling the traditional Lexus two tone too.[/QUOTE]

Thanks everybody!   Just trying to keep up with my fellow van enthusiast!
lowvanu2;346939 wrote:Looks damn nice!! See you at AF...
nokcy21;346998 wrote:damn thats clean man.. loving it....
James & Lydell, you guys bringing your vans to the AF meet?
View original BBCode
[QUOTE=lowvanu2;346939]Looks damn nice!! See you at AF...[/QUOTE]

[QUOTE=nokcy21;346998]damn thats clean man.. loving it....[/QUOTE]

James & Lydell, you guys bringing your vans to the AF meet?
shawnthemonster;347046 wrote:looks like those wheels turned out great.
chrispy;347251 wrote:Normandie, it's looking great! I'm glad it worked out for both of us. Hope those parts you ordered are the right ones. ;)
mdenoga;347237 wrote:dammnnn nice normandie. where the front bumper? now all you need to complete this project are the jp fogs.
Yes, love the scaras. Chris, thanks again for all your help.
Mike, front bumper is being worked on. Got to fix the cracks. JP fogs are so hard to find and none of our vendors has really given me much info about them.
Chrispy has found some fogs that might work and I am waiting for them to arrive from Japan.
In the meantime, I am working on a dual fog set up. Still need to make a fog light shroud from fiberglass but here's what it looks like so far:


View original BBCode
[QUOTE=shawnthemonster;347046]looks like those wheels turned out great.[/QUOTE]

[QUOTE=chrispy;347251]Normandie, it's looking great! I'm glad it worked out for both of us. Hope those parts you ordered are the right ones. ;)[/QUOTE]

[QUOTE=mdenoga;347237]dammnnn nice normandie. where the front bumper? now all you need to complete this project are the jp fogs.[/QUOTE]

Yes, love the scaras.  Chris, thanks again for all your help.

Mike, front bumper is being worked on.  Got to fix the cracks.  JP fogs are so hard to find and none of our vendors has really given me much info about them.

Chrispy has found some fogs that might work and I am waiting for them to arrive from Japan.

In the meantime, I am working on a dual fog set up.  Still need to make a fog light shroud from fiberglass but here's what it looks like so far:

[IMG]http://i2.photobucket.com/albums/y37/normandie/010.jpg[/IMG]

[IMG]http://i2.photobucket.com/albums/y37/normandie/007-2.jpg[/IMG]
Sushi Boy;347624 wrote:I saw you on the freeway a few days ago... tuesday I think it was, on the 101 freeway heading south in thousand oaks near the moorpark road exit... your ride is clean... I was in a 92 red civic hatch on black rims...
Thanks. I work in Camarillo so that's pretty much my route. Van is my daily driver.
View original BBCode
[QUOTE=Sushi Boy;347624]I saw you on the freeway a few days ago... tuesday I think it was, on the 101 freeway heading south in thousand oaks near the moorpark road exit... your ride is clean... I was in a 92 red civic hatch on black rims...[/QUOTE]

Thanks. I work in Camarillo so that's pretty much my route.  Van is my daily driver.
normandie;347704 wrote:Thanks everybody! Just trying to keep up with my fellow van enthusiast!
Keep up, were all just trying to catch up! ;)
View original BBCode
[QUOTE=normandie;347704]Thanks everybody!   Just trying to keep up with my fellow van enthusiast![/QUOTE]
Keep up, were all just trying to catch up! ;)
normandie;347705 wrote:James & Lydell, you guys bringing your vans to the AF meet?
maybe.. not sure yet..
View original BBCode
[QUOTE=normandie;347705]James & Lydell, you guys bringing your vans to the AF meet?[/QUOTE]


maybe.. not sure yet..
If it's finished I'm there...
View original BBCode
If it's finished I'm there...
nice! love the projectors and the Scaras are looking good
View original BBCode
nice! love the projectors and the Scaras are looking good
Putting off the dual fog light project for now. Finally was able to source the fog lights for the Junction Produce kit. Thanks to Chrispy for finding them. They are from a 2nd Gen (1997-2002) Toyota Caldina.


Also added a 90mm ccfl to the valeo projector high beams:

Still need to get an H3 hid kit for the fogs and thinking of clearing the corners.
View original BBCode
Putting off the dual fog light project for now.  Finally was able to source the fog lights for the Junction Produce kit.  Thanks to Chrispy for finding them.  They are from a 2nd Gen (1997-2002) Toyota Caldina.

[img]http://upload.wikimedia.org/wikipedia/commons/thumb/a/a9/1997_Toyota_Caldina_01.jpg/800px-1997_Toyota_Caldina_01.jpg[/img]

[IMG]http://i2.photobucket.com/albums/y37/normandie/028.jpg[/IMG]

Also added a 90mm ccfl to the valeo projector high beams:

[IMG]http://i2.photobucket.com/albums/y37/normandie/021.jpg[/IMG]

Still need to get an H3 hid kit for the fogs and thinking of clearing the corners.
Nice!
View original BBCode
Nice!
Normandie rides looking even better than the last time I saw it last year at AF with James. Hoping that both of you all can be there tommorow esp. James' ride that's if it's done
View original BBCode
Normandie rides looking even better than the last time I saw it last year at AF with James. Hoping that both of you all can be there tommorow esp. James' ride that's if it's done
pretty f'n sweet! finally fogs!
View original BBCode
pretty f'n sweet! finally fogs!
very nice looking! good job!! i love the new wheel setup too! good job!
View original BBCode
very nice looking! good job!! i love the new wheel setup too! good job!
normandie your van is king! never seen a previa as clean as yours inside and out. AND i love the scaras!

good job!
View original BBCode
normandie your van is king! never seen a previa as clean as yours inside and out. AND i love the scaras!
good job!
Wow! saw these today and they are perfect...
View original BBCode
Wow! saw these today and they are perfect...
Nice additions to the Egg.  Looking good!  Much props as always on your DIY Skills.

Sukoshiyoshi
View original BBCode
Nice additions to the Egg. Looking good! Much props as always on your DIY Skills.
Sukoshiyoshi
Thanks everybody! After what shawnthemonster & lowvanu2 has done with their builds, I still have a long way to go. Done with the exterior for now. Interior is next!
View original BBCode
Thanks everybody! After what shawnthemonster & lowvanu2 has done with their builds, I still have a long way to go. Done with the exterior for now. Interior is next!
A few things I've added:
Chrome door handle covers:


air bomber decal:

Also working on redoing my audio:
Speakers will be 3 way DLS. I'll be mounting the mids & tweets to the A pillars.


View original BBCode
A few things I've added:

Chrome door handle covers:
[IMG]http://i2.photobucket.com/albums/y37/normandie/015.jpg[/IMG]

[IMG]http://i2.photobucket.com/albums/y37/normandie/010-1.jpg[/IMG]

air bomber decal:
[IMG]http://i2.photobucket.com/albums/y37/normandie/011-2.jpg[/IMG]

Also working on redoing my audio:
Speakers will be 3 way DLS.  I'll be mounting the mids & tweets to the A pillars.

[IMG]http://i2.photobucket.com/albums/y37/normandie/007-3.jpg[/IMG]

[IMG]http://i2.photobucket.com/albums/y37/normandie/008-3.jpg[/IMG]

[IMG]http://i2.photobucket.com/albums/y37/normandie/009-3.jpg[/IMG]


[IMG]http://i2.photobucket.com/albums/y37/normandie/010-2.jpg[/IMG]
Nice. Cant wait to see it in person again. Let's have dinner when inmate it back in your area
View original BBCode
Nice. Cant wait to see it in person again. Let's have dinner when inmate it back in your area
looks great norm!!!
View original BBCode
looks great norm!!!
mdenoga;367013 wrote:Nice. Cant wait to see it in person again. Let's have dinner when inmate it back in your area
Mike, just let me know.
View original BBCode
[QUOTE=mdenoga;367013]Nice. Cant wait to see it in person again. Let's have dinner when inmate it back in your area[/QUOTE]

Mike, just let me know.
NICE!!
View original BBCode
NICE!!
nice..im so behind on your guys van...:sad:
View original BBCode
nice..im so behind on your guys van...:sad:
Since you are so handy with fiberglass may be I can drop off my car with you so you can finish my side, I can also bring Denogas' so you can do both at the same time =)=)=)
View original BBCode
Since you are so handy with fiberglass may be I can drop off my car with you so you can finish my side, I can also bring Denogas' so you can do both at the same time =)=)=)
Lets do it. Let's do a build meet.
View original BBCode
Lets do it. Let's do a build meet.
How about mine 
View original BBCode
How about mine 
nokcy21;367361 wrote:How about mine 
Of course, Lydell! Van enthusiasts got to take care of each other.
View original BBCode
[QUOTE=nokcy21;367361]How about mine [/QUOTE]

Of course, Lydell! Van enthusiasts got to take care of each other.
normandie;367370 wrote:Of course, Lydell! Van enthusiasts got to take care of each other.
hahahaha. thanks im trying to finished my kit too. just need time
View original BBCode
[QUOTE=normandie;367370]Of course, Lydell! Van enthusiasts got to take care of each other.[/QUOTE]

hahahaha.  thanks im trying to finished my kit too. just need time
i hope i will be there by then so i can come....
View original BBCode
i hope i will be there by then so i can come....
normandie;367370 wrote:Of course, Lydell! Van enthusiasts got to take care of each other.
then can you tell me where you got your chrome door handles? i've been looking for a looooooong loooooooooooong time and still can't find it. your van and you DIY skills are just awesome!!
View original BBCode
[QUOTE=normandie;367370]Of course, Lydell! Van enthusiasts got to take care of each other.[/QUOTE]


then can you tell me where you got your chrome door handles? i've been looking for a looooooong loooooooooooong time and still can't find it. your van and you DIY skills are just awesome!!
vippreviastyle;367738 wrote:then can you tell me where you got your chrome door handles? i've been looking for a looooooong loooooooooooong time and still can't find it. your van and you DIY skills are just awesome!!
http://cgi.ebay.com/TOYOTA-ESTIMA-LUCIDA-PREVIA-CHROME-DOOR-HANDLE-COVERS-/290490926120?pt=UK_CarsParts_Vehicles_CarParts_SM&hash=item43a29bc428View original BBCode
[QUOTE=vippreviastyle;367738]then can you tell me where you got your chrome door handles? i've been looking for a looooooong loooooooooooong time and still can't find it. your van and you DIY skills are just awesome!![/QUOTE]

[url]http://cgi.ebay.com/TOYOTA-ESTIMA-LUCIDA-PREVIA-CHROME-DOOR-HANDLE-COVERS-/290490926120?pt=UK_CarsParts_Vehicles_CarParts_SM&hash=item43a29bc428[/url]
Really coming along man!
View original BBCode
Really coming along man!
View original BBCode
[QUOTE=normandie;367824][URL]http://cgi.ebay.com/TOYOTA-ESTIMA-LUCIDA-PREVIA-CHROME-DOOR-HANDLE-COVERS-/290490926120?pt=UK_CarsParts_Vehicles_CarParts_SM&hash=item43a29bc428[/URL][/QUOTE]

you are the BEST NORM!!!!!
Best of the best Bro.

Thank you for share
View original BBCode
Best of the best Bro.
Thank you for share
really wanna see this thing blacked out from that line up dude, double/triple limo tint roof wing too dude. would be sick. i love this build, don't get me wrong, it's on point, that's the only thing that gets me...
View original BBCode
really wanna see this thing blacked out from that line up dude, double/triple limo tint roof wing too dude. would be sick. i love this build, don't get me wrong, it's on point, that's the only thing that gets me...
TRIPLE window tint??
View original BBCode
TRIPLE window tint??
View original BBCode
[url]http://www.night-import.com/2011/03/random-spotlight-junction-produce.html[/url]
Love it
View original BBCode
Love it
I still want a shoot with this van! =)
View original BBCode
I still want a shoot with this van! =)
Super-duper fresh Norm. Lovin it!
I did a slightly similar projector retrofit on my S14 back in the day...

By chance, is just a clear cover available for the Previa's headlight housings? I would rather just do a similar set up where I retrofit a projector or two and make the surround however I wanted instead of buying some JDM ones. Thanks in advance!
View original BBCode
Super-duper fresh Norm. Lovin it!

I did a slightly similar projector retrofit on my S14 back in the day...

[IMG]http://i154.photobucket.com/albums/s259/sargdesigns/brandonss14.jpg[/IMG]

By chance, is just a clear cover available for the Previa's headlight housings? I would rather just do a similar set up where I retrofit a projector or two and make the surround however I wanted instead of buying some JDM ones. Thanks in advance!
Previa headlight housing is fluted plastic.
View original BBCode
Previa headlight housing is fluted plastic.
normandie;379442 wrote:Previa headlight housing is fluted plastic.
Thanks for the heads up, which housings are you using?
View original BBCode
[QUOTE=normandie;379442]Previa headlight housing is fluted plastic.[/QUOTE]

Thanks for the heads up, which housings are you using?
I found some other cool ones, but all appear to have fluted lenses as well:
http://www.idsports.co.jp/html/lens/lens_wagon.htmlView original BBCode
I found some other cool ones, but all appear to have fluted lenses as well:

[url]http://www.idsports.co.jp/html/lens/lens_wagon.html[/url]
sargdesigns;379663 wrote:I found some other cool ones, but all appear to have fluted lenses as well:
http://www.idsports.co.jp/html/lens/lens_wagon.html
Those are the latter term Jdm ones.
View original BBCode
[QUOTE=sargdesigns;379663]I found some other cool ones, but all appear to have fluted lenses as well:

[url]http://www.idsports.co.jp/html/lens/lens_wagon.html[/url][/QUOTE]

Those are the latter term Jdm ones.
shawnthemonster;379687 wrote:Those are the latter term Jdm ones.
So they won't fit the 91-97? :pat:
View original BBCode
[QUOTE=shawnthemonster;379687]Those are the latter term Jdm ones.[/QUOTE]

So they won't fit the 91-97? :pat:
sargdesigns;379904 wrote:So they won't fit the 91-97? :pat:
They'll fit but you need the trim piece and the grill.
View original BBCode
[QUOTE=sargdesigns;379904]So they won't fit the 91-97? :pat:[/QUOTE]

They'll fit but you need the trim piece and the grill.
shawnthemonster;379922 wrote:They'll fit but you need the trim piece and the grill.
Ah, ok, thank you for the clarification. :biggthumpup:
View original BBCode
[QUOTE=shawnthemonster;379922]They'll fit but you need the trim piece and the grill.[/QUOTE]

Ah, ok, thank you for the clarification. :biggthumpup:
sargdesigns;380025 wrote:Ah, ok, thank you for the clarification. :biggthumpup:
hey.. i got an extra jdm trim piece if you need it.
View original BBCode
[QUOTE=sargdesigns;380025]Ah, ok, thank you for the clarification. :biggthumpup:[/QUOTE]

hey.. i got an extra jdm trim piece if you need it.
vippreviastyle;380346 wrote:hey.. i got an extra jdm trim piece if you need it.
Cool! I'll PM you.
View original BBCode
[QUOTE=vippreviastyle;380346]hey.. i got an extra jdm trim piece if you need it.[/QUOTE]

Cool! I'll PM you.
Picked this IRS up over the weekend. Thanks to Bee Loonz for the lead. It will be a major project for me.


View original BBCode
Picked this IRS up over the weekend. Thanks to Bee Loonz for the lead.  It will be a major project for me.

[IMG]http://i2.photobucket.com/albums/y37/normandie/001-2.jpg[/IMG]

[IMG]http://i2.photobucket.com/albums/y37/normandie/004-2.jpg[/IMG]
independent rear! woot norm!! we still gotta take a road trip to "whereverthehell" just to mob around in the vip egg! BP VIP doin thaangs
View original BBCode
independent rear! woot norm!! we still gotta take a road trip to "whereverthehell" just to mob around in the vip egg! BP VIP doin thaangs
so the lift did work ;)
View original BBCode
so the lift did work ;)
Awesome.
View original BBCode
Awesome.
Yeah, cheap harbor freight tranny jack is holding up so far.
View original BBCode
Yeah, cheap harbor freight tranny jack is holding up so far.
normandie;383118 wrote:Yeah, cheap harbor freight tranny jack is holding up so far.
nice!!! where you pick it up at
View original BBCode
[QUOTE=normandie;383118]Yeah, cheap harbor freight tranny jack is holding up so far.[/QUOTE]
nice!!! where you pick it up at
JPR Motorsports in El Monte CA. Tel. 626-575-8199 Ask for Jimmy. He has 5 more Estima IRS sitting in a pallet but he said it's going to a customer in Seattle who will use them for wheelchair accessible vans. Maybe he can bring in some more.
View original BBCode
JPR Motorsports in El Monte CA. Tel. 626-575-8199 Ask for Jimmy. He has 5 more Estima IRS sitting in a pallet but he said it's going to a customer in Seattle who will use them for wheelchair accessible vans. Maybe he can bring in some more.
Nice Nice !!
View original BBCode
Nice Nice !!
damn previa boys doing work!
View original BBCode
damn previa boys doing work!
normandie;383150 wrote:JPR Motorsports in El Monte CA. Tel. 626-575-8199 Ask for Jimmy. He has 5 more Estima IRS sitting in a pallet but he said it's going to a customer in Seattle who will use them for wheelchair accessible vans. Maybe he can bring in some more.
thanks..
View original BBCode
[QUOTE=normandie;383150]JPR Motorsports in El Monte CA. Tel. 626-575-8199 Ask for Jimmy. He has 5 more Estima IRS sitting in a pallet but he said it's going to a customer in Seattle who will use them for wheelchair accessible vans. Maybe he can bring in some more.[/QUOTE]
 thanks..
Nice, I remember seeing a Craigslist post from that guy, glad someone was able to grab one. Document the install if you can? Hope all goes smoothly!
View original BBCode
Nice, I remember seeing a Craigslist post from that guy, glad someone was able to grab one. Document the install if you can? Hope all goes smoothly!
lol for wheelchair vans.
View original BBCode
lol for wheelchair vans.
View original BBCode
man look at the progress.....
from this:
[IMG]http://i2.photobucket.com/albums/y37/normandie/IMG_1185.jpg[/IMG]

[IMG]http://i2.photobucket.com/albums/y37/normandie/IMG_1182.jpg[/IMG]


[IMG]http://i2.photobucket.com/albums/y37/normandie/IMG_1188.jpg[/IMG]
to this:
[IMG]http://farm5.static.flickr.com/4108/5186755715_7cd363c00f_b.jpg[/IMG]
[IMG]http://farm2.static.flickr.com/1010/5187358070_b6d183b7be_b.jpg[/IMG]
[IMG]http://farm2.static.flickr.com/1214/5186758577_5a8b32516c_b.jpg[/IMG]
1,000,000 times better
View original BBCode
1,000,000 times better
Oh Snap! IRS! Normandie doing it big too...
View original BBCode
Oh Snap! IRS! Normandie doing it big too...
Love it !!
View original BBCode
Love it !!
lowvanu2;383583 wrote:Oh Snap! IRS! Normandie doing it big too...
:D yup... im just glad im not the only one anymore...
View original BBCode
[QUOTE=lowvanu2;383583]Oh Snap! IRS! Normandie doing it big too...[/QUOTE]

:D yup... im just glad im not the only one anymore...
View original BBCode
Cleaned & prepped the IRS for a fresh coat of paint.  Painted the calipers, installed new brembo rotors & pbr/axxis brake pads.  Also replaced the differential breather plug.

[IMG]http://i2.photobucket.com/albums/y37/normandie/029-1.jpg[/IMG]

[IMG]http://i2.photobucket.com/albums/y37/normandie/031.jpg[/IMG]

[IMG]http://i2.photobucket.com/albums/y37/normandie/028-1.jpg[/IMG]
wow! nice......
View original BBCode
wow! nice......
Normandie, did you replace the shocks or just paint them =p?
View original BBCode
Normandie, did you replace the shocks or just paint them =p?
No, just painted them. Didn't realize I had so many rattle can paints in the garage that I had accumulated over the years.
View original BBCode
No, just painted them. Didn't realize I had so many rattle can paints in the garage that I had accumulated over the years.
you guys didnt realize that norm is such a baller he actually ordered a brand new irs ($$$) because the used one he got was too dirty ;)
View original BBCode
you guys didnt realize that norm is such a baller he actually ordered a brand new irs ($$$) because the used one he got was too dirty ;)
So clean .....and I'm still trying to get my sides done haha
View original BBCode
So clean .....and I'm still trying to get my sides done haha
after reading through this build it just absolutely amazes me!
so much change in really not that much time.....the kicker is that all of it is
DIY with blood and sweat.   Norm mad mad props to you!

I know you don't care much but I really hope all this hard work can
result in some recognition (maybe awards) at all these shows we are doing this summer.....peeps just don't know.

BP VIP all day ay day!
View original BBCode
after reading through this build it just absolutely amazes me!
so much change in really not that much time.....the kicker is that all of it is
DIY with blood and sweat. Norm mad mad props to you!
I know you don't care much but I really hope all this hard work can
result in some recognition (maybe awards) at all these shows we are doing this summer.....peeps just don't know.
BP VIP all day ay day!
Independent rear suspension has been installed, just haven’t had the time to post. I did the swap in my garage with help from my friends from BPVIP. Special thanks to shawnthemonster & stevie408 for all the support/help with pics from their own install. I don’t know how to weld, so all parts were bolted first then after the install, I took the van to a local shop for the brackets to be welded.
Hardest part for the install for me was cutting the materials off the chassis. Wish I had a lift and know how to use a plasma cutter.
Here’s a few pointers for somebody who wants to do the IRS swap:
- Once you commit to this swap, there’s no turning back! You will need to cut into the chassis, cut the lower control arm mount and fabricate brackets to mount the IRS. Which means you will no longer be able to put back the stock previa suspension.
- Driveshaft will need to be shortened by 1 inch.
- Rear brake lines will need to be extended.
- IRS needs to be notched in order to fit the previa chassis. You can see the cut visible by the shock tower. (shawnthemonster’s pic)

Driver’s side showing how much material needs to be cut from the chassis.

Passenger’s side:

Lower control arm mount cut, and flat bar welded. IRS lower control arm bolts to the bracket. (stevie408’s pic)

IRS center mount:

Here are a couple of pics showing the camber:


View original BBCode
Independent rear suspension has been installed, just haven’t had the time to post.  I did the swap in my garage with help from my friends from BPVIP.  Special thanks to shawnthemonster & stevie408 for all the support/help with pics from their own install.  I don’t know how to weld, so all parts were bolted first then after the install, I took the van to a local shop for the brackets to be welded.

Hardest part for the install for me was cutting the materials off the chassis.  Wish I had a lift and know how to use a plasma cutter.

Here’s a few pointers for somebody who wants to do the IRS swap:

 - Once you commit to this swap, there’s no turning back!  You will need to cut into the chassis, cut the lower control arm mount and fabricate brackets to mount the IRS.  Which means you will no longer be able to put back the stock previa suspension.

 -  Driveshaft will need to be shortened by 1 inch.

 -  Rear brake lines will need to be extended.

 -  IRS needs to be notched in order to fit the previa chassis.  You can see the cut visible by the shock tower. (shawnthemonster’s pic)

[IMG]http://i2.photobucket.com/albums/y37/normandie/irsnotchcut.jpg[/IMG]

Driver’s side showing how much material needs to be cut from the chassis.

[IMG]http://i2.photobucket.com/albums/y37/normandie/irsdriversidechassis.jpg[/IMG]

Passenger’s side:

[IMG]http://i2.photobucket.com/albums/y37/normandie/irspassengersidechassis.jpg[/IMG]

Lower control arm mount cut, and flat bar welded.  IRS lower control arm bolts to the bracket. (stevie408’s pic)

[IMG]http://i2.photobucket.com/albums/y37/normandie/irsswapstevie1.jpg[/IMG]

IRS center mount:

[IMG]http://i2.photobucket.com/albums/y37/normandie/irscentermount.jpg[/IMG]


Here are a couple of pics showing the camber:

[IMG]http://i2.photobucket.com/albums/y37/normandie/krispykremepic2.jpg[/IMG]

[IMG]http://i2.photobucket.com/albums/y37/normandie/krispykremepic1.jpg[/IMG]
gang*
View original BBCode
gang*
View original BBCode
Switched the Anceltion Esvein muffler to a Junction Produce Type III muffler.

[IMG]http://i2.photobucket.com/albums/y37/normandie/IMG_0351.jpg[/IMG]

[IMG]http://i2.photobucket.com/albums/y37/normandie/IMG_0357.jpg[/IMG]

[IMG]http://i2.photobucket.com/albums/y37/normandie/IMG_0356.jpg[/IMG]

[IMG]http://i2.photobucket.com/albums/y37/normandie/IMG_0123.jpg[/IMG]
Nice exhaust
View original BBCode
Nice exhaust
nice work!
View original BBCode
nice work!
nice..... can you take a pic.. of your whole wan full slam..
View original BBCode
nice..... can you take a pic.. of your whole wan full slam..
stevie408;417741 wrote:nice..... can you take a pic.. of your whole wan full slam..
you too buddy ;)
View original BBCode
[QUOTE=stevie408;417741]nice..... can  you take a pic.. of your whole wan full slam..[/QUOTE]

you too buddy ;)
ill b the last one on the board
View original BBCode
ill b the last one on the board
I'm loving the new look. :biggthumpup:
View original BBCode
I'm loving the new look. :biggthumpup:
View original BBCode
needed some other pics on this thread...
[IMG]http://farm8.staticflickr.com/7034/6747577965_e842455998_o.jpg[/IMG]
[IMG]http://farm8.staticflickr.com/7169/6747582885_4434878df2_o.jpg[/IMG]
[IMG]http://farm8.staticflickr.com/7171/6747584345_f8e8b6eed5_o.jpg[/IMG]
SO So Sick!!!
View original BBCode
SO So Sick!!!
View original BBCode
Tried my hand in fiberglassing speaker pods to the A pillar.  Tweeter was mounted using a piece of ABS pipe & mid mounted using mdf & spare styrene.

[IMG]http://i2.photobucket.com/albums/y37/normandie/008-3.jpg[/IMG]

Wrapped, resined & filled with bondo milkshake.

[IMG]http://i2.photobucket.com/albums/y37/normandie/010-2.jpg[/IMG]

After extensive sanding & a coat of gray primer.

[IMG]http://i2.photobucket.com/albums/y37/normandie/022.jpg[/IMG]

A Pillar was then flocked.  I used a flocking kit from [url]www.donjer.com[/url]

[IMG]http://i2.photobucket.com/albums/y37/normandie/023.jpg[/IMG]

[IMG]http://i2.photobucket.com/albums/y37/normandie/024.jpg[/IMG]

[IMG]http://i2.photobucket.com/albums/y37/normandie/IMG_0119.jpg[/IMG]

A set of DLS UP36i speakers was then installed:

[IMG]http://i2.photobucket.com/albums/y37/normandie/IMG_0220-1.jpg[/IMG]

[IMG]http://i2.photobucket.com/albums/y37/normandie/IMG_0221-1.jpg[/IMG]
Nice job bro:biggthumpup:
View original BBCode
Nice job bro:biggthumpup:
this man has skills.... ;)
View original BBCode
this man has skills.... ;)
nice..:drool: make me one...
View original BBCode
nice..:drool: make me one...
Those pillars turned out dope..
View original BBCode
Those pillars turned out dope..
Thanks everybody.
I have been slowly upgrading the rest of the sound system as time and budget permits.
Zapco Ref 1000.4 - midbass/center
Zapco 500M - subwoofer
Zapco 360 - midrange/tweeter/rear
JBL MS-8
Equipment is mounted on the driver’s side side panel. I wanted to keep the floor clear and this was the best place I found to mount them. The wiring work leaves a lot to be desired as far as neatness but it will do for now. I might add a fan to cool the amps but have not done so.

View original BBCode
Thanks everybody.

I have been slowly upgrading the rest of the sound system as time and budget permits.

Zapco Ref 1000.4  - midbass/center
Zapco 500M  - subwoofer
Zapco 360  - midrange/tweeter/rear
JBL MS-8

Equipment is mounted on the driver’s side side panel.  I wanted to keep the floor clear and this was the best place I found to mount them.  The wiring work leaves a lot to be desired as far as neatness but it will do for now.  I might add a fan to cool the amps but have not done so.

[IMG]http://i2.photobucket.com/albums/y37/normandie/AUDIO2.jpg[/IMG]
damn thats nice man....where pics of the #$#%#$. oh thats a secret.... lol
View original BBCode
damn thats nice man....where pics of the #$#%#$. oh thats a secret.... lol
Hardwood floor project:
I started by making a cardboard template of the floor. Brackets for the rear seats were raised by using steel spacers and longer bolts. I added 50 sq ft of mass loaded vinyl for sound deadening and kept the stock carpet in place.
Plywood was laid on top of the carpet as the base floor for the hardwood.

Purpleheart hardwood was then installed.


View original BBCode
Hardwood floor project:

I started by making a cardboard template of the floor.  Brackets for the rear seats were raised by using steel spacers and longer bolts.  I added 50 sq ft of mass loaded vinyl for sound deadening and kept the stock carpet in place.

Plywood was laid on top of the carpet as the base floor for the hardwood.

[IMG]http://i2.photobucket.com/albums/y37/normandie/basewoodfloor.jpg[/IMG]

Purpleheart hardwood was then installed.

[IMG]http://i2.photobucket.com/albums/y37/normandie/woodfloor.jpg[/IMG]

[IMG]http://i2.photobucket.com/albums/y37/normandie/XW6A5428.jpg[/IMG]
HANEP!!! :biggthumpup::biggthumpup::biggthumpup:
View original BBCode
HANEP!!! :biggthumpup::biggthumpup::biggthumpup:
MAN LOOKS AWESOME! Had that in mind for mine but not gotten around to it. Again looks awesome
View original BBCode
MAN LOOKS AWESOME! Had that in mind for mine but not gotten around to it. Again looks awesome
WOW ......GANDA !!!!!
View original BBCode
WOW ......GANDA !!!!!
Oh damn! Thats a limited edition junction produce dog!
---
I am here:
http://tapatalk.com/map.php?uhxgniView original BBCode
Oh damn! Thats a limited edition junction produce dog!


---
I am here: [url]http://tapatalk.com/map.php?uhxgni[/url]
Dranom;449267 wrote:HANEP!!! :biggthumpup::biggthumpup::biggthumpup:
nokcy21;449336 wrote:WOW ......GANDA !!!!!
Salamat mga pare!
View original BBCode
[QUOTE=Dranom;449267]HANEP!!! :biggthumpup::biggthumpup::biggthumpup:[/QUOTE]

[QUOTE=nokcy21;449336]WOW ......GANDA !!!!![/QUOTE]

Salamat mga pare!
Ericcash;449288 wrote:MAN LOOKS AWESOME! Had that in mind for mine but not gotten around to it. Again looks awesome
Thanks!
shawnthemonster;449339 wrote:Oh damn! Thats a limited edition junction produce dog!
---
I am here: http://tapatalk.com/map.php?uhxgni
Haha! maybe I'll get her a junction produce shirt.
View original BBCode
[QUOTE=Ericcash;449288]MAN LOOKS AWESOME!     Had that in mind for mine but not gotten around to it. Again looks awesome[/QUOTE]

Thanks!

[QUOTE=shawnthemonster;449339]Oh damn! Thats a limited edition junction produce dog!


---
I am here: [url]http://tapatalk.com/map.php?uhxgni[/url][/QUOTE]

Haha! maybe I'll get her a junction produce shirt.